Replacing a toilet fill valve is not a hard job. You need to drain the tank and then remove the old fill valve or ball cock. Once that is done it only takes ten or fifteen minutes to install the new fill valve.
For related articles on toilets and toilet tanks, see the articles 'How To Fix a Toilet' and 'Troubleshooting Toilet Tank Problems' for information and a listing of all the toilet repair topics.
Purchasing a Toilet Fill Valve
The only spot that needs to match the toilet is the threaded pipe that goes through the hole in the bottom of the tank. With that said, toilet fill valves are pretty universal. Most of the newer ones have a vertical post that also acts as the water supply. The floatation device is round and goes up and down along the post.
What if you have a ball cock. One of the ones with the big float ball attached to a horizonatal arm. Can you use a newer style flush valve? Yes you can, just completely remove the ball cock assembly and the new fluidmaster fill valve will fit in nicely.
A new fill valve will run between $10 and $20. They are available at hardware stores, home supply houses and numerous places online.
Draining the Toilet Tank
Draining the toilet tank is a must to replace a toilet fill valve. Depending on the age of your toilet, there could be as much as five gallons of water in the tank. The toilet fill valve is attached via a hole in the bottom of the tank.
Even after the tank has been flushed and the water is off, there is still a lot of water in the bottom of the tank.
To completely drain the tank you are going to have to loosen the nut on the toilet fill valve. You will need to have a pail underneath of the fitting, since the water will drain out onto the floor. See the article on 'How To Drain a Toilet' for complete instructions.
Removing the Old Fill Valve
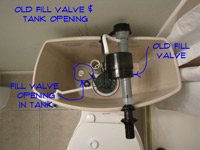 Before removing the toilet fill valve, make sure the tank is empty. You should have already taken the nut off the water supply and loosened the retaining nut that holds the fill valve in place.
Finish taking the nut off and then unhook the tube that connects the fill valve to the flush valve. Remove the fill valve and set it aside for the moment.
You should already have the new one available and now it is time to put it in. The vertical fluid master type as shown in the picture are the preferred style. You can replace ball cock type fill valve with this style.
Although, it may not be much fun, you should check the instructions for the new fill valve. Make sure you understand the order the parts should go in, especially the seals. Nothing worse than getting something back together only to find out that it leaks. There is usually a diagram that will help you.
Installing the New Toilet Fill Valve
 Installing a toilet fill valve is straight forward after the old valve is removed. Make sure the hole where the old one came out is clean and free of residue.
If you are using a fluidmaster type fill valve the length is adjustable. Compare the new valve to the old one and see if an adjustment is needed. Put the washer onto the threaded nipple with the rounded side turned down.
When the fill valve is set the proper length and the washer is in place, you can put it back in the hole where the old one was. Double check the instructions for the new valve for any specific steps that need to be taken.
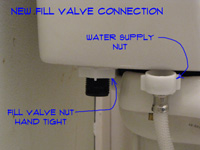
Start the nut onto the treads and snug it up finger tight. Adjust the orientation of the float inside the tank so that it does not interfere with the tank lever. Tighten up the nut until the fill valve is secure. Attach the tube from the flush valve at the outlet on the fill valve.
Put the nut for the supply line onto the threaded nipple and hand tighten. Use the adjustable pliers to tighten it snugly Do not over tighten, the parts are plastic. Turn the water on and check for leaks. Adjust the float so that the water shuts off at the correct height. No leaks, toilet flushes, great. You have successfully completed another home repair.