Search
Repair Topics
How To Wire a Three Way Switch
 Wiring a three way switch will be necessary when you deal with this type of switch in your home. Simply put, a three way switch consists of one light that is controlled by two separate switches. When you toggle either switch up or down, you turn the light on and off. A great feature for rooms that have more than one entrance to them. They are very common in modern homes. The problem is from a wiring stand point they have some unique requirements.
Not sure if this is your problem? See the articles 'Troubleshooting Electrical Wiring' and 'Residential Electrical Repair' for a listing of related articles.
The simplest schematic possible has the power for the light coming in one of the switch boxes. Two hot wires going between the two switch boxes. From the second box a hot wire would go up to the light. Your house may or may not have been wired using that configuration.
Any other combination will result in a white wire (usually the neutral to be used as a hot traveler). We are not discussing installing rough in wiring in this article. Instead we are dealing with the switches themselves and the correct hook up for them. Still for the sake of understanding we are including a couple of paragraphs on the correct wiring. See Step One for wiring a three way switch rough in requirements.
Wiring a Three Way Switch - Information
What Can You Save?
Prices will vary but it will probably cost between $40 and $150 to have someone come out and replace a light switch for you. A three way switch costs around five dollars (more for dimmers) and take ten to fifteen minutes to change. Your savings could be between $35 and $145, not bad for fifteen minutes of work wiring a three way switch. Installing a three way where you did not have one previously is another matter entirely. You could be looking at hundreds of dollars.
How Hard Could It Be?
Wiring a three way switch is not that difficult.
Check the Simple Things!
Check the bulbs first. Yes it is possible to get a brand new bulb out of the package and it be bad. Try a second one of the first one still does not work. Loose wires on the switch would be the next simple thing.
What Can Go Wrong?
Electrical shocks can cause severe injury and even death. Be careful, make sure the power is off. Always double check, turn the breaker off and then use a tester to make sure nothing is hot. It is possible for more than one circuit to be fed through a single box. Faulty or incorrect wiring can cause dead shorts and fires. Make sure you understand how to hook something up before you attempt it. A three way switch that is wired incorrectly may do weird things. The light may work with certain combinations of the switches, but not with others.
Understanding Three Way Switches
For a typical homeowner, understanding the intricacies of a 3 way switch can be a little challenging. Unless you are an electrician, in which case you are probably not reading this article. The whole purpose of a three way or four way switch, is the ability to control a single light or bank of lights from more than one location. Where things get interesting is when you have to coordinate electrical power between the switches and the lights.
For the rest of us, a three way switch has 'three' terminals. The 'single' terminal on one side of the switch is either the power or it provides the power to the light, no other choices. The other side of the switch has two terminals, these are often called the travelers. All this means is that they travel between the two switches. Both of these 'travelers' have power in them and when the switches are flipped, the light turns on, amazing?.
When you are replacing a 3 way switch the best thing to do is change the wires over to the new switch in the same position as the old switch. You will be sorry if you go online and start looking at wiring schematics for three way and four way switches. They can be confusing for more than one reason. The primary reason is that there are multiple ways that a 3 way switch can be wired. You may or may not find the schematic that matches what you have. To make matters worse, without spending a lot of time testing wires, you don't know how your three way switch is wired.
How a Three Way Switch Works
 How a three way switch works? Now that is a great question. Simply put, two switches control a single light. So, each switch always have to have power available to it. That is the tricky wiring feature.
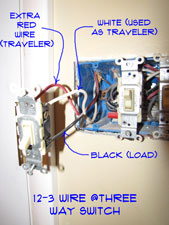
The answer to how a three way switch works, is to have an extra hot wire that runs between the two switch boxes. Most residential wiring is done with 12-2 w/ground or 14-2 w/ground sheathed cable. This type of cable consists of a Black, White and Bare Copper wire.
The cable that runs between the two switches needs to be either 12-3 w/ground or 14-3 w/ground. This gives you a Black, Red, White and Bare Copper wire. The extra red wire allows for the ability of power always being available to the light, no matter which way the switches are.
From a wiring standpoint, you want to bring the heat (power) into one of the switch boxes. Between the two switch boxes you run the wire with the extra hot wire. From the second switch box, you run a standard cable to provide power to the light.
Sounds simple right? It is as long as you follow the schematic that is provided with the switch. There are several possible wiring variations, for some information on some of the possibilities see this site, 3 Way Switch Variations. It provides diagrams for the various options.
WARNING!! Make Sure the Power is OFF!!! BEFORE You Work on Electrical Devices!!!
Replacing a Three Way Switch
 Replacing 3 way light switch, or if you want to use proper grammar 'replacing a three way switch' begins with obtaining a new switch. With an existing three way switch in place the change over is not too difficult. You will want to leave the existing switch in place until you have the new one ready to install. Remember, do not work on any electrical device until you have turned oof the power.
Purchasing a 3 Way Switch
Finding three way switches to purchase is not hard at all. Home supply, big box home stores, hardware stores and electrical supply stores will all have them. What may be challenging is finding the particular color and style that you want. Use your phone and take a picture of the existing switch or the new style you are trying to match before you go to the store.
A new three way switch should cost less than ten dollars unless you have something special in a decorator style. The wiring functionality of the switch should be the same, no matter what switch you choose.
Understanding Three Way Switches
Understanding three way switches can be difficult for a novice. Even those experienced with electrical wiring struggle with them at times. The confusion starts with the term 'three way' or '3 way'. Actually, it is two switches controlling one light. So where does the 'three' come from? Well, it is the number of poles on the switch itself.
Replacing 3 Way Light Switch
Before you begin replacing a 3 way light switch, the first thing you will want to do is turn off the power to the switch. Put a piece of tape over the breaker so that no one inadvertently turns it back on.
This happens when the your wife is ironing and she thinks the breaker tripped. In fact let everyone in the house know that you will be working on the electric. Check with the tester to make sure that it is dead. Remove the cover plate and then unscrew the switch from the box. Three way light switches have three lugs that need connections.
Pay particular attention to which wire is hooked to the black lug, or the single terminal on the switch. Make sure the you hook the same wire to the black lug on the new switch. If the lug is not black it should be the one by itself on one end of the switch. The other end will have the two alternating hot legs on them. It does not matter how you attach the wires to the two terminals.
Three Way Light Switch Replacement Suggestions
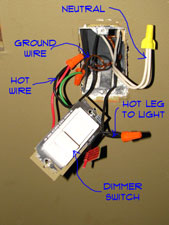
 Tagging 3 Way Switch Wires
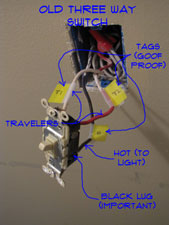
You may have any combination of Black, Red and possibly White wires attached to the switch. It might be a good idea to tag the wires with tape before you take them off. Mark the wire on the black lug 'B' and the other two 'T1' and 'T2'. The 'T' is for traveler.
At any given time this is the situation you will have with the two three way switches. One of the wires hooked to the black lug will be hot all the time. The wire attached to the black lug on the other switch will be hot when the light is on. One of the two traveler wires will always be hot. They will alternate when the switches are flipped. A ground wire may also be connected to a green grounding lug.
Take the new switch and line it up with the old one, with the black lug turned the same way. It might be a good idea to put some pieces of tape on the locations for the existing wires. Use the Same 'B', 'T1' and 'T2' designations.
It might be a little redundant, but if you get called away and have to come back. You might not remember which wire was which. With every thing marked, check one more time that the power is off. Unhook the wires from the old switch and attach them to the new switch.
Positioning Three Way Switch Wires
Another approach that is employed by professionals is to turn the wires in a certain direction when you remove the switch. Remember, the one you want to keep your eye on is the single wire that attaches to the single lug on the switch.
When you disconnect that wire, (power off, remember), turn it up or down, depending you how it was hooked to the original switch. The other two wires can be turned in the opposite direction when they are disconnected. You can keep them to the right or left, depending on how they were attached to the original switch.
When you use this method, even if you are called away, the connections should be self explanatory when you come back. This method is simple and straight forward.
Installing a New Three Way Switch
Attaching 3 Way Switch Wires
At this point you have marked or positioned your wires so that you know where they go on the new switch. Attach the single wire first, POWER OFF, CHECK IF YOU ARE NOT SURE, it goes on the single lug on the switch.
Then attach the to 'travelers' to the other two lugs. If you took the time to mark or position the wires, you can attach them to the same lugs on the new switch. The position of thes two wires is not critical, transposing them will have no impact on the operation of the switch.
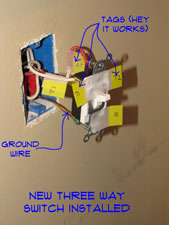
The new switch may have a grounding lug on it. If there is a ground wire available in the box you can hook it up to the green lug. Grounding of light switches is a new development in wiring and code practices. It is another safety precaution that can prevent shocks.
Wrap electrical tap around the bare lugs on the switch. This is just an additional safety precaution for you or someone else that may need to work on the switch in the future.
Testing Your Three Way Switch
Turn the power back on to make sure it is working properly. Does the light work? Check both switches to make sure that everything is functioning correctly. Screw the switch back into the box and install the cover plate. That's all there is, congratulations!
Summary
Are you done with your wiring a three way light switch project. We hope it was successful. A few tools and a few minutes should have taken care of it. Maybe a little longer, since you had to mark those confusing wires on the switch. Even longer if you didn't mark the wires and to work with trial and error.
What are you going to do with all the free time you have? Take a look at your list and decide on another project you want to tackle. Now that your confidence has been built up by this success story.
Light Switch Types
 A word about light switch options at this point. What is the word? Well, there are options. Styling, color, capabilities to name a few. This is not a decorating site so we won't go into style. The following features are available in light switches:
Single Pole Switch - The 'Single Pole' portion of the name has to do with the fact that it interrupts one pole or a 120 volt side of a 240 volt service. This does not mean that a single pole switch cannot turn on multiple lights. You can have multiple fixtures controlled by one switch. The only limitation is the circuiting for you lights.
Single Pole Dimmer Switch - Same as single pole switch for wiring purposes. Switch contains a 'dimming' mechanism that allows you to control the amount of power that goes to the light fixture. This can give you 'mood lighting' and 'task lighting' as desired. Not all light fixtures and bulbs will function properly with a dimmer switch. Check the information for you fixture and bulbs before switching to a dimmer.
Three Way Switch - This style of switch allows you to control one light or group of lights from two different locations. Three way switches need to be allowed for in the rough wiring that is inside the walls. So it is not easy to add one to an existing house.
Three Way Dimmer - Yes there are three way dimmers available. However, you can only install the dimmer at one of the three way switch locations. You will have to decide which one you want to have the dimming capabilities. Not all light fixtures and bulbs will function properly with a dimmer switch. Check the information for you fixture and bulbs before switching to a dimmer.
You can select any of the above light switch options in several shapes and styles. As long as your wiring and fixtures allow for a particular switch, it is mostly a matter of preference.
How To Test a Light Switch
How can you tell if you have no power to a switch? Use a non-contact voltage meter to check and see if you have power to the switch. You should get a reading when you move the switch up or down. Make sure you have checked the bulbs before proceeding.
For related information see 'Troubleshooting Wiring Problems' and 'Residential Electrical Repair'.
Checking the Light Bulbs
Try the bulbs in another fixture that is working before you automatically assume it is the switch.
Removing a Light Switch
You should shut the power off before you remove the cover plate on the light switch. With the power off, remove the two screws that hold the cover plate on.
After that, loosen the screws that hold the switch into the electrical box. You will need to take them completely out of the box, to free up the switch. Pull the switch out of the box a few inches until the wires that are attached to the switch are exposed.
Usting a Continuity Tester
Turn the power off and take off the cover plate for the switch. Check it with the tester to make sure the power is off. Remove the screws that hold the switch into the box. Pull the switch out and examine the connections. Are the loose or corroded? Yes, then clean them and tighten them. Turn the power back on and see if this has taken care of the problem. Yes, then it is a job well done. No need for wiring a three way switch. No, then the switch is bad and needs to be replaced.
Does the meter show that you have power to the switch? Yes, then the switch could be bad and need to be replaced. Or the wiring could be loose or corroded.
Using a Voltage Tester
There are different types of voltage testers. The cheapest ones sense when current is going between two point. Two use this type, you will place the leads on each terminal of the switch. Use extreme caution when performing this test, it will only work when the power to the switch is turned on.
They have two leads and a light the lights up when current is sensed. This type will not work properly when used for a light switch. The problem is that the light in the tester acts as a bridge for the circuit, when the switch is off. It allows current to pass through the filament in the tester. Thus current will show for both an on and off condition, making you think that the switch is bad.
The only way this will work properly is if you remove the light bulbs from the fixture. With the light bulbs removed the tester will not light up when the switch is off. It should still light up when the switch is turned on.
Using a Non Contact Voltage Tester
A much better option for testing a switch is a non-contact voltage tester. This type of tester senses when there is power in a wire. You can first check to see which side of the switch has power in it. Once you have located the power source, you can toggle the switch on and off to determine whether the wire on the far side of the switch is getting power when it should.
You need to be careful when performing this test. The power needs to be on when the test is performed.
Light Switch Wiring Diagram
This page provides a listing of all the 'Electrical Wiring Diagrams' that we have on the Home Repair Central website. Below you will find descriptions of each diagram.
Not sure if you are on the right page? See the articles 'Troubleshooting Electrical Repairs', 'Fixing Residential Wiring' and 'Basic House Wiring' for more information.
Single Pole Light Switches
Single pole light switches are the simplest switches and/or wiring devices that you are likely to encounter. All they do is interrupt the hot power supply to the light, one way, 'Power On', the other way, 'Power Off'. Simple, right?
Its fairly simple, but they can be wired in more than one configuration. One option is to have the power from the breaker box, coming into the box that has the switch. The other option, is to have the power coming into the box or boxes that contain the light fixture(s).
Single Pole Switch With Power in Switch Box
This, Single Pole Switch Wiring Diagram can be helpful if you are trying to understand how your light and switch are wired. With a single pole switch, there are two variations. One is with the power coming into the box that contains the switch. The other one, has the power coming into the box that the light fixture is mounted to.
You are going to want to look at both of them to determine which configuration that you have. Go to the 'Single Pole Wiring Diagram - Power at Light' diagram (below) for the other option. In addition, see the articles 'How To Wire an Outlet', 'Wiring a Dimmer Switch' and 'Three Way Switch Wiring' for more information.
Single Pole Switch Wiring Diagram - Power at the Switch
In this diagram we show how the wires are attached to the switch and the light. This is the 'Normal' or 'common' configuration, but this does not mean that you will always encounter this pattern. Circuit layout, wire economy and other factors will determine how the wiring is installed. For the homeowner, you just need to understand which wires are doing what, before you mess with them.
With this configuration you have your hot wire coming from the breaker box inside of the light switch box. You should be able to locate it with a non-contact tester. All of the wires are hooked up the way you would expect them to be. Black to Black, White to White and Ground to Ground.
You hook a black wire that is tied to the power from the box to one pole on the switch. On the other pole of the switch, you attach the black wire that goes up to the light fixture. The white wire from the switch is tied to the white wire that goes back to the panel. The same is true of the ground from the light, tie it to the ground going back to the panel.
When the switch is off, the black wire that goes to the light has no power in it. With the switch on, it is hot.
Single Pole Switch Wiring Diagram - Power at the Light
This, Single Pole Switch Wiring Diagram can be helpful if you are trying to understand how your light and switch are wired. With a single pole switch, there are two variations. One is with the power coming into the box that contains the switch. The other one, has the power coming into the box that the light fixture is mounted to.
You are going to want to look at both of them to determine which configuration that you have. Go to the 'Single Pole Wiring Diagram - Power at the Switch' diagram (below) for the other option. In addition, see the articles 'How To Wire an Outlet', 'Wiring a Dimmer Switch' and 'Three Way Switch Wiring' for more information.
In this diagram we show how the wires are attached to the switch and the light. This configuration is not as common and can be a bit confusing. The main reason is that some of the wires don't perform the normal function. The white wire coming from the switch has to carry the power from the panel to the switch box.
You hook the white wire (with black tape on it) to one of the poles on the switch. On the other pole of the switch, you attach the black wire that goes up to the light fixture. The white pole or wire on the light fixture is tied to the white wire that goes back to the panel inside of the light fixture box. The ground wires inside of each box are attached to the switch or light fixture.
When the switch is off, the black wire that goes to the light has no power in it. With the switch on, it is hot. The white wire (with the black ends) should always be hot.
Summary
For additional light switch resources, see the articles 'How To Wire an Outlet', 'Wiring a Dimmer Switch' and 'Three Way Switch Wiring' for more information.
Finding a Bad Light Switch
 Finding a bad light switch is not too difficult. It is a process of elimination. Make sure you check the simple things first. Is the bulb bad? Sounds silly but, you can get a bad bulb fresh out of the package. Try it with a bulb you know is working. Is the breaker tripped?
Use a non-contact voltage tester to see if you have power to the switch. Do you have power to the switch? You're sure the bulbs are good? The light still does not work? Yes to all three means that the switch is no good and needs to be replaced. The good news is that wiring a light switch is not hard at all. See The article 'Installing a Light Switch' for specific instructions. Just want to replace the switch? Follow the same link, it's pretty much the same thing.
Before you replace the switch, make sure it is not a loose wire. Turn the power off to the switch, put tape on the breaker (so no one will turn it on). Take the switch plate off and remove the switch from the box. Check for loose or corroded wires. Clean them up or tighten them as needed. Turn the power back on. Does it work? Problem solved. No need to engage in wiring a light switch.