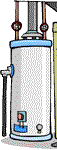
Working on a hot water heater gas valve is not a repair for your average homeowner. Replacing is is generally the only option.
There are several things you want to check before you assume your gas valve is bad. Make sure you rule out simpler repairs first. See the articles 'Hot Water Heater Pilot Litght', "Hot Water Heater Thermocouple', before you plan on replacing your gas valve.
See the article 'Gas Hot Water Heater Troubleshooting', if you are unsure of your problem.
How a Gas Valve Works
The gas valve sends gas to both the pilot light and the main burner. It senses electrical current from the thermocouple and shuts off the gas if the pilot is not lit. This is an important safety feature. There are not a lot of options if the gas valve is bad.
Replacing it is usually the only course of action. This is a bigger repair job and the part it fairly expensive. However, you would only look at the water heater gas valve after you have checked the thermocouple. The symptoms are the same.
Water Heater Gas Valve - The Issues
What Can You Save? - This is not a cheap repair. The part alone could run $80 to $250. The high end is brand named part vs. an after market replacement. There is a fair amount of labor. This could run you another $200 to $250. Then there is the 'why spend that much on an old water heater' pitch. You could get talked into an new water heater. Anywhere from $800 to $3,500.
How Hard Could It Be? - Replacing a water heater gas valve involves draining down the tank, unhooking the gas line, unhooking thermocouple and gas lines to the burner and actually changing the valve. A couple of hours of break a sweat work. These repairs will have a Difficulty Level of: A Bit of Work. These repairs require a Skill Level of: Determined Handyman. For and explanation of the terms in this section, see 'How to Use This Site'.
What Can Go Wrong? - You are dealing with natural gas. Make sure the gas is turned off and the area is well ventilated. There will be some residual gas in the lines when you take them apart. Also the water in your tank is hot, shut the tank off and run some hot water until it is lukewarm before you try to drain it. Not getting it fixed will leave you without hot water. This will likely generate a significant amount of complaining from the family.
Gas Valve Thermostats
The gas water heater thermostat is part of the gas valve. The thermostat cannot be replaced independently from the gas valve. In addition, there is no practical way to test it. You can replace the gas valve, although, unless your water heater is not working at all this should not be needed.
Are you convinced that the thermostat is not working properly? You could test the temperature of the water coming out of the tank. The reccommended temperature is 120 degrees.
You can make adjustments to compensate, if you find that the temperature is too low. Be very careful about raising the temperature above 120 degrees. Burns and scalding can occur. See the article 'Gas Water Heater Temperature Settings' for more information.
Take a look at the article 'Water Heater Gas Valve', if you think your gas valve has gone bad. Another thing you should check is the 'Gas Water Heater Thermocouple', this is the more likely candidate for issues with your gas valve. The gas valve will not work properly when the thermocouple is defective.
Purchasing a Gas Valve
Before you can replace your water heater gas valve, you need to purchase a new one. You may find that getting an exact match to the one you have difficult.
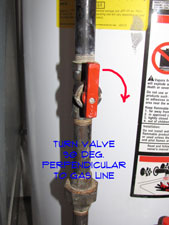
Shutting Off the Gas
The first thing you need to do is shut off the gas to the hot water tank. This is done at the shut off valve that is in the gas line.
Turning the water heater gas valve to off is not the place to do this. The 'Off' position on the gas valve dial only means that it will not heat the water. The pilot light is still on and gas from the main supply line is still on.
You need to turn the inline valve ninety degrees so that it is perpendicular with the gas line.
Cooling off the Hot Water
Next you want to run some hot water into a sink until the water cools down to lukewarm. The water in your tank can be very hot and dangerous. Cooling it off will make the draining operation a lot safer.
Remember, no repair project is worth getting hurt over. You can get some information on Safety if you click that button on the sidebar.
WARNING!! Natural Gas Can Explode! Make Sure the Gas is OFF!!! Hot Water Can Cause Severe Burns!!! WARNING!!!
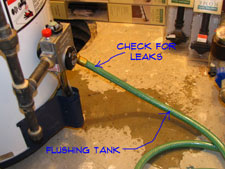 Draining the Tank
Shut off the water supply at the cold water inlet for the water heater. Next, hook up a garden hose to the water heater drain valve. Find a drain to run the garden hose to and make sure the hose will stay secure. Open the valve to allow the water to start draining. Open the pressure relief valve to allow air to get into the tank.
Does your tank have a sediment build up in it? This might be a good time to flush the tank. Go to the article Flushing a Hot Water Tank for instructions on what to do. You will have some wait time while the tank is draining. See Step Three for work you can get done in the mean time.
Unhooking the Lines
You will normally have four items that are hooked to the water heater gas valve. (1) The Gas Line (2) The Thermocouple (3) The Pilot Light Supply Line (4) The Main Burner Supply Line. A possible fifth item would be an electronic igniter that is attached to the side of the gas valve.
(1) For the Gas Line, you should find a union between the shut off valve and the gas valve. Loosen the union using two pipe wrenches. The gas line has a horizontal pipe that feed into the side. The other end is connected to a tee. You may have to take off the nipples on either side of the tee to be able to remove the nipple going into the water heater gas valve. Remove the gas line from the gas valve. Save the pieces, you will need them.
(2) Use an open end wrench or an adjustable wrench to remove the thermocouple. Be careful, some of them have left handed threads. If it won't loosen going the normal way, try the opposite direction.
(3) Next use an open end wrench or an adjustable wrench to remove the supply line for the pilot light. It will be the smaller of the two and likely on the far right.
(4) Use the proper size open end wrench or an adjustable wrench to remove the supply line to the main burner. This will be the larger line in the center of the gas valve.
(5) The igniter if you have one is not really a component of the gas valve. However, it may be attached to the side of it via a bracket. Use a screwdriver or nut driver to remove it as required.
Replacing the Gas Valve
Step Four – Replacing the Gas Valve
Removing the Gas Valve
You need a small pipe wrench to remove the gas valve. Make sure the tank has finished draining. The gas valve stands away from the tank housing. You likely have only 3/4" of space to work in. The jaws of the pipe wrench need to be about 5/8" wide. As you face the water heater, turn the gas valve counterclockwise to remove it.
You need to get a suitable gas valve replacement. There are a number of universal models available. There should be a model number on the side of your old gas valve. You can try searching for that model number to see if you can find an exact match. Your success will depend in part on the age of your water heater. For a universal one, the shank length is the main concern. They come in various lengths from 1 1/4" to 2 3/8". Make sure the one you get has the same shank length.
You want to put some pipe joint compound or Teflon tape on the threaded portion of the pipe that goes to the hot water heater. Use the pipe wrench to tighten the valve. Make sure it is tight. You should finish with the pilot knob facing up.
Filling the Tank
At this point you are ready to fill the tank. Close the drain valve and turn on the water supply. You want to make sure that there are no leaks around the gas valve.
When you start to get some water out of the drain for the pressure relief valve, you can close it. Open the a hot water faucet nearby and let it run until all of the air is bled out of the tank.
You will need to tighten the gas valve if the water is leaking. You will probably have to go a full turn to get the valve turned the right way.
Putting the Water Heater Back Together
You can re-install the lines coming into the bottom of the water heater gas valve in reverse order of taking them off. These fittings should not need any pipe dope or Teflon tape. Make sure the connections are tight. You will need to use a pipe joint compound on the gas line fittings that is rated for natural gas or one that is approved by your local building codes. Use pipe wrenches to put the gas line back together. Make sure you tighten the union.
Make sure the dial on the water heater gas valve is set to off. Turn the shut off valve on the gas line to the on position (parallel with the gas line). Use soapy water to check for leaks. Never use a lighter or any kind of flame to check for gas leaks.
After you are confident there are no gas leaks you can go through the pilot lighting procedure. You should have gotten some instructions with your new water heater gas valve. After the pilot is lit you can turn the valve to on and set the temperature. It should be set at the factory for 120 degrees. At this point you should use soapy water and check the fittings on the bottom of the water heater gas valve for leaks. Be careful about exceeding that, especially if you have children or anyone else that might inadvertently turn on just the hot water.
Put the instructions for pilot lighting you got with the new valve in a plastic bag. Tape it to the side of the water heater. Pilot lighting procedures differ slightly for valve to valve. You will want this information later.
Hot Water Heater Gas Valve Replacement Summary
Is it working now? That is great news. Was that a hard job? Yes it was kind of difficult. Draining the tank is a job in itself. Then removing the lines into the gas valve. You probably had to take at least a couple of the pipes for the gas line apart. Changing the gas valve and then putting it back together. At least two hours on a good run.
Now that you have that behind you, what are you going to do? Ambitious? Want to tackle something else? Tired? Why not take a breather before you get into another project.