 This article covers adjusting a garage door track. When the track is out of adjustment it can cause the garage door to not operate correctly. In extreme cases the door can even come out of the track.
For other garage door repair issues see 'Troubleshooting Garage Doors' or 'Garage Door Opener Problems'.
There are two ways that you can adjust garage door track. (1) You can align the track with the door itself, so that the rollers work properly. (2) You can adjust the track so that the door aligns with the weatherstripping.
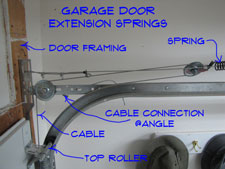
A related topic would be 'Adjusting Garage Door Springs'.
Adjusting Garage Door Track to the Rollers
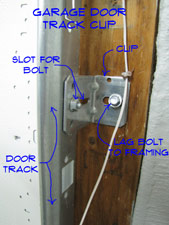
Adjusting the Track to the Rollers. The garage door track is attached to the door frame with metal clips. The track acts as a guide for the garaged door rollers. Adjusting a garage door track may involve setting the the track to the proper alignment for the rollers. See the article 'Garage Door Rollers', for more information on the correct alignment.
The clips have slots in them that allow for side to side adjustment. Rule of thumb, you should have about 1/2" to 3/4" between the edge of the door and the track. This leaves some room for the rollers to move in and out of the sleeves. When the track is too close to the door, the door will bind. Too far away and the rollers could pull out of the sleeves.
Safety First!!
When you are adjusting garage door track, you want the door down. Only loosen one track at a time and do not remove the lag bolts completely. Loosen the lag bolts that hold the track to the jamb and slide the bracket until the distance is correct. You may have to loosen more than one of the clips. Get the track where you want it and tighten the clips back down. Make sure the lag bolts that attach the clips to the framing are tight.

Adjusting the garage door track margins keeps the track properly aligned with the door itself. When it is resting on the ground the door establishes where the tracks should be. You want the tracks to be parallel with the door and have a consistent margin for the full height of the door.
Adjusting the margins along the side of the door is similar to adjusting it in and out. The brackets are fastened to the jamb with lag bolts. The hole in the bracket is also slotted. This allows the bracket to move from side to side the length of the slot. Hopefully, the installer put the lag in the center of the slot.
You will need a wrench to loosen the lag bolt. Loosen the bolt and adjust the bracket in the desired direction. You may need to loosen two brackets at a time if they are binding.
Adjust the brackets on both sides of the door until you have a consistent garage door track margins. You should be able to see about 1/2" to 3/4" of the shaft.
Adjusting the Overhead Track
 The overhead portion of the garage door track only has one adjustment point. The overhead track should be the same distance away from the door as the wall track. Do not try to adjust the track with the door up. The brackets that hold up the track have slots and additional holes in them. The end of the track will need to be moved to to adjust it.
Loosen the bolts or remove them if a new hole needs to be used. Move the end of the track closer or away from the door as needed. Do not move it very far each time. If the track is too far away from the door, the door could fall. Too close and the door will bind. Move the end of the track the minimum increment and try the door. You want the track to be parallel with the door, 1/2" to 3/4" away from the door. Tighten the bolts as needed and carefully try the operation of the door. Do not stand underneath it and watch carefully for binding or pulling away of the rollers.

Adjusting overhead garage door track is similar to adjusting the tracks along the side of the door. The difference is that the track only has one place that you can adjust it at. Assuming that the overhead garage door track is not bent, this will work fine.
The ends of the garage door tracks are usually held in place by metal angles that are attached to the ceiling or rafters. The metal angles have holes in them, some are slotted and some are not. The idea is to have the track parallel to the door in its up position.
You want the rollers to show about 1/2" to 3/4" margin on them. Raise the door and check the alignment. Note which way the track needs to move and how much.
WARNING!!! Do not work on the overhead tracks with the door in the up position! WARNING!!!
To adjust the track you will need to move the vertical angle in the proper direction. Remove the bolt from the angle and move the angle over one or more holes to get the desired margin. You can use wrenches to loosen the bolts. Do one track at a time with the door in the down position. Raise the door carefully the first time to make sure that the rollers will not pull out of the sleeves.
WARNING!! DO NOT Try to Adjust the Door When It Is Up!!! Lower the Door Before You Work On It!
Adjusting Garage Door Track to the Weatherstripping
Often, you will need to adjust the track to the weatherstripping. For all but the top clip, there are slotted bolt holes where the track is attached to the clip. With the door closed the door should be touching the weatherstripping. Do you see daylight or feel cold air coming in? You can loosen the bolts and move the track toward the framing. Snug, but not too tight. Tighten the bolts back up and check the operation of the door.
It is possible that you will have to adjust more than one of the clips. Do not force the track. If it won't move the proper distance, loosen the clips above or below it. Get the full length of the track adjusted so that the door is snug against the weatherstrip (no daylight, right?). Tighten the bolts up and you're done. Adjusting garage door track did not turn out to be that tough. Good Job!
For more information on 'Garage Door Weatherstripping', follow this link.
Summary
So you can see that there are several adjustments on a garage door that involve the track. Fortunately, most of the time it is not that difficult to make these adjustments. Hopefully your door is operating better now.