 Repairing water shut off valves with washers will usually, well, it will involve the washer. The washer is the rubber (usually) disk that compresses to shut off the water. After repeated use and age the rubber wears out and it does not seal correctly.
Do you have a different problem? See 'Plumbing Repair' for a complete listing of all the plumbing topics.
The other issue with a washer is the seat. The seat is the metal ring that the washer presses against. A corroded or pitted seat will not allow even a new washer to shut off the water.
Tightening the Stem Nut
There is a brass nut at the stem of the valve that can work loose during normal use. Leaks can develop at this location.
Use a small crescent wrench to tighten this nut if it starts to leak. If the leak gets worse when you tighten it, then the washer is shot and will need to be replaced.
Replacing Washers
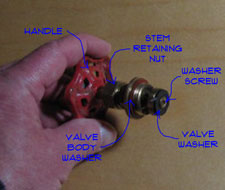
Replacing a washer is the first thing to try when a valve will not shut off. There is a nut on the base of the handle stem that holds the stem and washer assembly in place. Before you can remove this nut you need to shut the water off to the valve. Since you are working on the valve you will have to go to a shut off valve that controls the branch that you are working on. It is possible that you will have to shut off the main water supply valve.
With the water off you can loosen the nut that holds the valve stem. Use two wrenches to perform this task. One on the valve itself and one on the nut. Loosen the nut and remove the valve stem assembly. At the end of the valve stem you will find a washer held in place by a screw.
What is the condition of the washer? Grooved, partially disintegrated? Mostly disintegrated? The washer should be replaced. At this point in time you should also check the seat, see Step Three for information on making sure the seat is in good shape.
Purchasing Washers
The main challenge now will be finding a washer that is the same size as the one you have. You can buy specific sizes or packages that contain multiple sizes. Remove the washer using a screwdriver and find one that matches. Sometimes the screw holding the washer in place also needs to be replaced. Many washer kits come with new screws. Screw the washer in place and then reassemble the valve. That should solve the problem. Turn the water back on and see if your water shut off valve works.
Fixing Valve Seats
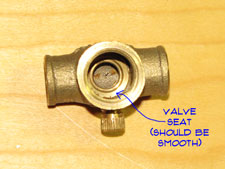 The valve seat is a flat machined area in the valve that the washer presses against when closed. If this area is not smooth or it is pitted, the valve will allow water to go through even when the washer is new.
Examine the seat and see if it is smooth. Since the seat is part of the main housing of the valve you are left with two choices if it is bad.
The first would be to replace the valve. For shut off valves at your fixtures this may not be too much trouble. See Step Four for instructions. For other valves that may be soldered into place this could be a lot more work.
They do make valve seat dressing tools that can be used to get the valve seat smooth again. You can try this if the valve is too much trouble to replace. The dressing tool needs to have a cutting head that matches the size of your valve.
Follow the instructions for the tool you purchased and dress in the seat. Install a new washer on the valve stem. After that you can assemble the valve and turn on the water. Hopefully your water shut off valve works as intended and shuts the water off.
Summary
All valve have washers in them. Some have more than others. Replacing the washers is an option when a valve starts to leak.