 Why would you need to make a drywall hole repair? Maybe you had to repair something in your wall, perhaps plumbing, electrical or another concealed item. Could be that you had a water leak and the drywall is rotted and needs to be replaced. Or it could be the kids were wrestling and a hole resulted. Whatever the reason you are here because you need to replace some drywall.
Not sure if this is your problem? See the articles 'How To Fix Drywall', 'Patching Drywall' and 'How To Spackle Drywall' for more information.
Drywall is supported by the wood framing in your home, usually 2 x 4's. When you cut out drywall you will have to provide support for it. Most residential framing is spaced at 16" on center, although you will find 24" on center framing at some ceilings and even some walls.
Cutting the drywall back to the framing would seem to be the logical choice for providing support. There are a few reasons why you might not want to do that.
Drywall Hole Repair - Information
What Can You Save?
A drywall hole repair is a bit more involved than some other drywall repairs. Some drywall needs to be replaced and then taping needs to happen. Even with quick setting compound you can be looking at one to four hours to take care of something. There is some down time with drying time for the mud. Someone you hire will either wait or make return trips. The size of the patch matters but let's say between $50 and $250 dollars to hire someone to repair drywall in your home.
How Hard Could It Be?
A drywall hole repair will require replacing drywall and taping. Both of these activities require some work.
Check the Simple Things!
When you have a big hole in your wall there is nothing simple to do. Take a deep breath and prepare yourself for the character building experience you are about to have.
What Can Go Wrong?
Failing to take your time and make sure that your drywall hole repair is smooth can leave a patch that will show after it is painted. You would be amazed at how unforgiving drywall can be when the right light hits it. For a repair that is located at picture height you can find a picture to hang there. At other locations you will still have a problem to address. Drywall is messy in it's own way, take precautions to deal with the mess. Yes the dust can wind up in a room that is on the other end of the house. In fact it may get there quicker than you can.
Drywall Hole Repair – The Steps Involved
Adding Backing for Drywall Holes
Another acceptable method for supporting drywall is adding backing for drywall patches. This consists of screwing wood supports to the existing drywall.
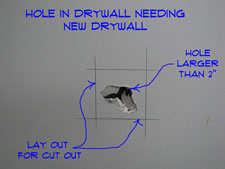
Use the tape measure, level, pencil and keyhole saw to lay out a square or rectangular box around your hole. You want to be back to the undamaged portion of your drywall. There is no mystery about the square or rectangle, it is just easier to cut a new piece of drywall that is one of those shapes. Make sure you have the right thickness of drywall for the patch, usually 1/2", sometimes 3/8" or 5/8". Cut the patch about 1/8" to 1/4" smaller than the hole.
Find a couple pieces of scrap wood that are about three or four inches longer than the shorter dimension of the hole. Anything will work that will fit into the hole and still leave you enough room to get your fingers behind the wood. Furring strips, 1" x 2" or 1" x 3" are great.
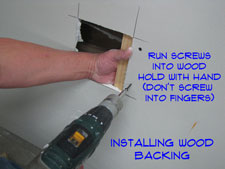 Hold the wood against the back side of the drywall with your fingers. Run three or four screws through the drywall into the wood to hold it in place. You need another piece of wood on the opposite side of the hole. You only need wood on two sides of the drywall hole repair. Install your replacement piece of drywall and run a couple of screws on each side into the wood. Gently, it is only the drywall holding the wood in place. Adding backing for drywall patches using this method is not that difficult, once you get the hang of it.
Now that you have your replacement piece of drywall installed you can jump to Step Five for instructions on taping and finishing the drywall. I admit that I have a lot of experience working with drywall. Still, comparing less than five minutes to install a patch to between twenty and thirty minutes for a 'hot patch'. I just think that this would involve a short debate. Of course debaters pride themselves on being able to say a lot about almost nothing. Well OK, that is really another discussion.
Big Holes in Drywall
Fixing big holes in drywall is a bit more work. Bigger holes that are larger than the spacing for the framing need to be attached to the framing members. Drywall has a span rating, 1/2" drywall can span sixteen inches both horizontally and vertically, although you may find it spanning twenty four inches. 5/8" Drywall can span twenty four inches.
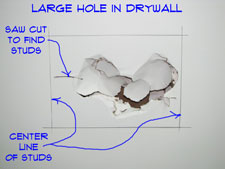
Your first task is to find the framing members on either side of the hole that needs to be repaired. You can use a stud finder or you can use as keyhole saw to cut laterally in each direction to find the framing. Once you have found your studs you want to lay out your patch on the centers of the studs.
Make sure you know which way the framing is running. For walls it is easy, vertically. For ceilings it is usually perpendicular to a bearing wall. Which walls are bearing? Great question with no easy answer. Outside walls that run the long dimension of your home are usually bearing, no guarantee though. You're patching the drywall anyway, make the hole a little bigger and stick you hand up there to find out.
 You need to cut back to the framing members to fix big holes in drywall. You can use the keyhole saw to cut laterally between the framing. For cutting along the framing you are going to have a bit more trouble. The problem is that there are nails or screws that hold the drywall in place. You will need to score the drywall with a utility knife along the stud.
Keep scoring the drywall deeper and deeper until you cut completely through it. When you hit a nail or a screw you are going to break the tip off the blade and it will not cut very well. In addition the gypsum dulls the blades quickly.
Replace or sharpen the blade as needed. Remember, utility knife blades are very sharp and cut skin easily. There is a tendency for blade to slip out of the groove and fly past where you want it to go. Make sure you are cutting away from any body parts. Be careful, I cannot stress that enough. With the patch removed you need to pull out the screws or nails. The edges of the remaining drywall will need some additional fastening. Install screws as required.
Adding New Drywall
Patching with new drywall is not uncommon. The main thing is that you want to get the right size drywall for the patch. The article 'Drywall Sizes' gives you some tips on doing that.
Cut a replacement piece of drywall. Make sure you have the right thickness of drywall for the patch, usually 1/2", sometimes 3/8" or 5/8". Cut the patch about 1/8" to 1/4" smaller that the hole. Install the patch with drywall screws into the framing members.
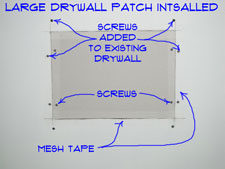
When your patch bridges multiple studs you will need to install screws in the field of the drywall. Maximum spacing for screws in drywall is twelve inches. Put more than that as needed.
With your replacement piece of drywall installed you are ready to move onto Steps Five for taping and finishing the drywall. Depending on the size of your drywall hole repair you may have a sizable taping job. Don't worry, it is not much more work to do a big patch, than it is to do a small one.
Taping and Finishing a Large Hole Patch

For a complete discussion on taping and finishing drywall patches, see the aticle, 'Taping and Mudding Drywall'.
Taping a drywall patch begins with, you guessed it, the tape. You have two options on the tape. You can use 2” wide paper tape or fiberglass mesh tape. For a drywall hole repair, paper tape will require one extra step. First you have to apply mud and wipe the tape down to get it to stick to the drywall. Spread about and eighth of an inch of compound along two opposite sides of the drywall hole repair.
Cut a piece of paper tape about two or three inches longer than the joint you are taping. Center the tape over the joint. Use a four or a six inch knife to wipe the tape down, pressing the excess mud out from under it. The tape should be fairly tight to the wall. The flatter the better. Repeat this for the opposite side of the repair. After two sides are taped repeat for the remaining two sides. Make sure the tape laps onto the other pieces of tape by at least an inch.
Fiberglass mesh tape will stick to the surface of the drywall on its own. You do not need to put mud on first. You can install fiberglass tape on all four sides of the repair at the same time. You can apply a first coat of mud directly over the fiberglass tape. Fiberglass tape is definitely better for a drywall hole repair. Fiberglass tape is a little more expensive, six to eight dollars per roll for a full size roll. Compare that with two or three dollars for paper tape. I think it is worth the extra money for the time it saves. Taping a drywall patch will go quicker if you use mesh tape.
For a paper taped patch you have to leave and let it dry. Do not try to apply a coat of mud over top of wet tape, it will make you sad and you will blame yourself for a long time. Did you decide to use mesh tape, good, you are ready for the first coat of mud. When the paper tape is dry, you are also allowed to move on to the next step.
Summary
They say that drywall installers and finishers are a breed of their own. That is probably because not too many people like doing it. OK, this was a bigger job with several steps, but none of them should have taken that long. The trick is to be patient. Allow a drywall hole repair to run over the course of a couple of days. Find other things to do while the mud is drying. We hope that your experience with drywall hole repairs has not been too traumatizing. If you were traumatized, try to find a support group in your area. With the skills you have developed you will be ready to deal with holes in the future.