 It is rare that the toilet tank lever is responsible for problems with your toilet.
Do you have to jiggle the handle to get the toilet to flush correctly. This is probably not the handles fault. Check the 'Toilet Flapper' or the chain that is attached to it for correct adjustment. The same would hold true for a toilet that is running either constantly of intermittently. Go to the Article on 'Repair a Running Toilet' for the correct information for solving this problem.
Not sure what your problem is? See the article 'How to Fix a Toilet' to troubleshoot your problem.
The repair that you want to make may mean replacement. Follow the information below to check for problems and make the appropriate repairs.
Repairing Toilet Tank Levers - Information
What Can You Save?
If you call a plumber it would be a service call, $50 to $100 plus parts. Likely a new handle would be installed.
How Hard Could It Be?
This repair requires that you have some basic skills with simple tools. This is a very easy toilet repair.
Check the Simple Things!
Check the adjustment on the chain for the flapper valve before you buy a new handle. The chain should not have too much slack or the handle will not cause the flapper to lift high enough.
What Can Go Wrong?
Be careful when tightening or loosening the nuts for the toilet tank lever. You can crack the tank if you use too much force. If you are careful you should not splash any water on any other surfaces. Take precautions if you think you will splash water. You can flush the toilet by manually pulling on the flapper chain if for some reason you obtained the wrong handle.
Repairing a Toilet Tank Lever - The Steps Involved
There is not much that can go wrong with a toilet tank lever. Its only function is to move up and down to pull on a chain that is attached to the flapper valve. Adjusting the chain so that the flapper opens correctly is a simple task. The finish on the handle can corrode and look worn. You may want to replace the handle for that reason.
Types of Toilet Tank Levers
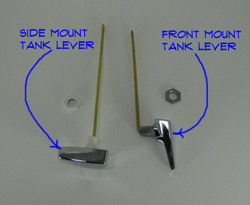 There are several toilet tank lever styles. The finish on the exposed part of the handle can vary. From a functional point of view there are two common styles of toilet tank levers. A front mount or a side mount.
Most of the time, the levers can be used on either side of the tank. The bar that lifts the chain needs to be reversed, depending on the handing that you need.
Front mount is the more common style. When purchasing a new tank lever, make sure you get the correct one. The package should be marked showing the front or side mount designation.
Getting the wrong handle may cause you to question your home repair skills. Don't, just go back and get the right one at the store. This is not a serious physiological issue, just a mistake.
Removing the Old Lever
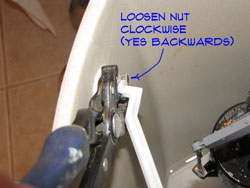
Removing a toilet tank lever is not too hard. There is usually just one nut that holds it in place.
Shut the water supply off and drain down the tank by flushing it if you do not want to work in the cold water. Using a pair of adjustable pliers loosen the nut on the lever by turning clockwise. Yes this is correct the nuts are threaded left hand or backwards from what you would expect.
The nut may be badly corroded and difficult to loosen. Do not try to force it. Use a hack saw to cut through the shank nut. Unhook the chain from the flapper and the handle should be free. Remove and discard.
The hole that the lever was connected to may be discolored and corroded. This is a good opportunity to clean it up. Use a plastic scrubber and some bleach based cleaner to clean up the area. Now you are ready for the new toilet tank lever.
Installing a New Tank Lever
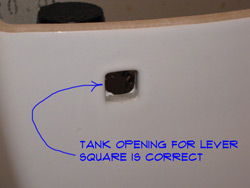 Installing a toilet tank lever is simple once you have the old one removed. By now you should have purchased a replacement lever and you are ready to go.
Clean any corrosion or residue off of the finished surface of the toilet. Insert the new handle and tighten the nut with your fingers, turn counterclockwise, yes it is backwards.
Do not over tighten with pliers, you could crack the tank. Attach the chain for the flapper at the appropriate hole on the lever. More or less vertical from the flapper. Leave the minimum amount of slack on the chain so that the flapper will open correctly.
Flush the toilet a couple of times to make sure the flapper is opening and closing correctly. Everything working fine? Great, that's all there is to it. Good Job!
Summary
So, what were you faced with on this repair? Was the chain tangled? That should have been pretty easy to take care of. The toilet tank lever is such a simple device that repairing it usually involves replacing it with a new one.
Following the steps above you were able to successfully accomplish this task. This was an easy job and should not have taken up much of your time. Now you can move on to more pressing matters in your life. Maybe a well deserved nap.