Search
Piping
How To Cut PVC Pipe
 Knowing how to cut pvc pipe is useful knowledge that will be needed for many plumbing repair projects. The pipe is made of plastic and cuts easily. The trick is getting it the righ length.
For related information see the articles, 'Sink Drain Plumbing Repair', 'Identifying Sink Drain Plumbing Parts', 'Installing a Sink Drain' and 'Troubleshooting Plumbing Pipes'.
Cutting sink drain pipes is not difficult. Especially if you go with the less expensive pvc plastic pipes.
Types of PVC Pipe
PVC pipe comes in several different types. The most common varieties are for interior and exterior drains and residential water piping. Depending on the usage, the pipe can be different colors. Exterior drainage pipe is usually green. However, there is no completely standard coloring system and the use of colors has evolved over time.
For interior drain pipes, it is usually white. The white color can also apply to sink drain plumbing fittings. White can also be used for water supply lines.
So what is the right pipe to use for a repair or replacement? You need to have pipe that matches the pipe that y
For sink drains the fittings are mostly compression type. Meaning that they do not get glued together, instead a nut and washer is used to stop the fitting from leaking.
The other type of pvc pipe is for glued connections.
Measuring PVC Pipe
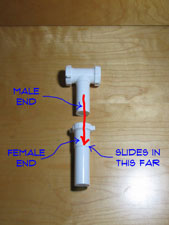
Notice the fittings fit inside one another. So the fittings that slip together have either a male or female end. Some ends are threaded to mate up with a matching piece, like the P Trap.
Due to this feature you will have to allow for the overlap when you measure your pieces. You can tell on the outside of the female piece how far in the other piece will slide in. Mark the piece you are cutting accordingly.
Ways To Cut PVC Pipe
Your use a hack saw to cut the pipe whether it is metal or plastic. The cuts do not have to be perfect due to the overlap. Dry fit the pieces to make sure the are fitting correctly. The piece of drain pipe that goes into the wall will also be cut long. It will go inside the pipe a couple of inches and be held in place by the nut and washer.
Water Shut Off Valve Leaking
 A water shut off valve leaking can make a mess and waste water. Water shut off valves can also leak at various points on the valve. For instance, a standard stop and waste valve has three other washers that can leak in addition to the washer that shuts the water off.
Not sure if this is your problem? See the articles 'Troubleshooting Water Pipes' and 'Home Plumbing Repair' for a listing of related topics.
Leaks at the Valve Stem
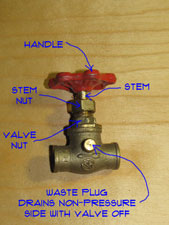
The valve stem is the part the has the handle attached to it. There is a nut underneath the handle that holds the stem in place.
Most valves have a washer that seals the stem from leaking. The nut that keeps the stem aligned is the one that is most likely to leak. This is especially true if the valve gets used regularly. The opening and closing of the valve can loosen the nut over time.
When this happens, it is likely that tightening the nut will solve the problem. Use a crescent wrench to tighten the nut. Try not to over tighten it.
Leaks at the Stop and Waste Cap
Some valves have a small drain on the side that can also leak. Since these washers do not see a lot of action they are less prone to problems. However, they do leak if the nuts are not kept tight.
The stop and waste cap does not have a hex fitting on it, so you will have to use a pair of pliers or channel locks to tighten it. Use the pliers to turn the cap clockwise until it feels snug. This should stop the leak.
If this does not work, there is a small washer on the inside of the cap that can be replaced. Or you can get a new cap with a washer on the inside. Install the cap with a new washer and snug it up. This should solve the problem.
Leaks at the Valve Body Nut
The valve is made of two components, the stem assembly and the valve flow body. The nut that holds the tow pieces together can leak, although this is not that common.
If you do have a leak at this location you can use an adjustable wrench or pipe wrench to tighten it. This is a machined fitting so when it is tight it will lock in place and will not go any farther.
Shut Off Washer Leaking
You usually only notice this when you shut the valve off. Many valves get used rarely, so you don't realize that they won't shut the water off completely. If the water continues to run even with the valve off, you have a bad washer.
To replace the washer, you need to take the valve apart at the valve body nut. The valve will come apart in two pieces. The washer is held in place by a brass screw. You will need to get one that is the same size. Install the new washer and replace the stem assembly in the valve body.
With a new washer in place you should be able to shut the valve off and not have water trickling or flowing through it.
Drain Pipe Repair
Drain pipe repair will usually involve one of two problems. The first and more common problem is clogs in the drains. See below for information on the different types of clogged drains that you can have.
Common problems with drain pipes are 'Clogged Kitchen Sinks', 'Clogged Bathtub Drains' and 'Cleaning a Drain'. Follow these links for more information.
Most plumbing fixtures in your home have both water supply and water drainage features. The water that is drained away is usually less desirable than the water that comes in. When the water fails to drain away, it is usually a big mess.
Getting drains cleaned out had become an expensive repair. You could be faced with a several hundred dollar charge for getting a drain cleaned. Sometimes the severity of the problem and the knowledge to run the equipment invoved makes this expense unavoidable. Most of the time, fixing the problem could be within your reach.
Plumbing Drain Repair - Finding Help
Below you will find some common problems. There is a brief description and a link that will lead you to additional information. Our evaluation sections of the pages will help you to decide if you want to make the repair. The "What Can You Save?" and "How Hard Could It Be?" sections give you a quick overview of the repair. This will help you decide if it is using good judgment to make the repair yourself.
The "Check the Simple Things First" section will clue you in to easy fixes to check for. Many times something easy will eliminate a problem without the aggravation of an involved repair. In an effort to warn you about what you are in for, there is the "What Can Go Wrong" section. Forewarned is forearmed as they say. Knowing what to watch out for is always helpful.
Plumbing Drain Repair - Topics
How To Unclog a Drain
This article deals with problems that are common to all plumbing drains. It also provides some general troubleshootiting guidelines. There are multiple ways to unclog a drain. Depednding on your situation, one methoed will prevail over another. See the specific articles for kitchen sinks and bathtubs for information related to those drains.
Clogged Bathtub Drains
Bathtub drains have unique problems. Hair is a big problem with this drain. The linkage that makes the drain work can add some unusual problems to dealing with clogs. Making sure that the bathtub is the actual problem is another factor.
Clogged Kitchen Sinks
Kitchen sinks have drains similar to other devices in your home. They are slightly different for a few reasons. One is the grease. Grease creates and unusual type of clog. A snake can go through it without getting it to move. The other unique feature is the garbage disposal. Find out how to deal with the special problems that affect a kitchen sink.
Sink Drain Plumbing
Sometimes, fixing plumbing drains involves taking apart the plumbing. Putting it back together can be a little challenging. You may have to replace some or all of the parts. Most of the time, it is not that hard.
Plumbing Drain Repair - Summary
After you have reviewed the articles noted above you will be equipped for fixing plumbing drains. With a few tools and your acquired knowledge you should be able to solve your problems.
Plumbing drain problems come in different flavors. That is why there are specific articles for each.
Fixing Washered Water Shut Off Valves
 Repairing water shut off valves with washers will usually, well, it will involve the washer. The washer is the rubber (usually) disk that compresses to shut off the water. After repeated use and age the rubber wears out and it does not seal correctly.
Do you have a different problem? See 'Plumbing Repair' for a complete listing of all the plumbing topics.
The other issue with a washer is the seat. The seat is the metal ring that the washer presses against. A corroded or pitted seat will not allow even a new washer to shut off the water.
Tightening the Stem Nut
There is a brass nut at the stem of the valve that can work loose during normal use. Leaks can develop at this location.
Use a small crescent wrench to tighten this nut if it starts to leak. If the leak gets worse when you tighten it, then the washer is shot and will need to be replaced.
Replacing Washers
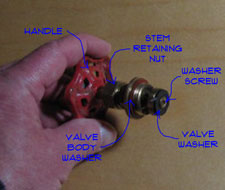
Replacing a washer is the first thing to try when a valve will not shut off. There is a nut on the base of the handle stem that holds the stem and washer assembly in place. Before you can remove this nut you need to shut the water off to the valve. Since you are working on the valve you will have to go to a shut off valve that controls the branch that you are working on. It is possible that you will have to shut off the main water supply valve.
With the water off you can loosen the nut that holds the valve stem. Use two wrenches to perform this task. One on the valve itself and one on the nut. Loosen the nut and remove the valve stem assembly. At the end of the valve stem you will find a washer held in place by a screw.
What is the condition of the washer? Grooved, partially disintegrated? Mostly disintegrated? The washer should be replaced. At this point in time you should also check the seat, see Step Three for information on making sure the seat is in good shape.
Purchasing Washers
The main challenge now will be finding a washer that is the same size as the one you have. You can buy specific sizes or packages that contain multiple sizes. Remove the washer using a screwdriver and find one that matches. Sometimes the screw holding the washer in place also needs to be replaced. Many washer kits come with new screws. Screw the washer in place and then reassemble the valve. That should solve the problem. Turn the water back on and see if your water shut off valve works.
Fixing Valve Seats
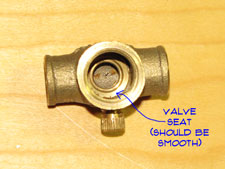 The valve seat is a flat machined area in the valve that the washer presses against when closed. If this area is not smooth or it is pitted, the valve will allow water to go through even when the washer is new.
Examine the seat and see if it is smooth. Since the seat is part of the main housing of the valve you are left with two choices if it is bad.
The first would be to replace the valve. For shut off valves at your fixtures this may not be too much trouble. See Step Four for instructions. For other valves that may be soldered into place this could be a lot more work.
They do make valve seat dressing tools that can be used to get the valve seat smooth again. You can try this if the valve is too much trouble to replace. The dressing tool needs to have a cutting head that matches the size of your valve.
Follow the instructions for the tool you purchased and dress in the seat. Install a new washer on the valve stem. After that you can assemble the valve and turn on the water. Hopefully your water shut off valve works as intended and shuts the water off.
Summary
All valve have washers in them. Some have more than others. Replacing the washers is an option when a valve starts to leak.
How To Fix a Broken Pipe
Do you need to learn how to fix a broken pipe? Most every home has two kinds of pipe, water supply lines and drains. These pipes can be made of many different materials.
Common problems with pipes are leaks, clogs and problems with valves.