 Bigger cracks take a little more effort to deal with. Are all cracks bad? A big crack in your drywall is bad.
Got another drywall problem? See 'Drywall Repair' for a listing of drywall topics and 'Drywall Patching' for information about fixing drywall.
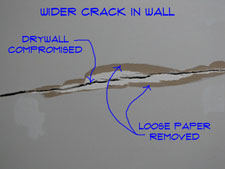
You want to remove any loose paper and gypsum from the crack. Use a utility knife or a scraper to clean out the debris.
It is a good idea to fasten the drywall with some screws. Try to locate the studs and run some screws into them on either side of the crack. This will stabilize the drywall and hopefully keep it from cracking again.
Set the screws so that they are sunken into the drywall. Not so far that it breaks the paper, but far enough so that the mud will 'key' into the indentation. Drywall screw guns have a depth gauge for this. Using a battery drill will work, but you have to use a light touch. Ease the screw in and pull back just as it starts into the paper.
How wide is the crack? Is there a gap? For cracks that have a separation between the two sides you should pre fill them with drywall compound. These would be cracks where, there is clearly a separation.
Use a knife that is wider than the crack. With stiff drywall compound (right out of the pail without any water added), pack some mud into the crack. Drag the knife lengthwise with the crack, removing the excess mud. You should keep the knife tight to the flat portion of the wall. Check and make sure you have filled the crack completely. Add some mud and drag it again, when you see voids.
Now put down the knife and step back from the crack. Let the mud dry before you try and tape it. At this point the crack is ready for the mud and tape. You have a few steps to go for this drywall crack repair. Don't despair, others have survived and not been seriously damaged.
Fixing Minor Drywall Cracks
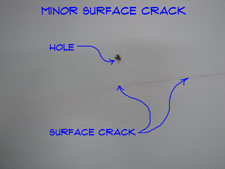
A minor crack can be fixed with spackling, once you have cleared away the loose material.
Examine the crack. Is it just a hairline crack? Take something and dig into the crack a little bit. You probably won't believe this, but the tool I like for this job is the sharp point of a bottle opener. When you dig a small groove into the crack does it appear that the paper below is still intact? Yes, that's good, this won't be that hard.
Use something, like the 'bottle opener', to dig out the crack. You want to dig out the loose material and create a groove to accept some new mud or compound. Dig it out the entire length.
Be careful you don't want to make the situation worse. Make sure you have all the loose material removed. Additionally, you want to have a place for the mud to 'key' into (it's an old plastering term). The more area the mud has to stick to, the better.
Now all you have to do is fill the crack with compound or spackling. Use a knife that is wider than the crack. Pull the mud tight against the flat surface of the wall on either side of the crack. It will take two or three applications to get a smooth surface. Use a sanding sponge to lightly sand the area after each coat. For additional information go to the article 'How to Spackle Drywall'.
Taping and Mudding Drywall Cracks
Taping and mudding a drywall crack will involve a few steps. You will need to let the mud dry between each application.
The following is the steps you need to follow to tape and finish the crack. For complete instruction of drywall finishing, see the article 'Taping and Mudding Drywall'.
Applying the Drywall Tape
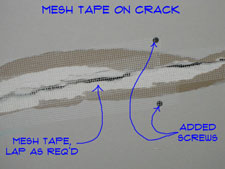
You can use paper drywall tape or fiberglass mesh tape to repair the crack. Mesh tape will save a step, allowing you to coat it immediately after the tape is installed.
Make sure you completely cover the crack and have the tap onto solid wall surface. This may mean that you have more than one width of tape. If you use paper tape, make sure you have compound between the layers of tape.
Coating the Crack With Compound
 You will likely have to apply two coats of compound and a skim coat to get a nice finish. Lightly sand the high spots down between each coat.
Do not try to do too much with each pass. The first coat will be the heaviest. You want to completely cover the tape and feather the edges toward the flat surface of the wall.
Allow the drywall mud to completely dry before you apply another coat of mud. Skim the repair with a wide knife on the third pass to eliminate in hollow spots and tool marks left from the previous passes. See the article 'Taping and Mudding Drywall', fior additional instructions.
Sanding and Painting
Sand the repair lightly until you have a smooth surface suitable for paint. Paint the wall and your crack is gone.