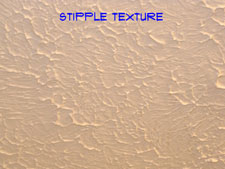
 Stipple texture is recoginized by it's pronounced raised points that can resemble tiny mountain ranges. Actually, in the last few decades this type of texture has been toned down quite a bit. Instead of the heavy looking stalagtite typs points, a much flatter, subtle looking texture is preferred.
Due to this feature it is primarily used on ceilings. A close cousin is "Knock Down Texture", this texture is first stippled and then the points are flattened. See the article "Patching Drywall" for information on fixing the drywall prior to repairing the texture.
This article covers how to patch a texture ceiling that is already installed. The problem is, that to match the texture, you need to use the same techniques that the original installers used.
Variations in Texture
Whether the stipple texture is heavy or light, the methods for installing it are the same. The texture is applied by rolling or spraying drywall compound onto the ceiling. The pattern is created by 'stopmping' the ceiling with a round or oval texture brush. The indectations and raised portions are created by the brush.
Stipple drywall texture can range from very light, usually done with a sprayer, to heavy. You want to thin the the mud accordingly. For a heavy stipple the mud should be stiff but workable.
For a very thin texture the mud might be the consistency of a heavy paint. The pattern is also important. You may not have a brush that matches the one used.
The thicker the mud, the more pronounced and sharper looking the stipple will be. You may need to experiment with the thickness to get a stipple similar to the one you have currently.
Finding a Texture Brush
The two common ones are round and oval. You can buy them at a home supply store. A texture brush and be found near the drywall supplies. They are around ten dollars. The have a threaded fitting in them so that any broom handle or painting extension stick will work.
For a very small patch it may be possible to use a brush that you already have, even a paint brush. However, it will take some experimenting to get the pattern to look the same.
Patching Stipple Texture
Mixing the Mud
The thicknes of the mud will determine how sharp or flat the pattern looks. Start with thicker mud and keep adding water until you have the consistency that will create the correct pattern.
Installing the Patch
Roll the drywall compound onto the area that needs to be patched. Roll the wet mud onto the existing texture by a couple of inches. The stippling is where you tap or 'stomp', as it is called in the industry, the brush into the wet mud. You may have to experiment with how vigorous the 'stomping' is, again this is to get the pattern you want. The bristles of the brush are kept perpendicular to the drywall and when you pull the brush away it leaves a stipple.
Play with it a little bit until you get your stipple drywall texture right. Blend the texture into the existing edges. Normally you would want to rotate the brush in your hand as you stomp it, this keeps the pattern as random as possible
Step back, how does it look? If you are satisfied, let it dry and paint the area. Not satisfied. Scrape it off while it is still wet and try again. No shame in that. You will probably never find the guy that did it the first time. Even if you did he probably could not exactly match his own work. Texturing drywall is very common you will be glad over time the you are able to install a stippled texture when you need to.
Summary
As you can see from the above, matching an existing texture as a trial and error process. With a little experimentation and practice you should be able to get the patch to look the same as your existing ceiling. You should paint the entire ceiling after the patch has dried. This will help the texture to blend.