 Installing extension springs will be easier if you were able to keep the cable threaded and hanging to the side? Yes, well now you may need to get someone to give you a hand. One person to hold the spring and another to lift and hold the cable assembly. Attach the spring to the hook or clip at the hanger bracket and then lift the spring and the cables up to meet each other.
For related information, see the articles 'Troubleshooting Garage Door Problems' and 'Fixing Garaged Door Openers'.
Carefully put the clevis on the end of the spring and bolt the clevis to the pulley. Do you have to stretch the spring to get them to connect? You may have to move the hook that holds the cable on the bracket back a notch or two. The Spring should be completely relaxed when the door is up all the way. Repeat this process for the other spring.
Installing Extension Springs - The Safety Cable
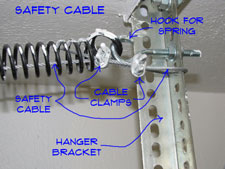
Next you need to install the safety cable. You may have gotten a new set of these with your springs. The safety cable attaches to the bracket at the door head, probably through a hook and cable clamp. There may be a guide hole on the clevis. Thread the cable through the guide hole and then through the spring. The cable then attaches to the hanging bracket at the end of the track. It does not need to be tight just snug so it does not tangle. Repeat this process for the other spring. When you get this far, you're almost done replacing garage door springs.
 With both springs installed you can release the clamps and slowly lower the door. Make sure the pulleys and cables are moving in the right way and do not jump off one or both of the pulleys. Try the door a couple of times. Is it working? Great you are done replacing garage door springs. Is it working but needs adjusting? See the article 'Adjusting Garage Door Springs' for instructions. Did the cables pop off and need to be re-threaded? Then read on, hopefully you took those pictures. Replacing garage door springs is easier with pictures.
Threading the Cable
 If the cabling pulled off and needs threading follow these steps. It is still a good idea to get help. Someone to hold the spring until everything is threaded. First attach the clevis and the pulley to one end of the spring. Use the bolt you took out and two wrenches to tighten it up. Next you will want to attach the one end of the spring to the hook on the hanging bracket. If you had a hook or a bracket you should have been able to leave it in place.
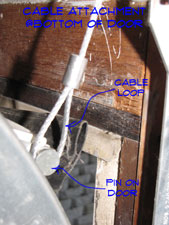
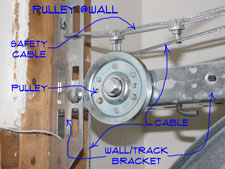
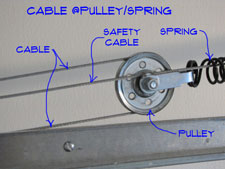
 Have your partner hold the spring in its approximate location. There is a loop on the end of the cable that hooks to the pin on the bottom of the garage door. The cable next goes to the pulley that is attached to the bracket on the wall. The cable threads to the inside of the pulley. Look at the pictures. The new box for the springs should have a generic diagram. Pictures of your installation would be better. The cable now goes around the pulley at the end of the spring, through the clevis. Next it attaches to the hook at the bracket that is attached to the overhead track. The hook location may need to be adjusted. Don't give up your almost done replacing garage door springs.
You may have had to loosen the clamp on the cable at the hook. Tighten the cable back up and set the hook so that the spring is elevated, but not in tension. Install the safety cables (go back four paragraphs, too much repetition). Repeat the process for the other spring. With everything hooked up carefully lower the door and watch that the cables are staying in place. Does the door close? Yes, good job, now you are done replacing garage door springs. Take a look at Adjusting Garage Door Springs, if your door needs adjustment (the link is three paragraphs back). ,if the door is not closing quite right.

