Search
Interior Doors
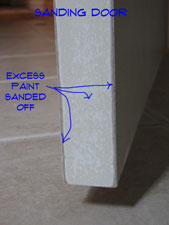
How To Plane a Door
 Most interior doors are made of wood or composite material. Planing wooden doors is one option for fixing a door that sticks. For minor adjustments you can sand the edge of the door.
You can usually tell from the scuff marks on the edge of the door where it is sticking at. Try sanding the spots until the door closes without too much friction. If you sand through to bare wood you will need to touch up the paint or varnish. It may take a little elbow grease to sand off enough material to matter.
For related information see, 'Troubleshooting Door Problems', 'How To Adjust Interior Doors' and 'Adjusting Exterior Doors'.
I do not recommend trying to plane the door unless you have some experience working with wood planes and doors. One reason is that unless the door is solid wood, it is probably made of a composite material. Masonite, plastic and mdf do not plane well at all. The other reason is that prehung doors should not need to be planed, the doors are correctly sized for the openings. It is more likely that it is sagging and needs to be adjusted.
If after adjusting and sanding, the door still sticks you can try running a couple of square drive trim screws (2 1/4” Screws should be long enough) through the jamb and into the framing. Do this at the location where the door is sticking. You may be able to draw the jamb in enough to relieve the pressure. Hopefully you have been able to get the door working freely for this repair on a prehung interior door.
Planing a door along with sanding may be needed if the door swells and will not close. However, this should be done cautiously, since taking too much off the edge of the door can leave gaps when the humidity is lower.
You can usually tell from the scuff marks on the edge of the door where it is sticking at. Try sanding the spots until the door closes without too much friction. If you sand through to bare wood you will need to touch up the paint or varnish. It may take a little elbow grease to sand off enough material to matter.
Do not try planing the door unless you have some experience working with wood planes and doors. It is easy to damage the door by taking off too much material. Make sure the door is not out of adjustment first. See the article 'Adjusting Exterior Doors' for more information.
If after adjusting and sanding, the door still sticks you can try running a couple of square drive trim screws (2 1/4” Screws should be long enough) through the jamb and into the framing. Do this at the location where the door is sticking. You may be able to draw the jamb in enough to relieve the pressure.
Adjusting Interior Doors
 Adjusting interior doors is something that need to be done periodically. The weight of the door pulls on the hinges and causes them to get out of alignment over time. Fortunately, adjusting the door is not too hard and only requires a few tools.
Not sure if this is your problem? See the article, 'Troubleshooting Door Problems' for a complete listing of all the door topics.
Inspecting a Door
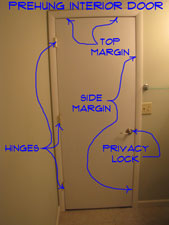
The first thing to do is look at the door from the inside when it is closed. There should be an even gap across the top and down the latch side. This gap occurs between the door and the frame or jamb. It should be about an eighth of an inch and be consistent.
If the door is tight against the frame at the top and there is a gap at the bottom, the door is sagging. If the door is hitting the floor, it will still be indicated in the margin along the latch side. Is the gap wider at the bottom and narrower at the top? Yes, then the door is sagging.
Tightening a Top Hinge
Open the door back up and remove the two inner screws for the top hinge. How long are they? An inch or less? This means that the hinge is only being supported by the door jamb itself, not the framing lumber for the wall. Are the screws long, say 2 ½ to 3 inches. That's good, all you will need to do is tighten them up. This prehung interior door repair could be that easy.
More is not better in this situation. If you over tighten, the door will bind in another direction, meaning you will continue to need a prehung interior door repair. Tighten until the margins are even and the door closes easily and then stop. With the long screws in place you may have to snug them a little from time to time. Five minutes now that you know how. Door closes, Great! Go to the next project on your list.
If you have long screws, make sure the heads are not stripped. For short screws you need to obtain some 3” number 8 screws. Square or Torx drive are better, but phillips head will work. Install the long screws, angling them slightly toward the center of the jamb. Snug them up and then check the margins again. Still sagging? Tighten them a quarter turn at a time until the margins are even and the door closes properly.
Summary
The top hinge is the key to most door problems. Getting the door adjusted properly will solve many of the issues that you have.
Interior Door Problems
Is the door hard to close or open. Try to determine where the friction is occurring. There are two spots that take the prize most of the time: (1) The upper corner on the latch side of the door (the side with the door knob). (2) The bottom of the door, again on the latch side. Both of these conditions indicate that the door is sagging. Over time the weight of the door pulls on the top hinge and loosens it up. See Step Two below for instructions on tightening the top hinge and checking the door for alignment. This is a very common prehung interior door repair problem.
Is the door hard to move even when it is not going into the frame? Are the hinges squeaking or making noise? The hinges may be binding up. See Step Three for instructions on lubricating or replacing hinges.
Do you think the door is swelling? This is only going to be true if it is an all wood door and it is not sealed very well. Check the margins first before you start sanding or planing a door. See Step Five for instructions on sanding or planing a wood door.
How To Fix Swinging Doors
 Do you have prehung interior doors? Are they in need of repair? Interior doors are used for bedrooms, bathrooms, closets and any other rooms that require a level of privacy. Generally they have a door knob that can either have a locking or passage function. Doors also help with sound transmission in the home. It's great when the kids can shut the door and you don't have to listen to their music.
Not sure if this is your problem? See the article 'Troubleshooting Door Problems' for all of the door topics. Working on an exterior door? See the article, 'Fixing Exterior Doors' for more information.
This article will discuss some common problems that occur with prehung interior doors. We are going to focus on the operational problems that can arise. Visually, you may need to paint or caulk some items that need attention.
You want your door to open and close correctly and the locks to provide privacy. These features can be addressed without replacing the door. Read on and evaluate what you need to do, to start repairing your prehung interior doors.
Repairing Prehung Interior Doors - Information
What Can You Save?
That depends on whether you repair the door or replace it. Often, people will equate repairing prehung interior doors with door replacement. A decent off the shelf prehung door will run from $50 to $100. Solid wood or high end doors can run a lot more. It will cost another $100 to $200 to have it installed, assuming there are no problems.
You may be fortunate and find a carpenter that will repair the door and be honest with you. Minimum it will involve a service call, around $50 plus any parts. This would be to adjust the door or lock set. You will need to be the judge on whether or not you want to be sold a new door. So you could save from $50 to $450. The lower figure is for something that might take you fifteen minutes to accomplish.
How Hard Could It Be?
Working on prehung interior doors is not that difficult. Take your time and be patient.
Check the Simple Things!
Over time doors get out of adjustment, this will cause them to sag and not close correctly. The common culprit is the top hinge. Check the adjustment on the door before you do anything. The alignment on the strike plate can also cause the lock not to work.
What Can Go Wrong?
Worst case, you take the door out and cannot get it put back in. Your prehung interior door repair problem has escalated. If you take the door off and can't get it re-installed you will have to put something up temporarily. You can also make things worse if you start adjusting the door the wrong way. A sticking door could turn into a door that won't close at all. Make sure you understand what you are trying to accomplish before you do anything.
Repairing Prehung Interior Doors - The Steps Involved
Adjusting Interior Doors - Most of the problems you will have with a door are related to adjustments. The alignment of the door in the opening and the alignment to the hardware is very important. This step covers where adjustments can be made.
Problems With Hinges - Hinges can start to make noise and in extreme cases seize up. This step covers lubricating and replacing hinges that are causing trouble.
Troubleshooting Door Locks - The door lock and door strike need to work together. Adjusting a replacing the hardware are options that this step covers.
Sanding and Planing a Door - When adjustments won't work, you may need to sand or plane the door.
Installing Hardware for Pocket Doors
The problem you have at this point is the portion of the track that is inside the wall. You will not be able to reach the screws that are inside of the pocket. No, the pocket door kits that you buy, don't have a solution for this problem.
For additional information you can see the articles, 'Replacing Pocket Door Rollers', 'Removing a Pocket Door', 'Pocket Door Adjustment', 'Pocket Door Guides' and 'Troubleshooting Pocket Doors' for additional information.
Types of Hardware Kits
Pocket door kits vary from just hardware kits to complete kits that include the frame material. Kit as the name implies means a collection of parts. A kit for the frame is not assembled and has to be put together. A hardware kit should include a new track and rollers along with stops and guides.
Before you decide to install a pocket door kit, you want to make sure that you cannot repair your pocket door. A big problem with pocket doors is stuck or noisy rollers. See the article 'Lubricating Pocket Door Rollers' for information getting the pocket door to work smoothly. See the article 'Troubleshooting Pocket Doors' for a listing of all the repair topics for pocket doors.
Pocket Door Hardware Kits
The rollers are the main moving part on a pocket door. Over time, the rollers and seize up or get noisy. Replacing them is an option. You can purchase a kit that includes just the roller assemblies and hangers. There will normally be two rollers and two hangers in a kit of this type.
There are some things to be aware of when you go to replace the rollers.
First, the rollers and the hangers are made to work together and they are seldom interchangeable. The hangers are the part that attached to the top of the door. The hangers have a retention clip that hold the hanger onto the bolt for the roller assembly. If replace the rollers, you will also have to replace the hangers. This will involve taking the door off.
The other issue is that the rollers will need to match the track. Different tracks will take different types of rollers. Unfortunately, there is no standardization in pocket door hardware. If you get new rollers, they will need to be the same size and configuration as the old ones.
Pocket Door Hardware and Track Kits
Getting a kit that includes both the roller hanger assemblies and a new track is the safest way to make sure that everything matches. The length of the track needs to be approximately twice as long as the door opening the you have (less a relief space to get the rollers in and out).
The draw back is that you will have to remove some drywall to install the track. You cannot get at the screws that hold the track in place on the inside of the pocket. This is not the end of the world, but it will involve some drywall patching and painting.
Complete Pocket Door Kits
A complete pocket door kit will include, new rollers, hangers, track, framing members and a header assembly. For what you get these kits are reasonably priced and come in common door sizes. See the article 'Pocket Door Sizes' for more information on the sizes available. Double pocket doors are also possible, thus increasing the size options.
Some kits are adjustable, allowing the same kit to be used for more than one door size. The main item that needs to change is the track and header assembly. These can be cut to the desired length to fit your door opening.
It is not easy to retrofit a pocket door into an existing home. You need an opening framed into the wall that is twice the size of the door. The wall itself needs to be more than twice the length of the door to allow for the opening and the jambs.
In addition, the area where the pocket goes cannot have plumbing, electrical or heating runs in it. The door will fill the pocket completely.
If you are remodeling and don't mind opening up a few walls, then installing a complete pocket door kit is an option.
Purchasing a Hardware Kit
Purchasing a pocket door kit does not need to be difficult. The hardest purchase will be replacement hardware for an existing door. New rollers will need to match the track that is alread installed on the door. When you are replacing everything, or installing a new pocket door, getting the correct size is the main concern.
Many times a pocket door can be repaired without replacing the hardware. See the article 'Troubleshooting Pocket Doors' for more information.
Pocket Door Kit Manufacturers
There are several manufacturers that make pocket door hardware and kits. Different manufactureres have different styles of rollers and track. When you are trying to match the rollers to the track it best to find out the manufacturer's name.
The likely place to find this information will be on the rollers. The name of the manufacturer and the model number should be stamped on the roller assembly.
To get the rollers out to examine them you will need to take the door off. See the article 'Removing a Pocket Door' for instructions on taking the door down.
Once you have the correct manufacturer and model number, you can search for the correct replacement parts.
Getting the Right Type of Kit
Determine your needs based on the parts that you need to replace. See the information above that discusses different types of kits. If you are installing a new pocket door, you need a complete kit that includes the framing, track and hardware.
Getting the Right Size Kit
A kit that is 72" will be long enough for most doors. You need a 72" track for a 36" door. Simple math, the track needs to be twice as long as the door opening. You may be able to purchase just the rollers if you can find ones that match. The rollers fit the track and are not interchangeable. Changing the rollers is a lot easier than replacing the track.
Locating and Purchasing Pocket Door Kits
Some hardware and home supply stores have kits in stock. You can also search online. Try 'Pocket Door Hardware Kits' for a search term. You will find that prices vary dramatically. Some suppliers sell hardware that is suitable for commercial doors and they can get quite expensive.
Residential grade pocket door kits should run between $25 and $75. A kit that includes the frame may run as much as $125. Stanley and Johnson Products make some reasonably priced residential grade kits. These kits are good for doors that weigh up to around a hundred pounds. It is unlikely you have a door heavier than that, unless you have a solid core door.
Pocket Door Hardware Items
A standard pocket door kit should include a new set of rollers. The rollers are and assembly that also includes the hanging bolts for the door. The rollers run inside the track at the top of the door. You will get two roller assemblies for each door leaf that you have.
Along with the rollers there should be two matching hangers or brackets. The hangers go on top of the door. The hangers are made to attach to the hanging bolts and they carry the weight of the door.
Other items will include the pocket door guides and a bumper along with misc. screws that you will need to install the items.
Installing Pocket Door Rollers
Pocket door rollers are fairly easy to install. The end of the track should be cut short at the strike side door jamb. Look up at the corner of the door on the strike side of the door to locate this spot. To remove the rollers, you need to remove the pocket door. This is a little tricky to do. See the articles 'Removing a Pocket Door' and 'Putting a Pocket Door Back On Track' for instructions on what to do.
For a complete discussion on installing pocket door rollers, see the article on 'Replacing Pocket Door Rollers'.
Installing Pocket Door Hangers
Pocket door hangers are part of the assembly that includes the rollers at the top of the door. The hanger includes a bolt that attaches to the roller carriage. The hanger has an adjustment nut that aligns the door in the opening. The attachment plate is screwed into the top of the door.
Most pocket doors have two hangers. In order to work on them or replace them, you have to remove the door. See the articles 'Removing a Pocket Door' and 'Putting a Pocket Door Back On Track' for instructions on what to do.
For instructions on how to replace the hangers, see the article 'Pocket Door Hangers'.
Installing Pocket Door Guides
Pocket door guides go on the bottom of the door jamb on the pocket side of the door. They can be one or two pieces that are attached with screws.
The pocket door guides keep the door centered in the pocket. They help it to stay aligned as it moves in the opening. You want to set them so that there is no more than a 1/16" between the door and the guide when the door is centered in the opening.
The guides have a slotted hole in them that allows for them to be adjusted. The article 'Pocket Door Guides' provides information on setting them properly.
Installing a Pocket Door Bumper
For an existing pocket door it could be a problem to change this piece of hardware. The bumper goes on the jamb stud that is at the far end of the pocket. The bumper's purpose is to stop the door from going to far into the pocket.
If the wall is opened up you can change the bumper. If the jamb stud was set correctly the bumper should stop the door at the edge of the jamb face on the pocket side of the door. If it hangs out or goes in to far some trimming or shimming may be required.
Pocket Door Track
Replacing pocket door track on an existing door can be difficult. Getting at the track inside of the pocket is the biggest challenge you will face.
Before you tackle a project like this, you might want to see if you can repair your pocket door. See 'Troubleshooting Pocket Doors' for all of the repair topics.
There are only two to four screws that hold it in place. Yet, if you cannot reach them they are an important issue. Even if you opt to tear out the old track with a pry bar, you will not be able to get the screws installed on the new track. There are some options but they involve some work. See the article 'Replacing Pocket Door Track' for instructions on what to do.