Search
Pocket Doors
Installing a Pocket Door
This article is about how to install a pocket door. It is not common to install a pocket door in an existing home, they require framing in the walls to make them work.
You may not need to replace your pocket door, see the articles 'How To Adjust a Pocket Door', 'Fixing a Pocket Door Off the Track' and 'Troubleshooting Pocket Door Problems'.
Installing a pocket door frame can only be done when you are remodeling or during new construction. The wall needs to be open at the door opening and at the pocket location.
In addition, you cannot have electrical, plumbing or heating lines at this location. If there are any at this location, they will need to be moved or eliminated.
The following is an overview of the steps involved in installing a pocket door frame.
Pocket Door Sizes
A pocket door can be any standard door size. This statement is made with the understanding that the pocket door hardware must allow for the door size used.
There are several complete pocket door kits that allow for all of the door sizes between 2' 0" and 3' 0". The adjustment to the sizes is made by cutting the top head rail and track. Most of the time, pocket doors are used in rooms that people go in and out of. Therefore, it is unlikely that you will have a pocket door that is less than 2' 0".
Some common pocket door sizes are:
- 2' 0" - 24" Single Leaf
- 2' 6" - 30" Single Leaf
- 2' 8" - 32" Single Leaf
- 3' 0" - 36" Single Leaf
- 4' 0" - 48" Double 24" Leaves
- 5' 0" - 60" Double 30" Leaves
- 6' 0" - 72" Double 36" Leaves
Something to keep in mind is that you need the the same amount of room inside of the wall as the door size. Things such as wiring and plumbing cannot be installed in the area where the pocket goes.
Framing a Pocket Door Opening
The first requirement for a pocket door is a rough opening in the wall the will allow for a pocket door. This opening is usually slightly more than twice the width of the door with allowances made for jamb material. When the wall is being built the layout of the wall will need to be coordinated with the instructions in the pocket door kit.
A header needs to be installed that will support the pocket door track. Different kits and pocket door hardware have different height requirements. Consult the instructions for the correct framing height.
Installing the Head Rail
The head rail in a kit is made up of the pocket door track and some support framing. The support framing provides a place to fasten the vertical framing members. The jamb material for the head of the door is also provided.
The head rail assembly will fasten to the frame work on each end via a provided clip. Check the instructions that were provided with the kit for locating the rail. Usually, the head rail is not fastened to the header. This is done so that any sagging in the header will not be transferred to the door framing.
Installing the Pocket Door Framing
Most pocket door kits use four or six vertical framing members. These are usually metal sleeves with wood inserts. The wood inserts allow for the fastening of the drywall.
The framing members are attached to the floor via metal clips. The clips will need to be placed at the correct locations per the instructions. At the top the framing members are screwed to the head rail at the prescribed framing member.
Installing Pocket Door Jambs
After the framing is installed the remaining work is done after the drywall is installed and the painting is done. The jambs would be the next step.
Pocket door jambs are similar to the jambs on a regular door with one key difference. The jambs at the head and pocket side of the door are split. This provides an area for the door to slide back and forth.
The jamb at the head of the door is usually provided with the head rail. this provides a guide for installing the other jamb members. The jambs need to be installed and shimmed to the proper location in relationship to the pocket door.
Pocket Door Trim
After the jambs are installed the trim can be put in place. The only difference between pocket door trim an normal trim is the fasteners. On the head and pocket side of the door the fasteners cannot be longer that the combination of the framing members, drywall and trim. A longer fastener will protrude inside the pocket and damage the door.
Angling the nails can help, but extreme caution should be used. You only have about 1 1/2" to work with to fasten the trim. Gluing can minimize the number of fasteners needed.
Hanging the Pocket Door
There are two hangers or brackets that need to be installed on the top of the door. They are installed with screws and should be centered on the top of the door. The hangers should be located about four inches from each end of the top of the door.
Install the hanger at the back of the door first (the portion of the door that goes into the pocket). Release the retention spring and attach the door to the hanger. After that, align the front hanger with the front roller and attach it to the bolt on the roller.
Installing a Pocket Door Frame - Conclusion
For related topics, see the articles 'How To Adjust a Pocket Door', 'Fixing a Pocket Door Off the Track' and 'Troubleshooting Pocket Door Problems'.
Replacing a locks on a pocket door should not have taken you too long, once you found a replacement. We hope this article helped to get your pocket door lock installed correctly.
Installing Hardware for Pocket Doors
The problem you have at this point is the portion of the track that is inside the wall. You will not be able to reach the screws that are inside of the pocket. No, the pocket door kits that you buy, don't have a solution for this problem.
For additional information you can see the articles, 'Replacing Pocket Door Rollers', 'Removing a Pocket Door', 'Pocket Door Adjustment', 'Pocket Door Guides' and 'Troubleshooting Pocket Doors' for additional information.
Types of Hardware Kits
Pocket door kits vary from just hardware kits to complete kits that include the frame material. Kit as the name implies means a collection of parts. A kit for the frame is not assembled and has to be put together. A hardware kit should include a new track and rollers along with stops and guides.
Before you decide to install a pocket door kit, you want to make sure that you cannot repair your pocket door. A big problem with pocket doors is stuck or noisy rollers. See the article 'Lubricating Pocket Door Rollers' for information getting the pocket door to work smoothly. See the article 'Troubleshooting Pocket Doors' for a listing of all the repair topics for pocket doors.
Pocket Door Hardware Kits
The rollers are the main moving part on a pocket door. Over time, the rollers and seize up or get noisy. Replacing them is an option. You can purchase a kit that includes just the roller assemblies and hangers. There will normally be two rollers and two hangers in a kit of this type.
There are some things to be aware of when you go to replace the rollers.
First, the rollers and the hangers are made to work together and they are seldom interchangeable. The hangers are the part that attached to the top of the door. The hangers have a retention clip that hold the hanger onto the bolt for the roller assembly. If replace the rollers, you will also have to replace the hangers. This will involve taking the door off.
The other issue is that the rollers will need to match the track. Different tracks will take different types of rollers. Unfortunately, there is no standardization in pocket door hardware. If you get new rollers, they will need to be the same size and configuration as the old ones.
Pocket Door Hardware and Track Kits
Getting a kit that includes both the roller hanger assemblies and a new track is the safest way to make sure that everything matches. The length of the track needs to be approximately twice as long as the door opening the you have (less a relief space to get the rollers in and out).
The draw back is that you will have to remove some drywall to install the track. You cannot get at the screws that hold the track in place on the inside of the pocket. This is not the end of the world, but it will involve some drywall patching and painting.
Complete Pocket Door Kits
A complete pocket door kit will include, new rollers, hangers, track, framing members and a header assembly. For what you get these kits are reasonably priced and come in common door sizes. See the article 'Pocket Door Sizes' for more information on the sizes available. Double pocket doors are also possible, thus increasing the size options.
Some kits are adjustable, allowing the same kit to be used for more than one door size. The main item that needs to change is the track and header assembly. These can be cut to the desired length to fit your door opening.
It is not easy to retrofit a pocket door into an existing home. You need an opening framed into the wall that is twice the size of the door. The wall itself needs to be more than twice the length of the door to allow for the opening and the jambs.
In addition, the area where the pocket goes cannot have plumbing, electrical or heating runs in it. The door will fill the pocket completely.
If you are remodeling and don't mind opening up a few walls, then installing a complete pocket door kit is an option.
Purchasing a Hardware Kit
Purchasing a pocket door kit does not need to be difficult. The hardest purchase will be replacement hardware for an existing door. New rollers will need to match the track that is alread installed on the door. When you are replacing everything, or installing a new pocket door, getting the correct size is the main concern.
Many times a pocket door can be repaired without replacing the hardware. See the article 'Troubleshooting Pocket Doors' for more information.
Pocket Door Kit Manufacturers
There are several manufacturers that make pocket door hardware and kits. Different manufactureres have different styles of rollers and track. When you are trying to match the rollers to the track it best to find out the manufacturer's name.
The likely place to find this information will be on the rollers. The name of the manufacturer and the model number should be stamped on the roller assembly.
To get the rollers out to examine them you will need to take the door off. See the article 'Removing a Pocket Door' for instructions on taking the door down.
Once you have the correct manufacturer and model number, you can search for the correct replacement parts.
Getting the Right Type of Kit
Determine your needs based on the parts that you need to replace. See the information above that discusses different types of kits. If you are installing a new pocket door, you need a complete kit that includes the framing, track and hardware.
Getting the Right Size Kit
A kit that is 72" will be long enough for most doors. You need a 72" track for a 36" door. Simple math, the track needs to be twice as long as the door opening. You may be able to purchase just the rollers if you can find ones that match. The rollers fit the track and are not interchangeable. Changing the rollers is a lot easier than replacing the track.
Locating and Purchasing Pocket Door Kits
Some hardware and home supply stores have kits in stock. You can also search online. Try 'Pocket Door Hardware Kits' for a search term. You will find that prices vary dramatically. Some suppliers sell hardware that is suitable for commercial doors and they can get quite expensive.
Residential grade pocket door kits should run between $25 and $75. A kit that includes the frame may run as much as $125. Stanley and Johnson Products make some reasonably priced residential grade kits. These kits are good for doors that weigh up to around a hundred pounds. It is unlikely you have a door heavier than that, unless you have a solid core door.
Pocket Door Hardware Items
A standard pocket door kit should include a new set of rollers. The rollers are and assembly that also includes the hanging bolts for the door. The rollers run inside the track at the top of the door. You will get two roller assemblies for each door leaf that you have.
Along with the rollers there should be two matching hangers or brackets. The hangers go on top of the door. The hangers are made to attach to the hanging bolts and they carry the weight of the door.
Other items will include the pocket door guides and a bumper along with misc. screws that you will need to install the items.
Installing Pocket Door Rollers
Pocket door rollers are fairly easy to install. The end of the track should be cut short at the strike side door jamb. Look up at the corner of the door on the strike side of the door to locate this spot. To remove the rollers, you need to remove the pocket door. This is a little tricky to do. See the articles 'Removing a Pocket Door' and 'Putting a Pocket Door Back On Track' for instructions on what to do.
For a complete discussion on installing pocket door rollers, see the article on 'Replacing Pocket Door Rollers'.
Installing Pocket Door Hangers
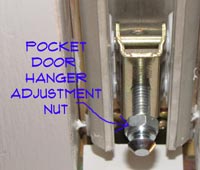
Pocket door hangers are part of the assembly that includes the rollers at the top of the door. The hanger includes a bolt that attaches to the roller carriage. The hanger has an adjustment nut that aligns the door in the opening. The attachment plate is screwed into the top of the door.
Most pocket doors have two hangers. In order to work on them or replace them, you have to remove the door. See the articles 'Removing a Pocket Door' and 'Putting a Pocket Door Back On Track' for instructions on what to do.
For instructions on how to replace the hangers, see the article 'Pocket Door Hangers'.
Installing Pocket Door Guides
Pocket door guides go on the bottom of the door jamb on the pocket side of the door. They can be one or two pieces that are attached with screws.
The pocket door guides keep the door centered in the pocket. They help it to stay aligned as it moves in the opening. You want to set them so that there is no more than a 1/16" between the door and the guide when the door is centered in the opening.
The guides have a slotted hole in them that allows for them to be adjusted. The article 'Pocket Door Guides' provides information on setting them properly.
Installing a Pocket Door Bumper
For an existing pocket door it could be a problem to change this piece of hardware. The bumper goes on the jamb stud that is at the far end of the pocket. The bumper's purpose is to stop the door from going to far into the pocket.
If the wall is opened up you can change the bumper. If the jamb stud was set correctly the bumper should stop the door at the edge of the jamb face on the pocket side of the door. If it hangs out or goes in to far some trimming or shimming may be required.
Pocket Door Track
Replacing pocket door track on an existing door can be difficult. Getting at the track inside of the pocket is the biggest challenge you will face.
Before you tackle a project like this, you might want to see if you can repair your pocket door. See 'Troubleshooting Pocket Doors' for all of the repair topics.
There are only two to four screws that hold it in place. Yet, if you cannot reach them they are an important issue. Even if you opt to tear out the old track with a pry bar, you will not be able to get the screws installed on the new track. There are some options but they involve some work. See the article 'Replacing Pocket Door Track' for instructions on what to do.
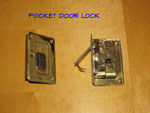
Pocket Door Lock Installation
 Replacing a pocket door latch is not too hard if you get the same size and style that you had before. Replacing the lock will consist of four steps. (1) Purchasing the new latch or lockset, (2) Removing the old latchset, (3) Changing the mortise in the door if required and (4) Installing the new pocket door latch.
Are you sure that you need to replace the lock? See the articles 'Adjusting Pocket Doors' and 'Troubleshooting Pocket Door Problems' for a listing of possible repairs that may solve your problem.
This repair should take less than an hour once you have the new door lock in hand.
Purchasing a Pocket Door Latch
You can find pocket door latches or locks on the internet and at home supply stores. They are about the same price as a conventional lockset.
There are not nearly as many options with pocket door locks as you have with regular swinging doors. You may find the selection and functionality somewhat limited.
When replacing the door lock, you need to get one that is the same size as the old one. There is not a lot of door left around the lock for the cover plates to seat on. A lock that is too small will not cover the mortise. It would be a good idea to take the old lock with you when you go shopping.
Removing the Old Lock
 A Pocket door lock is held together with screws. There are probably four screws that are toward the center of the door that hold the lock assembly to the door. Use a screwdriver to take these screws out. The entire assembly should slide out, once the screws are removed.
The three pieces are also held together with screws. It will be one or two on each side.
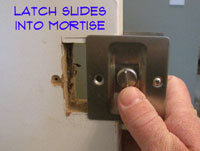
Preparing the Pocket Door for a New Latch
The new lock should have a template for the mortise. Check the old opening to make sure you don't have to trim it. Use a sharp chisel to trim it if necessary. After you're sure the opening is the right size you can install the lock. Slide the lock into place and install the screws.
You may have to chisel out the mortise for the strike plate. Mark the outline with a pencil and use the chisel to remove any wood that is in the way. Screw the strike plate in and check the door to make sure the lock is working. Adjust the door as needed.
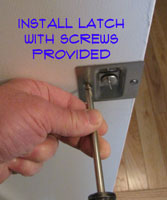
Installing the New Pocket Door Latch
 Dry fit the new lockset in the mortise to make sure that it fits correctly. If there are any interferences, chisel or file them away until the lock fits in place properly.
The lockset is made of three pieces. The center piece is the actual latch and can only be installed one way. You want to make sure that the latch comes out and goes down when the knob is turned. Use the thumbset to make sure you have it turned the right way.
 The thumbset should go on the side of the door that is inside of the room. Remove the screws and switch them around if they are the wrong way. The two outer plates are interchangeable, screw the lockset together with the thumbset facing into the room and the privacy function facing out.
Once you are sure that the pocket door latch if assembled correctly you can slide it into the mortise. Install the screws into the holes and then check the action.
Replacing a Pocket Door Latch - Summary
Replacing a locks on a pocket door should not have taken you too long, once you found a replacement. We hope this article helped to get your pocket door lock installed correctly. Still having problems?
Pocket Door Adjustment
 A common problem with pocket doors is difficulty getting the door to latch. The locksets for pocket doors are pretty sensitive and do not allow much of a margin for error. Pocket door adjustment is needed to correct height and alignment issues. When you are working on a latch, the height is a critical concern.
Not sure if this is your problem? See the articles, 'Troubleshooting Pocket Doors' and 'Pocket Door Off Track' for some common pocket door probems. For a discussion on common door problems, see 'Fixing Residential Doors'.
Troubleshooting Pocket Door Adjustment Problems
To adjust the latch, you need to get the height of the door lined up with the strike plate correctly. See next section for instructions.
When the catch won't engage it usually means that the strike plate and the catch are not aligned properly.
Bring the door as close as you can to the strike plate and work the lock to see whether the tongue on the catch is too high or too low. The catch acts like a hook to hold the door closed when it is engaged.
If your door is too low, possibly scraping the floor, you will need to raise it. You will need to be careful, too much change in the height of the door may cause the pocket door latch to not work.
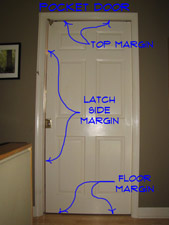
When the door has a gap along the side, the adjustments can get a little tricky. You need to understand how the door reacts when you raise or lower only one side. See the heading 'Adjusting Pocket Door Side Margins', below.
Pocket Door Height Adjustment
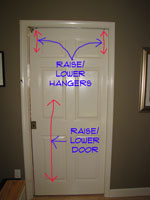 The way that a pocket door is installed allows for adjustments on the height. A standard hinged door cannot be adjusted this way.
You need a wrench to adjust the hangers on a pocket door. There is a relatively narrow space at the top of the door where the nut is on the hanger. Most pocket doors will have two hangers. See 'Pocket Door Wrenches' and 'Pocket Door Hangers' for additional information.
Turning the nut clockwise will raise the door and counterclockwise will lower it. When you are adjusting the height you want to turn each nut the same amount. Rasing one hanger more or less than the other one will cause the door to be crooked in the opening.
Turn each nut one full turn and check you height. Continue to raise or lower the door until the desired height is reached.
 Be careful when you raise or lower the door, it may affect the operation of the pocket door latch. Raising the door may seem like a logical choice when you add new flooring. However, raising it that much will likely cause the lockset to stop working. It is better to trim the door at the bottom, instead of trying to raise it.
Adjusting Pocket Door Side Margins
 The side adjustments on a pocket door work differently than you might think. If the gap in your door is not too bad, you are only going to want to adjust one of the hangers on the door, preferably the one farthest from the door latch. See 'Pocket Door Wrenches' and 'Pocket Door Hangers' for additional information.
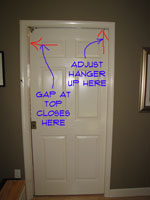
The gap along the side of the door is going to be at either the top or the bottom. I will describe this with words, but you want to look at the pictures to get a sense of what is happening.
 If the gap is at the top of the door, you want to raise the door at the hanger that is farthest away from the latchset. Use the pocket door wrench and turn it one quarter to one half turn at a time until the door is parallel with the jamb.
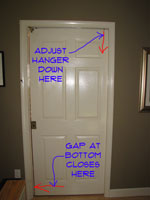
For a gap at the bottom of the door, you want to do the exact opposite. Lower the door at the hanger that is farthest away from the door latch. This will cause the bottom of the door to move toward the jamb, closing the gap. Turn it one quarter to one half turn at a time until it is aligned properly.
You may need to make some minor adjustments to the height of the door after you have corrected the margin. Check the operation of the lockset and adjust accordingly.
Pocket Door Adjustment Summary
Once your pocket door is adjusted properly, you want to make sure it is latching correctly. See the articles 'Troubleshooting Pocket Door Locks' and 'Pocket Door Guides' for instructions and information.
Adjusting a pocket door is not that difficult if you still have the wrench that came with the door. Once you understand how the door moves, adjustments are easy.