Search
Doors
Door Hinge Repair
 Door hinge repair is a common task for homeowners. The hinges support the weight of the door and give it a way to swing in and out of an opening. They are the main moving part of a door and do all the hard work. Hinges can wear out and will need attention. What can you do?
Not sure if this is your problem? See the article 'How To Fix a Door' for a complete listing of all the door related topics.
There are three main areas with door hinge repair. Lubricating, adjusting and replacing them are the options. These repairs get harder as they go. Lubricating a sticky or squeaky door hinge is the easiest job. Adjusting a hinge is also not that hard. Replacing hinges is a bit more work, but still not a major job.
Check out this information to see if this is something you want to take care of. You may be pleasantly surprised, it may only take a few minutes of your time.
Door Hinge Repair - Information
What Can You Save?
Lubricating squeaky or sticking door hinges and adjusting the door should run from $50 to $75. Replacing a set of hinges may run $100. It will be more if the hinges have to be fit to the door.
How Hard Could It Be?
Door hinge repairs are not too hard and usually only take a few minutes.
For and explanation of the terms in this section, see 'How to Use This Site'.
Check the Simple Things!
Lubricating the hinges is the easiest thing. Squeaky or sticking hinges can usually be taken care of by some oil.
What Can Go Wrong?
Be careful when using oil or graphite on a door hinge. Oil can leak and get on other surfaces. Graphite is a dry black powder that can stain walls and carpet. When adjusting a door hinge it is possible to make the situation worse, not better. A door that is too far out of adjustment will not close.
Troubleshooting Door Hinge Problems
Oiling or lubricating is the solution most of the time when it comes to troublesome hinges. The article 'Oiling Door Hinges' gives you instructions on what to do.
The hinges hold the door in the frame. Hinges that are not attached securely will allow the door to sag. The article 'Adjusting Door HInges' talked about how to correct this problem.
Hinges that are too discolored or too rusty may need to be replaced. The article 'Replacing Door Hinges' gave you instructions on what to do.
Are you all done with your door hinge repair? What did you have to do? Hopefully you were in the majority and all that was needed was some lubrication. A few minutes with the right oil and you have solved your problem. The next easiest door hinge repair involves adjusting the hinges. This is usually confined to the top hinge.
Were you left with the task of replacing your door hinges? This is a little more work, but not impossible to do. Hardest part is finding the right hinges. What are you going to do now? You could check your list and tackle another project.
Replacing Existing Door Hinges
 Replacing hinges is fairly easy. When you have three hinges, you can replace them one at a time without taking the door off.
Before you replace them, make sure that adjustment or lubrications won't fix the problem.
See the articles 'Adjusting an Interior Door' and 'Adjusting Exterior Doors' for information on adjusting the hinges without replacing them. Also see, 'Lubricating Door Hinges' to see if you can get them working again.
Make sure you have the same size hinges and style of hinges before you try to replace them. See the article 'Types of Door Hinges' for more information.
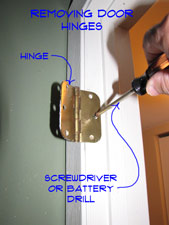
Remove the screws for one of the hinges on both the door and the frame. Turn the new hinge with the head of the pin turned up. Make sure the hinge folds together the same way as the door will close. Put the hinge in place and install the screws. When the wood is worn, you may need to use a larger diameter or longer screw.
Repeat this process for all three hinges, one at a time. For two hinges, the procedure is similar, except you may want to take the door down and replace the hinges in halves. One half attaches to the frame and then the other half to the door. Use the old hinges as a guide.
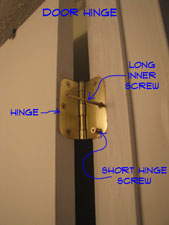
The top hinge needs slightly different treatment. You may or may not have found a long screw in the top hinge. The long screw is usually on an inner hole and goes through into the wood framing for the jamb. See Step Four for more information on the top hinge. You want to put a long screw in, regardless of whether the old hinge had one. The long screw will not come with the replacement hinges, you will have to purchase it separately. A 2 1/2" #7 or #8 shanked screw with a wood thread is ideal.
Door Hinge Installation Concerns
 What door hinge installation means should be clarified. Replacing exising hinges is one possibility and installing hinges on a replacement door slab is a different job.
Most new doors are sold in a pre-hung format. The hinges are installed at the factory when the door is assembled. When you replace a door slab in an existing frame, you may have to mortise the hinges into the door. This involves laying out and chiseling. A bit more work.
This article is focused on repair situations that involve a door hinge installation. Remodeling projects and home improvements may also involve door hinges. Can you replace door hinges in your home when you need to? The answer is yes. Even when you have to do some chiseling, the job is not that hard.
What Can You Save? - A new set of hinges will run between $10 and $30 for residential grade hinges. Spring loaded and decorator hinges will run more. Replacing a pair of same size hinges will run between $50 and $75. A custom installation where the door has to be taken down and mortised will run around $100 to $150.
How Hard Could It Be? - Replacing the same size hinges on an existing door is fairly easy and can take less than a half an hour. Installing new hinges or hinges that are a different size will require 'mortising' (chiseling) door and frame to get them to fit. For and explanation of the terms in this section, see 'How to Use This Site'.
Check the Simple Things! - Lubricating sticking or squeaky door hinges is the simplest thing. See the article 'Fixing Squeaky Door Hinges', for information.
What Can Go Wrong? -Hinges need to be oriented a certain way. Installing them incorrectly will cause the door not to work. Taking a door down and not completing the task will leave you with a big hole in your wall. This could be critical for an exterior or bathroom door. Hinges need to be aligned properly on both the door and frame. Even a small difference can make it difficult or impossible to install the door.
Mortising Door Hinges
Can you mortise a door frame with a chisel for a door hinge installation? Yes you can. Do you really want to? Probably not.
You may have the unfortunate situation of having to buy hinges that are a different size than the old ones. You may need to widen the mortise where the hinge is seated.
When you are engaged in a door hinge replacement project you want to maintain a point of reference on the door and the frame. Leave one side of the mortise for the hinges intact on both the door and the frame. Your best choice would be the top of the hinge.
Remove the old hinges and use a new hinge as a template. Hold the hinge snuggly against the mortise at the top of the old hinges. Take a sharp pencil and draw an outline of the hinge on the door frame. You will repeat this process for all the hinges, always keeping the hinge aligned with the top of the old location.
Setting the Top Door Hinge
 Most residential doors have two or three hinges. Does this mean that they have an equal share in the work? The answer to that question is No! The other hinges are there mostly to act as guides when the door opens. They keep it straight while it swings.
The top hinge carries the majority of the weight of the door. For a door hinge installation, you need to pay special attention to the top hinge. The door frame needs to be properly supported behind the top hinge. Most door manufacturers recommend that a long screw be used for the top hinge. This screw goes into the wood framework for the door.
Over time a door will start to sag. When the sagging gets bad enough the door won't close properly. When this happens, look to the top hinge first. A long screw back into the door jamb can work wonders for a sagging door.
For a door hinge installation, you want to make sure you install a long #8 screw in the top hinge. Usually 2 1/2" long will work. Go easy when you put this screw in, you can pull the door frame in too far. The long screw should go into one the inner holes on the hinge, to make sure it hits the stud for the jamb.
Summary
So how did your door hinge installation project go? Hopefully, you were able to find replacement hinges that were the same size and style as the ones you had. This makes the job a lot easier. Searching for exact matches can be hard when you have an old door. They can also get expensive.
Did you have to try to fit hinges that were a different size? You may have had to do a little chiseling to get the mortise to work. If you were careful this should have worked fine. Now that you are done with your door hinge installation project, you can think about other home repair jobs you have been putting off.
How To Fix a Sticking Door
 Before you consider this option make sure the door cannot be adjusted. See the article 'Adjusting Doors' for more information.
Correct Door Opening Sizes
Door frames are usually installed in nominal sizes in increments of 2". For residential doors this would be from about 1' 6” to 3' 0”. The opening of the door frame will usually be exactly that size, 36” for a 3' 0” Door.
The door slab will be slightly undersized to allow the door to go in and out of the opening. A 3' 0” door slab will be 35 3/4” or slightly less. This would always be true, unless the door frame was improperly installed.
Door Frame Options
Check the size of the opening. Is it less than an even size? Is the door too big for the opening? Not good news and some work to fix.
Two choices at this point. Cut the door down to fit the opening or move the door jamb to the proper size. We may only be talking about an eighth or a quarter of an inch. Unfortunately, it is an important fraction of an inch.
Sanding and Planing a Door
If the door is just slightly off, you may be able to sand or plane. Keep in mind that both of these options will ruin the finish on the door. Part of the repair will be fixing the finish.
See the article 'Sanding and Planing a Door' for information on removing small amounts from a door.
Moving the Door Frame
If you choose to move the frame, get ready for some work.
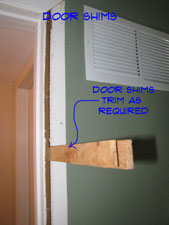
Use a flat pry bar and carefully remove the trim on both sides of the strike side of the door frame. You will find that there is a gap between the door jamb and the framing for the wall. There are shims that keep the two spaced. Quickest easiest thing to do is use a reciprocating saw with a combination metal/wood cutting blade to cut out the shims.
With the shims gone, take a block of wood and a hammer and drive the door jamb toward the wall framing the needed distance. Make sure you take down anything that can be damaged or fall from the wall before you start pounding. Nothing worse than pounding on a wall and you hear your antique clock crashing to the floor on the opposite side.
Use the door to check your margins. With the door installed on the hinges, close it and adjust the jamb so that you have an even margin, an eighth of an inch or slightly more, along the strike side of the jamb. Use shims to hold the door the proper distance from the framing.
Re-Installing the Frame
I like square drive trim screws for door jambs, especially repair projects. Very positive attachment and eliminates a lot of pounding. Use 2 1/4” square drive trim screws to fasten the jamb. Go easy with a battery drill and draw them up until they set.
Sometimes they will pull the jamb in too far. Back them out, move the shim in a little and try again. Check the door and make sure it closes properly before you install the trim.
Clean up the trim and install it with finish nails or trim screws. Touch up the paint or stain as needed. Big job, were you successful? Find someone to pat you on the back, you have made a rather difficult door frame repair.
How To Adjust a Door
 Doors that do not close properly often can be fixed with some adjustment to the door. Before you can adjust a door, you need to understand how the door is supported.
If this is not your problem, see 'Door Repair' for all of the Door Repair topics.
Door Supports
Most doors are supported by two to four hinges, with two or three being typical in most residential homes. An exterior door will likely have three hinges.
Your front door is probably the heaviest door you have. So, if you front door has three hinges and it weighs 100 lbs, you might assume that each hinge supports 33 lbs.
That is not entirely true. The reason is that the door is a rectangular object and it is being supported from one side. Therefore, the force on the hinges is not equal.
In fact, the bottom hinge acts as a pivot point for the weight that is pulling against the top hinge. It is the loosening of the top hinge that causes doors to sag and rub against the frame.
Door Alignment
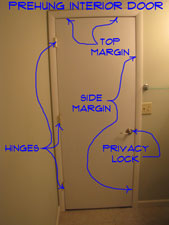
A properly aligned or adjusted door will have an even margin between the door and the frame all the way around. When the margins are uneven, the door is out of adjustment.
It may not be sticking yet, but it will soon. The wider margins will be on the top of the door on the strike side, and along the side near the bottom on the strike side.
You will also likely have a wider margin on the hinge side near the top of the door.
Adjusting a Door
Adjusting a sagging door properly, will mean tightening the top hinge. Most door manufacturers now require one or two long screws installed through the frame and into the door jambs.
See the articles 'Adjusting Interior Doors' for instructions on your inside doors and 'Adjusting Exterior Doors' for information on adjusting entrance doors.
Repairing Split Door Frames
 A split door frame is another door frame repair you may need to make. It is possible for a door jamb to split when the wood dries out. Another way a door frame can split is when it is forced open for whatever reason.
Not sure if this is your problem? See the article 'Troubleshooting Door Problems' for more information.
Fixing Small Splits
What you need to do depends on how bad the split is and whether the integrity of the frame is compromised. A split that affects the hinges or the strike plates is not just cosmetic.
A minor split may be cosmetic. Use wood putty to fill the crack and paint or varnish the door as needed.
Serious Splits in Door Frames
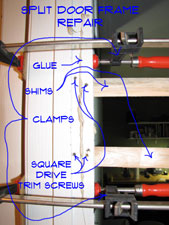
For a more serious split you may be able to glue and clamp the door. At this point you may need to decide if you will be happy with the patched up door frame when you are done.
Take the trim off the door on both sides using a flat pry bar. Add some door shims behind the damaged area to support it. Use a construction adhesive like liquid nails in the crack. Use a couple of bar clamps to draw the frame back together.
With the frame drawn back in shape, add a few 2 1/4” trim screws on either side of the split.
Check the directions for the glue to find out the drying time. Leave the clamps in place until the glue has set. Replace the trim using finish nails or trim screws. Check for objects that could fall before you start pounding on the wall. With the trim in place you can replace any hardware that needed to be removed.
You will probably still be left with some cosmetic issues. Use wood filler or putty to blend in the remaining visual issues. Touch up the paint or varnish as required. How does it look? Hopefully you are satisfied with the results and this has been a successful door frame repair or door jamb repair, depending on which term you like better.