Doors
Common Bifold Door Sizes
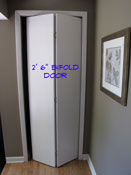 Your interest in 'Bifold Door Sizes' is likely related to a repair or replacement project on a closet door.
For information on repairing bifold doors, see the article 'Troubleshooting Bifold Doors'. If you are considering a replacement project, see the article, 'Installing Bifold Doors'.
Table of Bifold Door Sizes
Bifold door sizes do have limitations. Some sizes can be special ordered if you have time to wait. This is a list of common bifold door sizes that are fairly standard and readily available.
- 2' 0" x 6' 8" Bifold - Two 12" Panels
- 2' 6" x 6' 8" Bifold - Two 15" Panels
- 2' 8" x 6' 8" Bifold - Two 16" Panels
- 3' 0" x 6' 8" Bifold - Two 18" Panels
- 4' 0" x 6' 8" Bifold - Four 12" Panels
- 5' 0" x 6' 8" Bifold - Four 15" Panels
- 6' 0" x 6' 8" Bifold - Four 18" Panels
Some manufacturers may offer a few additional sizes in addition to the ones listed above. Likely these will need to be ordered. Remember, even with additional availability, there are limitations to the sizes. Check with your door supplier before you assume that something is available.
The above sizes should also be available in a shorter version. Again, check on availability before you commit to a size.
Measuring a Bifold Door Opening
The opening size for a bifold door is measured from the finish face of the opening, not the trim. A casing type molding is often used around a bifold door. The trim hangs over the edge of the opening to cover the gap around the edge of the door.
Most bifold door openings are finished with drwyall. So the width of the opening is measured from the face of drywall on one side to the face of the drywall on the other side.
The height is measured from the finished floor to the finished face of the drywall on the head.
The width and the height will determine what size bifold can be used. This is sometime called the 'rough opening' or 'R.O.', although for a bifold the measurments are taken from the finished opening.
It should be obvious from the foregoing the retrofitting a bifold into another style door opening may be a problem. Even in new construction, rough openings for common bifold doors are set during the framing stage. The rough openings differ in from standard doors that have jambs.
Allowing for Bifold Door Hardware
A critical issue for bifold door is the hardware at the top and bottom of the door. Bifold door slabs need to be shorter and/or the openings need to be taller to allow for the hardware.
As a rule the height of the door opening needs to be 1 1/2" to 2" higher than the height of the door. When you are buying a new bifold door, there should be an opening size listed. This will need to match the opening measurements that you took.
If you are using an existing bifold door in a different opening, you will have to guage the amount to allow for hardware. It will usually be around 1 3/4".
Related Bifold Door Articles
- To install a new bifold door, see the article 'Installing Bifold Doors'.
- Many problems associated with bifold doors can be fix by adjusting them. See the article 'Adjusting Bifold Doors'.
- For a discussion on general bifold door repair, see 'Repairing Bifold Doors'.
Summary
As you can see from the foregoing, there are several bifold door sizes available. However, the margins and rough in sizes for bifold doors is different from regular doors.
How Bifold Doors are Sized
Before purchasing a bifold door, it is important to know how bifold doors are sized. Stated bifold door sizes are in nominal increments. Similar to regular doors, the sizes are expressed in the finished opening size. For instance, a 3' 0" bifold door fits inside of a 36" wide finished opening. The leaves of the bifold are appropriately undersized to allow for clearance around the door.
The same is true of the height of the door. Bifold door sizes are based on having a track at the top and a pivot bracket at the base. Generally, you need an extra 1 3/4" of height beyond the height of the door panel. The bifold doors are undercut 1" standard. For a nominal 6' 8" opening, you need a finished height of 6' 8 3/4" (80 3/4").
Translated that means a 79" door plus 1 3/4" for the track and brackets. Since this height is sometimes a problem, you can get bifold doors that are 2" shorter. The doors are 77" plus 1 3/4" equals 78 3/4". This will work for openings that are 80" finish or slightly less.
Another thing to keep in mind, about how bifold doors are sized, is that bifold doors are sized in pairs. A 2' 0" bifold door will have (2) 12" leaves that are held together by hinges. Again the spacing of the panels is allowed for in the nominal size.
Bifold Door Sizes
Bifold door sizes are limited, therefore, you will need to verify if the size you need is available. Bifold doors come in fewer sizes than other types of doors. In addition, you generally need a finished opening for a bifold. So taking out a conventional door and replacing it with a bifold will not always work. This article discusses the cost, difficulty, and possible problems with replacing or installing a bifold door.
Not sure if you need a new bifold door? See the articles 'Repairing Bifold Doors' and 'Adjusting Bifold Door Hardware'. Many times a malfunctioning bifold door can be asjusted to solve closing problems. Also see, 'Troubleshooting Closet Doors' for more information.
As a rule you only use bifold doors on closets. There are a couple of reasons for this. First, bifold doors are not made for heavy use, so they work well on closets. Second, they are designed to open from one side only. Bifold doors do not require wood jambs like other doors. Often the openings are just covered with drywall.
Before you select a bifold door size, you want to see if you are up for this project. Check out the article 'Installing Bifold Doors' for information. Installing a bifold door is a project that only takes a couple of hours, provided you have an opening that will work with available bifold door sizes.
Selecting Bifold Door Sizes Using Common Sense
What Can You Save?
Replacing a bifold door yourself can save you some money. It will probably run between $100 and $150 to have someone install a door. Assuming you have the correct opening, it could only be an hour of work. Not bad.
How Hard Could It Be?
Determining your bifold door size is not hard at all, a tape measure and a few minutes is all it takes.
- Difficulty Level of: Easy
- Skill Level of: Total Novice
Check the Simple Things!
Checking out an opening for a bifold door is pretty easy. You may just need to repair it, instead of replacing it. See the article 'Repairing Interior Bifold Doors' for more information.
What Can Go Wrong?
Remember to hold the tape measure straight. Write the dimensions down, don't trust your memory. Height is important too, check it at the same time. The tolerance is around a quarter of an inch. Undersize is a problem, slightly oversize will be fine.
Bifold Door Options
Bifold door options include different styles and finishes. Some are pre-finished, others are pre-primed and ready for paint. You can also choose from flush or embossed patterns. Louvers are also an option with bifold doors. This may require a trip to the supply store to see what's available.
You are not locked into only considering bifold door options, just because it is a closet. Sliding doors are still available and may provide some relief on the opening size. Sliding doors do have the drawback of only allowing access to half the closet at a time.
The various bifold door options should be compared with your decor and available openings. See the article 'How Bifold Doors Are Sized' and 'Common Bifold Sizes' for information on the opening requirements. Pre-primed doors can be painted to match existing trim. However, matching existing stained or natural woodwork can be a problem. First you may have difficulty finding the same wood and then the staining and finishing may not match.
Swing door can also be used for closets. These do need a wood jamb to attach the hinges to. For smaller openings (less that 36"), you have more size choices with swinging doors. Swinging doors are available in two inch increments.
Replacing Bifold Doors
Replacing a bifold door is not a hard project, provided that the opening is close to what it needs to be for a standard bifold door size. Bifold doors are supported by a track on top and a pivot pin on the bottom. The sides and head do not need to have a wood jamb.
Many times you will find that closet openings are finished with drywall. Screws will need to be an appropriate length when going through drywall.
When replacing a bifold door, can the door panels be cut? The answer to that question is maybe. It depends on how much you need to cut it. Additionally, cutting doors requires some carpenter skills and the ability to work with power tools. Provided you have the skills and don't need to trim too much, it is possible. The finish on the door will also be a factor if you attempt to cut it.
For a discussion on replacing a bifold door you need to see the article 'Installing a Bifold Door'. This article has detailed information on how to install a bifold. In addition it will provide information on adjusting and trimming doors.
Summary
Where do you go from here? Now that you have your bifold door size issue behind you. Take a look at your list and see if anything sounds good. Check the main menu for other topics that you are in need of.
Adjusting Garage Door Torsion Springs
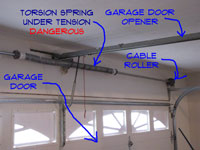 'Adjusting Garage Door Torsion Springs' should not be attempted by most homeowners. They can be very dangerous.
Not your problem? See 'Door Repair' and 'Overhead Garage Door Repair' for a complete listing of garage door and door topics.
The problem is that they have to be worked on when the door is down and the springs are under tension. When you release the set screw you have to have a rod in place and be holding it to control the force of the spring. Adjusting garage door springs of this type is not recommended for the average homeowner.
WARNING!! Torsion Springs can be VERY DANGEROUS, Precautions and thorough knowledge are REQUIRED!!! Do not attempt this repair without the proper skills.
There are those die hard do it yourself pros that insist on doing everything themselves. Are you one of those? Well then you should check further online for instructions. Clopay a manufacturer of residential garage doors has some instructions that may apply to your situation, Supplement to Torsion Springs, follow this link to check it out. There is another article that gives you and in depth discussion of this type of spring. The article provides installation instructions for springs and adjustment information, Torsion Spring Information.
I have been in construction most of my life and I personally know a few garage door installers. I have worked on torsion springs and I must confess that it made me nervous. I will not relate some of the horror stories, however, I will say that people have been seriously hurt, messing around with this type of spring.
Before you call a garage door serviceman, write down exactly what the door is doing. Verify by examining them that the springs are not broken. Springs either work or the don't, there is not much in between. Write down the width and height of your door and the type of springs you have. Ask for a quote over the phone for a cost on adjusting both springs. Make sure you specify both. Sometimes they will try to quote you for one spring and want to charge you double when they show up.
Call at least three places and try to make sure they are actually different places. Get quotes from all three. If they won't quote it over the phone, call someone else. A door that works, but does not close all the way does not need to be replaced. Make up your mind that you are not buying a new door. You be the judge if you want to be sold new springs. For another seventy-five to one-hundred dollars you can have new springs and the adjustment is free.
Torsion springs have cycle ratings. The minimum is 10,000 with the highest being 100,000. Get quotes for new springs at the same time. Remember, ask for both of them. Ask about the cycles and get the longer lasting ones if you can. Buying new springs when they just need to be adjusted is your decision. Weigh the age of the door and the cost when deciding.
Adjusting Extension Springs
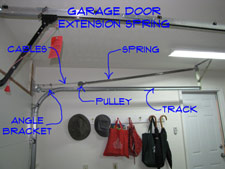 'Adjusting Extension Springs' can be done in two ways. One is by moving the hook that holds the cable to another hole to decrease or increase the tension. The other is by loosening the clamp on the cable and adjusting the length of the cable.
Not your problem? See 'Door Repair' and 'Overhead Garage Door Repair' for a complete listing of garage door and door topics.
What is the door doing? Is there a gap along the floor when it is closed. Too much tension on the springs. Is the gap on one side only. The springs are not balanced and the side where the gap occurs needs to be adjusted.
Safety Concerns
Garage doors are heavy and can be dangerous of they are not controlled. A garage door that is not attached to the springs can fall and cause injury. See below to make sure the door is secured before you work on it.
Brace Door Before Adjusting Extension Springs
To be able to adjust the springs, the door must be in a position that release the tension on the springs. For extension springs this is in the up position. To keep the door from falling, it must be clamped to hold it in place.
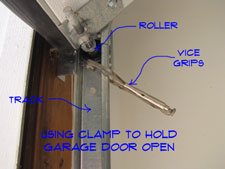
Raise the door and release the garage door opener. Push the door up as far as you can to release the tension on the springs. Use two pair of vice grips or two C clamps to clamp the track below the roller. You don't want the door coming down while you are working on it. Try tugging on the door to make sure the clamps are tight.
Making Adjustments
To lower the tension on the spring you want to move the hook one hole away from the door frame, toward the inside of the garage. This will reduce the length of the spring when it is stretched. By doing this you will lower the tension on the spring when the door is down.
This should allow the door to close and not leave a gap. Try adjusting it one hole at a time until it closes properly. Is the gap gone? No, keep trying one hole at a time. Yes, your attempt at adjusting garage door springs has been successful. Good job!
For a door that seems hard to lift the opposite would be true. Moving the hook one hole toward the door frame or toward the outside will increase the tension. Again go one hole at a time and try it. Increasing the tension may cause the door not to close all the way.
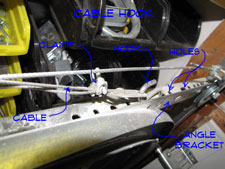 If you find that one hole is too much, you will have to adjust the cable. Go to Step Two. Adjust it back if this happens and look into getting a garage door opener to do the lifting. See that? Adjusting garage door springs may be as simple as moving the hook from one hole to another.
Did you run out of holes? Or do you need a finer adjustment than the holes are allowing for? Your cable will have a clip with a knot on it or a clamp where the cable attaches to the hook. Loosen the knot or the clamp to adjust the cable. Make the cable longer to reduce the tension and shorter to increase it.
The cable is looped, so if you increase the length about the distance between two holes on the angle, it will yield an adjustment of about half of what moving it from one hole to another would. Is the door working properly now? Yes, then you are done adjusting garage door springs. Go to the next repair on your list.
Summary
Extension springs are not that hard to adjust. You mostly have them on smaller doors that are easier to handle. You can see from the above, that there are a couple of ways to adjust them. To get your garage door in tip top shape, you may need to adjust the track and lubricate it. See the articles 'Adjusting Garage Door Track', 'Oiling Garage Door Hinges' and 'Lubricating Garage Door Rollers' for more information.


