Search
Doors
Repairing Interior Bifold Doors
 Why would you need to make repairs on interior bifold doors? In the last four decades bifold doors have become very popular. They have replaced sliding doors in most closets. Bifold doors allow for access to the entire closet as opposed to just half with a sliding door. Always seems like what you want is on the side that is hidden with a slider.
Do you have another type of closet door? See, 'Troubleshooting Closet Doors' and 'Residential Door Repair' for listings of related articles.
Bifold doors are inexpensive and easy to install making them popular with builders. You may have several bifold doors in your home. With repeated use the doors can get out of alignment and hardware can wear out.
Each pair of bifold doors is fixed in the opening by two pivot pins. A roller in the top of the second leaf keeps the door aligned as you open and close it. The pivot pins can get out of adjustment. Repairing interior bifold doors is a doable job for just about all homeowners. Check the information below to determine if you want to tackle this home repair.
Repairing Interior Bifold Doors - Information
What Can You Save?
Adjusting a bifold door when you know how, is an easy job. A carpenter or serviceman can take care of that in a service call. Cost you $50 to $85 depending on who you deal with. New doors range in price from about $40 to $125. If you get talked into a new door it will be another $75 to $125. Low end you could save $50 for a fifteen minute job. A new door could run as much as $250, more for a better quality door.
How Hard Could It Be?
Working on interior bifold doors is not that hard. With a little patience you can deal with most or all of the possible issues.
Check the Simple Things!
Adjusting the bifold door is the simplest thing. Usually no parts involved, a screw driver, maybe a wrench and ten minutes. How simple is that? See Step One below for more information.
What Can Go Wrong?
Parts can break, screws can strip. You may damage something when you start working on it. If you do you will need to get a hardware kit. This could leave the door not working until you get the new parts installed. Is it the guest room? Are they coming tonight? Better go to the hardware store now.
Troubleshooting Bifold Door Problems
Bifold doors have become very popular in residential construction. These doors are inexpensive and easy to install, making them a first choice with builders. Adjustment are the main problem. Four panel bifold doors can be a little challenging to adjust. The door has to align in several directions.
The top of a bifold door has two important items that work with the track to held the door work properly. Equally important is the bottom pivot pin. The articles 'Adjusting the Bifold Doors' and 'Adjusting Bifold Door Hardware', cover all of the adjustments that can be made to the bifold doors.
Another option to repairing bifold doors is replacing the door hardware. There are kits that include a complete set of door hardware. When the door is old, this may be a good choice. See the article 'Replacing Bifold Door Hardware' for information on the options available.
'Lubricating a Bifold Door' as the title implies, covered oiling the door to free up the hardware. Hinges, rollers and pins can benefit from a little oil once in a while.
You may decide that a new bifold door is what you want. Perhaps the old door is tired looking. In addition, you found out that a new one is not that expensive. Can you install the door yourself? Is it hard? Find out what you are up against by following the link above. This is something you can do yourself and save the price of a carpenter.
Summary
Most homes have several interior bifold doors in them. From time to time it is likely that they will need some attention. In this article there is useful knowledge and links to other resources that should have helped with your door issues. Usually it is just an adjustment that is needed.
Was repairing bifold doors a success for you? That's great if it was. You can move on to your next home repair. Don't feel like another repair project? Pick another easy one, it will inspire you.
Removing an Old Bifold Closet Door
 Removing an old bifold closet door can require a little effort. Most doors are hollow core, so they do not weigh a great deal. There is a little bit of a trick to taking them out, with a little help, it only takes a couple of minutes.
Not sure if you need to remove the door? See the article 'Troubleshooting Bifold Doors' to find out what you need to do. See 'How To Fix Doors' for a listing of all the door topics.
Understanding how a bifold door works will help a lot when it comes to removing it.
How Bifold Closet Doors Work
The name bifold implies that the door folds, which it does. A bifold has two door leaves or slabs that are held together with hinges. The two slabs fold together to open the closet door.
The slab that is closest to the door jamb on the pivot side has a pin at the top and a pin at the bottom that the door turns on. The top pivot pin is spring loaded so that the door can be lifted up.
Removing a Bifold Safely
A 36" pair of doors may weigh around 30 to 40 lbs. They can be a little awkward, since they need to be lifted and then tipped out. So consider getting some help. Follow the steps below to remove the door.
(1) You can open the pair of doors or one of the two pairs if it is a double door. If you have help, try to get one person on each side of the door, one towards the closet and the other person in the room. Grab the pair of doors on the sides keeping them together.
(2) Lift up on the pair of doors. You will only be lifting them approximately three quarters of an inch, so don't expect to make a dramatic change in the location of the door. Once the door is lifted, you shouls be able to swing the bottom of the door toward the center of the closet.
(3) Tilt the door out of the opening. Be careful not to drag the bottom of the door across the floor. There is a metal pin in it and it will scratch the flooring or damaged the carpeting. Lay the door on a pair of saw horses or lean it against the wall. Best to set it on a piece of cardboard.
Yes, that's all there is to it, do you see why bifold doors are popular. For a four panel door take the other pair out the same way.
At this point you will need to make a decision. The top track and brackets at the floor may be very similar to the new ones that you will be installing. Your choice, whether you want to leave the old ones in place. So removing an old bifold door does not need to include taking out the track.
You have gone to the trouble of installing bifold doors, so we will assume you are going with all new parts. Unscrew the top track and the bottom brackets and remove them. Discard the old door slabs and hardware.
Summary
So you can see that it is not that hard to remove a bifold door. Next you want to complete whatever tasks you needed to do and the set the door back in place. See the article 'Installing a Bifold Door' for instructions on getting it back in place and the article 'Adjusting a Bifold Door' for instructions on aligning it correctly.
How To Install a Bifold Door
Installing bifold doors is fairly easy, as long as the opening is the right size for them. When you are taking out an old set of bifolds it is not too much of a problem. Replacing bifolds in an opening that had another style of door may be an issue. See the article 'Bifold Door Sizes' for more information.
Homes built in the last three or four decades are likely to have bifold doors installed in them. Bifold doors are inexpensive and easy to install making them popular with builders. You may have several bifold doors in your home. With repeated use the doors can get out of alignment and hardware can wear out.
Assuming that you have openings that are the right size, you can install an new bifold door in an afternoon. Check out the rest of the information in this series to see if this is something you want to tackle.
Installing Bifold Doors - Information
What Can You Save?
New doors range in price from about $50 to $150. Hiring someone to install if for you could run $75 to $175, or more. Since we are talking about replacing the bifold door, the savings is in the installation and the mark up on the material.
How Hard Could It Be?
Installing a bifold door is not that hard. With a little patience you can deal with most or all of the possible issues.
Check the Simple Things!
Are you sure you need to replace the door? Adjusting and lubricating may get the door working properly again. See the article 'Repairing Bifold Doors' for more information.
What Can Go Wrong?
The biggest potential problem is the door not fitting in the opening. Both height and width will be a considerations. See the article 'Bifold Door Sizes' to see if you are a candidate for a new bifold. You will want to get most of the items out of the closet before you begin. Setting the doors involves tipping the panels.
Purchasing a Bifold Door
Before purchasing a bifold door, you want to do is verify the size you need. Both width and height matter when it comes to a bifold door. You won't get very far with your installing bifold doors project if the door won't fit.
Take a look at the article 'Bifold Door Sizes', for information on correctly sizing your door. Does it look like a bifold door will fit? Good, you can move forward to actually purchasing the bifold door.
There are a lot of options when it comes to purchasing a bifold door. Flush doors, embossed doors, louvered doors, unfinished and pre-finished are just a few of the things you want to consider. Likely, you will want to match the doors you already have in your home. Matching pre-finished doors may be a little challenging.
You may not be able to find every size, style and finish in stock. Depending on your needs, you may need to order your door. Doors that are unfinished or primed should be finished before you install them. It is a lot easier to paint or stain a door on a bench.
Installing Bifold Door Hardware

You start installing bifold door track by laying it out in the opening. The track and the bottom bracket determine the levelness of the door in the opening.
Take a look at the instructions and verify the alignment of the tracks and the bottom brackets. If you took a bifold door out of the opening, the alignment should be the same. Begin installing bifold door track at the top using screws that are long enough to go through the drywall and into the wood framing. Install the brackets at the base in a similar way.
For a door that only has two door panels, you will have a choice on which way you want the door to open. The two door leaves can fold open on either the right or left side. It is up to you, it makes no difference to the doors. The bottom bracket needs to be installed on the side the you want the doors to open to.
Make sure the bottom bracket is the same distance in from the face of the door opening as the top track. Each pair of bifold doors has three points of contact. Two at the top track and one at the bottom bracket. Proper alignment of these elements is important.

In this step you can begin installing the bifold door hardware. There is usually a bag full of parts that comes with the door. It can be a little intimidating. Take a breath and open the bag to start identifying the parts.
Before you begin installing bifold door hardware, you want to check the pieces that came with the door you purchased. You should have a top pivot pin, bottom pivot pin and top guide roller for each pair of doors. The top and bottom pivot pins should go at the top and bottom of the same door slab. The top guide roller should go at the top of the other leaf.
The doors should already have the hinges installed. Each pair of door slabs should be held together by two or three hinges. Before you install the hardware get the door opened up and laid, facing up, across two saw horses. Make sure you understand which end is the top.
The pins and rollers should friction fit into the pre-drilled holes. Gently tap the pins into place with a hammer. Drive them in until they are snug. Unscrew the bottom pivot pin until there is about a quarter of an inch of threads showing. You may need to adjust this pin later, but this will be a good place to start.
Setting the Bifold Panels

Setting the bifold door panels is similar to removing the old ones. It is a littly bit of work and you might want to get a little help. Likely they will only weigh thirty or forty pounds per pair. If you tipped the old ones out, you are already a veteran.
When you have all the hardware installed you are ready to begin setting the bifold door panels. Fold the door leaves together and pick them up from the side. You tip the door into place in a similar way to removing it. Use caution when you tip the door in, the bottom pivot pin can damage the floor if it scrapes across it.
It will be helpful to have a helper to guide the pins into place. The top guide pin has to hit a small hole in a bracket that is at the end of the top track. The roller just has to be inside the track.
When the pivot pin and roller are in the top track, you can lift the door and set the bottom pivot pin into the bracket.
Summary
Has your installing bifold doors project turned out to be a success? Hopefully it has. Part of the appeal of bifold doors is the fact that they are so easy to install. With practice, installing bifold doors can take less than an hour.
Adjusting them, well that's another matter. They seem to move in so many directions. After you get used to them, adjusting is not hard either. A few well placed tweaks and the doors will work great. You may not be ready to start installing bifold doors for a living, but you may be willing to tackle another installation should the need arise.
Garage Door Weatherstripping
 Garage door weatherstripping keeps the cold and heat out of your garage. There are two types you might have to deal with:
Not sure if you are in the right place? See the article, 'Troubleshooting Garage Door Problems' for more information.
The garage door pulls away from the jamb as it opens. It needs something to snug up to when it closes. Additionally, the bottom of the garage door is resting a floor that may not be perfect. There is another seal along the bottom of the door that keeps the air out. In the middle of winter it can be very cold air.
Take a little time and fix up your garage door weatherstripping. It's not that hard and it will save you money.
Garage Door Weatherstripping - Information
What Can You Save?
This is not a difficult job for a service man. Completely replacing the weatherstripping for your garage door could involve $50 to $75 in material. Add to that another $50 to $75 in labor. In this case you will mostly just save the labor. You will need to buy the replacement material when you do it yourself.
How Hard Could It Be?
Working with garage door weatherstripping is not that difficult.
Check the Simple Things!
Weatherstripping is simple. For garage doors, it is not adjustable. When it goes bad, you just have to replace it.
What Can Go Wrong?
Not getting the job done could leave you with a door that leaks a lot more air than it did before. The door will still work, but your heating bills will go up.
Replacing Top and Side Weatherstripping
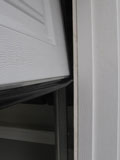
 Replace top and side weatherstripping on a garage door when you notice gaps or air leaking in. Replacing the top and side weatherstripping keeps cold or hot air from blowing in around the edges of the door.
Even if the garage is not conditioned, it still makes sense to conserve as much heat or cooling as possible.
Pull out the nails and clean up the surface. Obtain a new piece of trim. Get vinyl, no painting. You will need to use a miter box to cut it to length.
Close the door and make sure the new piece fits snugly against the door. Mark it with a pencil. The old trim may have been a different size and using the old line may not work. Use galvanized finish nails or plated screws to install it. With the new piece of trim in place, check the operation of the garage door. Does it fit against the weatherstrip when it is closed? Yes, well, good, you're done.
Replacing the Bottom Garage Door Boot
 Replacing the bottom boot on your garage door is needed when you see light under your door. Cold or hot air blowing in below your door is also a sign of a defective weatherstripping boot.
Two situations here. You should have an aluminum track that the rubber boot slides in and out of. Common widths for garage doors are 8', 9', 10', 12', 16' and 18'. Measure your door to get the proper length.
Working on the boot is probably best done with the door up. Slide the old boot out and take a piece with you to obtain a replacement. Slide it in place and trim off the excess. It may take a little patience to slide the boot into place, take your time, it will be fine.
Older doors may have the rubber boot screwed directly into the door. If this is the case you will want to obtain a kit that has a track and new boot. Raise the door to work on the boot. Remove the old boot and clean up the bottom of the door.
Obtain a replacement kit for your width of door. Use the screws provided to fasten the track to the bottom of the door. Slide the new boot into place and trim it with a utility knife. That's all there is to it.
Summary
Repairing garage door weatherstripping usually means replacing it. Sorry, nothing lasts forever. Granite lasts a long time, still not forever. Your weatherstripping is not in the same league as granite, sorry. It is not too difficult and we hope you were successful.
The parts for this job are a little expensive, but well worth it when weighed against your heating bills. You may be thinking that you are not heating your garage. When it is attached to your house it is a transitional zone. That cold air matters.
Adjusting Garage Door to Weatherstripping
 Adjusting a garage door to the weatherstripping will involve the garage door track. First, close the door and see how the door lines up with the weatherstripping on the outside. In the closed position, the garage door needs to be snug against the weatherstripping. When there are gaps, air will leak in around the door. If the track is too close to the jamb, the door will bind.
To adjust the door to the weatherstripping you want to loosen the nut on the bolt that holds the garage door track to the bracket. The bracket should have a slotted hole that allows the track to move.
You may need to loosen more than one bracket at a time, since the track will bind when you try and move it. Hold the door against the weatherstripping. Make sure the track is up against the back of the roller and tighten the bolt.
Repeat this process with all of the brackets on one side of the door. Check the door again to make sure there are no gaps. Repeat this process as needed on the other side of the door as needed.