Search

Drywall

drywall-mold-removal-pic2Disinfecting moldy drywall will work fine for small areas. For larger areas, you will need to consider removing the drywall. For related information, see the articles 'Is Black Mold Dangerous' and 'Removing Mold From Drywall'.

Dealing With Mold Concerns

Is it advisable to try to remove mold yourself. That is your decision to make. Bleach will kill mold and remove it from many surfaces. Precautions need to be taken so that the mold is not breathed in. It also needs to be disposed of properly.

Check out this government website before you mess with mold. A Brief Guide to Mold, Moisture, and Your Home, it will give you some insight and safety tips. Another good article is Mold, on the CDC website. The EPA states that repairs of less than ten square feet can be performed by a homeowner, as long as they follow the guidelines.

Mold Removing Solutions

There are commercially manufactured mold disinfectants available. An example is the 'Moldex' website. They have multiple products that can kill and remove mold. Read the information and determine the product that best fits your needs.

Your home supply store should have a selection. A solution of a quarter to half cup of bleach to a gallon of water will also work.

Cleaning a Moldy Area

Were a mask and disinfect the area. Wipe down the area until the mold is gone.

Discard the rags after you are done and get rid of the dirty water. Let the area dry and make sure that the mold is gone. Use a good quality stain blocker/sealer such as Kilz or Zinnser as a primer. Paint the area as needed.

>

Drywall mold removal is a repair that should be made sooner than later. Address the problem at the first sign of mold. A musty smell is also an indicator of mold, even if you don't see it.

drywall-mold-removal-pic1
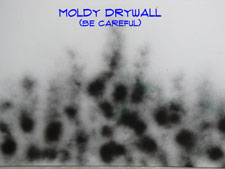
Drywall mold removal is needed when you find mold on your walls or ceilings. The 'black mold' scare has certainly brought this problem into the consciousness of the public. Not all mold, even mold that is black in color is the dangerous black mold. Unfortunately it takes laboratory testing to tell. Err on the side of caution in this matter. Treat any mold you see with a healthy respect.

Take precautions before you attempt a drywall mold removal project. Check out this government website before you mess with mold. A Brief Guide to Mold, Moisture, and Your Home, it will give you some insight and safety tips. Another good article is Mold, on the CDC website. The EPA states that repairs of less than ten square feet can be performed by a homeowner, as long as they follow the guidelines.

Testing Moldy Drywall

You may be concerned that the mold that you have is the dangerous 'black mold' that everyone is afraid of. There are many thousands of types of mold that you could have in your home. Only a few of them are toxic and not all of the toxic ones are black.

There has been overactive use of scare tactics with regard to mold. Some of this comes from the media, and some of it comes from companies that want to sell expensive remediation services.

How can you tell what type of mold you have? You cannot tell by the naked eye. The only way to tell is to have it tested. With that said, testing can be expensive.

There are some relatively inexpensive test kits that can tell you whether or not you have a dangerous problem. You can find 'Test Kits' for purchase at the 'My Mold Detective' website. If you want to put your mind at ease, test the mold before you attempt to clean or remove it.

Make sure you understand the precautions you need to take before proceeding. Review all the information on the EPA website. People have become very sick from breathing airborne mold. We do not want you or your family to be among them.

Mold is an indication of a moisture problem. A leak or some sort or seepage will cause mold. In addition to drywall mold removal you will need to address the problem that caused the mold. Fix the leak at the same time.

Drywall Mold Removal - Information

What Can You Save?

A contractor will charge you for the amount of work involved to remove and repair the drywall. This is called Mold Remediation and only specialty contractors are licensed to perform this service. Depending on the level and size of the area, these types of repairs could run hundreds perhaps thousands of dollars.

How Hard Could It Be?

Drywall mold removal can take you into some difficult projects. Taking precautions also adds to the level of work involved.

These repairs will have a Difficulty Level of: Clearly This is Work
These repairs require a Skill Level of: Determined Handyman
 
For and explanation of the terms in this section, see 'How to Use This Site'.

Check the Simple Things!

A small moldy area that is restricted to the surface may be treated with a mold killing solution. There are some that are commercially available. Bleach, diluted with water serves as the main ingredient in most of them.

What Can Go Wrong?

You can get sick if you breathe a dangerous kind of mold. Wear a mask or respirator. Try not to disturb the mold. Use a solution to disinfect the mold before proceeding with repairs. Quarantine the area until you have the problem solved. Use plastic or keep doors closed with a sign on them to segregate the area.

Drywall Mold Removal – The Steps Involved

When it comes to dealing with mold you have to basic choices. The first is to remove or disinfect the mold on the surface where the mold is occurring. If the mold has not penetrated deep into the wall, this can be effective. You will likely use a cleaner that contains bleach and other chemicals to accomplish this.

For instructions and information, see the article 'Disinfecting Moldy Drywall'. This article has guidelines and some information on what type of products can be used.

For mold that has penetrated deep into the drywall, you will need to remove the drywall. This is a much bigger job, since you will have to repair the drywall that has been removed. See the article, 'Removing Moldy Drywall' for a discussion on what to do and how extensive the project will be..

Summary

>

Drywall mold removal is a potentially dangerous repair. Take precautions and deal with the problem quickly. To the degree possible you should try not to disturb the mold. Put it in plastic bags and dispose of it properly. Make sure you solve the moisture problem or the mold will come back.

All drywall repairs involve some work. Don't despair they are not that difficult once you know a few basics. Hopefully your drywall mold removal project has gone well. You can move on to other home repair projects.

drywall-hole-repair-pic1Why would you need to make a drywall hole repair? Maybe you had to repair something in your wall, perhaps plumbing, electrical or another concealed item. Could be that you had a water leak and the drywall is rotted and needs to be replaced. Or it could be the kids were wrestling and a hole resulted. Whatever the reason you are here because you need to replace some drywall.

Not sure if this is your problem? See the articles 'How To Fix Drywall', 'Patching Drywall' and 'How To Spackle Drywall' for more information.

Drywall is supported by the wood framing in your home, usually 2 x 4's. When you cut out drywall you will have to provide support for it. Most residential framing is spaced at 16" on center, although you will find 24" on center framing at some ceilings and even some walls.

Cutting the drywall back to the framing would seem to be the logical choice for providing support. There are a few reasons why you might not want to do that.

Drywall Hole Repair - Information

What Can You Save?

A drywall hole repair is a bit more involved than some other drywall repairs. Some drywall needs to be replaced and then taping needs to happen. Even with quick setting compound you can be looking at one to four hours to take care of something. There is some down time with drying time for the mud. Someone you hire will either wait or make return trips. The size of the patch matters but let's say between $50 and $250 dollars to hire someone to repair drywall in your home.

How Hard Could It Be?

A drywall hole repair will require replacing drywall and taping. Both of these activities require some work.

These repairs will have a Difficulty Level of: A Bit of Work
These repairs require a Skill Level of: Determined Handyman
 
For and explanation of the terms in this section, see 'How to Use This Site'.
 

Check the Simple Things!

When you have a big hole in your wall there is nothing simple to do. Take a deep breath and prepare yourself for the character building experience you are about to have.

What Can Go Wrong?

Failing to take your time and make sure that your drywall hole repair is smooth can leave a patch that will show after it is painted. You would be amazed at how unforgiving drywall can be when the right light hits it. For a repair that is located at picture height you can find a picture to hang there. At other locations you will still have a problem to address. Drywall is messy in it's own way, take precautions to deal with the mess. Yes the dust can wind up in a room that is on the other end of the house. In fact it may get there quicker than you can.

Drywall Hole Repair – The Steps Involved

Adding Backing for Drywall Holes

drywall-hole-repair-pic2

Another acceptable method for supporting drywall is adding backing for drywall patches. This consists of screwing wood supports to the existing drywall.

Use the tape measure, level, pencil and keyhole saw to lay out a square or rectangular box around your hole. You want to be back to the undamaged portion of your drywall. There is no mystery about the square or rectangle, it is just easier to cut a new piece of drywall that is one of those shapes. Make sure you have the right thickness of drywall for the patch, usually 1/2", sometimes 3/8" or 5/8". Cut the patch about 1/8" to 1/4" smaller than the hole.

Find a couple pieces of scrap wood that are about three or four inches longer than the shorter dimension of the hole. Anything will work that will fit into the hole and still leave you enough room to get your fingers behind the wood. Furring strips, 1" x 2" or 1" x 3" are great.

drywall-hole-repair-pic3
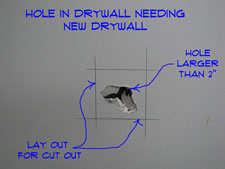
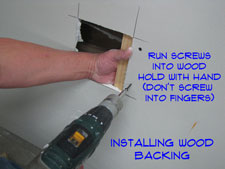
Hold the wood against the back side of the drywall with your fingers. Run three or four screws through the drywall into the wood to hold it in place. You need another piece of wood on the opposite side of the hole. You only need wood on two sides of the drywall hole repair. Install your replacement piece of drywall and run a couple of screws on each side into the wood. Gently, it is only the drywall holding the wood in place. Adding backing for drywall patches using this method is not that difficult, once you get the hang of it.

Now that you have your replacement piece of drywall installed you can jump to Step Five for instructions on taping and finishing the drywall. I admit that I have a lot of experience working with drywall. Still, comparing less than five minutes to install a patch to between twenty and thirty minutes for a 'hot patch'. I just think that this would involve a short debate. Of course debaters pride themselves on being able to say a lot about almost nothing. Well OK, that is really another discussion.

Big Holes in Drywall

drywall-hole-repair-pic4

Fixing big holes in drywall is a bit more work. Bigger holes that are larger than the spacing for the framing need to be attached to the framing members. Drywall has a span rating, 1/2" drywall can span sixteen inches both horizontally and vertically, although you may find it spanning twenty four inches. 5/8" Drywall can span twenty four inches.

Your first task is to find the framing members on either side of the hole that needs to be repaired. You can use a stud finder or you can use as keyhole saw to cut laterally in each direction to find the framing. Once you have found your studs you want to lay out your patch on the centers of the studs.

Make sure you know which way the framing is running. For walls it is easy, vertically. For ceilings it is usually perpendicular to a bearing wall. Which walls are bearing? Great question with no easy answer. Outside walls that run the long dimension of your home are usually bearing, no guarantee though. You're patching the drywall anyway, make the hole a little bigger and stick you hand up there to find out.

drywall-hole-repair-pic5
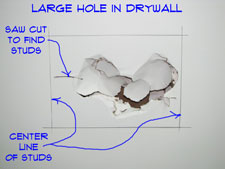
You need to cut back to the framing members to fix big holes in drywall. You can use the keyhole saw to cut laterally between the framing. For cutting along the framing you are going to have a bit more trouble. The problem is that there are nails or screws that hold the drywall in place. You will need to score the drywall with a utility knife along the stud.

Keep scoring the drywall deeper and deeper until you cut completely through it. When you hit a nail or a screw you are going to break the tip off the blade and it will not cut very well. In addition the gypsum dulls the blades quickly.

Replace or sharpen the blade as needed. Remember, utility knife blades are very sharp and cut skin easily. There is a tendency for blade to slip out of the groove and fly past where you want it to go. Make sure you are cutting away from any body parts. Be careful, I cannot stress that enough. With the patch removed you need to pull out the screws or nails. The edges of the remaining drywall will need some additional fastening. Install screws as required.

Adding New Drywall

drywall-hole-repair-pic6

Patching with new drywall is not uncommon. The main thing is that you want to get the right size drywall for the patch. The article 'Drywall Sizes' gives you some tips on doing that.

Cut a replacement piece of drywall. Make sure you have the right thickness of drywall for the patch, usually 1/2", sometimes 3/8" or 5/8". Cut the patch about 1/8" to 1/4" smaller that the hole. Install the patch with drywall screws into the framing members.

When your patch bridges multiple studs you will need to install screws in the field of the drywall. Maximum spacing for screws in drywall is twelve inches. Put more than that as needed.

With your replacement piece of drywall installed you are ready to move onto Steps Five for taping and finishing the drywall. Depending on the size of your drywall hole repair you may have a sizable taping job. Don't worry, it is not much more work to do a big patch, than it is to do a small one.

Taping and Finishing a Large Hole Patch

drywall-hole-repair-pic7

For a complete discussion on taping and finishing drywall patches, see the aticle, 'Taping and Mudding Drywall'.

Taping a drywall patch begins with, you guessed it, the tape. You have two options on the tape. You can use 2” wide paper tape or fiberglass mesh tape. For a drywall hole repair, paper tape will require one extra step. First you have to apply mud and wipe the tape down to get it to stick to the drywall. Spread about and eighth of an inch of compound along two opposite sides of the drywall hole repair.

Cut a piece of paper tape about two or three inches longer than the joint you are taping. Center the tape over the joint. Use a four or a six inch knife to wipe the tape down, pressing the excess mud out from under it. The tape should be fairly tight to the wall. The flatter the better. Repeat this for the opposite side of the repair. After two sides are taped repeat for the remaining two sides. Make sure the tape laps onto the other pieces of tape by at least an inch.

Fiberglass mesh tape will stick to the surface of the drywall on its own. You do not need to put mud on first. You can install fiberglass tape on all four sides of the repair at the same time. You can apply a first coat of mud directly over the fiberglass tape. Fiberglass tape is definitely better for a drywall hole repair. Fiberglass tape is a little more expensive, six to eight dollars per roll for a full size roll. Compare that with two or three dollars for paper tape. I think it is worth the extra money for the time it saves. Taping a drywall patch will go quicker if you use mesh tape.

>

For a paper taped patch you have to leave and let it dry. Do not try to apply a coat of mud over top of wet tape, it will make you sad and you will blame yourself for a long time. Did you decide to use mesh tape, good, you are ready for the first coat of mud. When the paper tape is dry, you are also allowed to move on to the next step.

Summary

They say that drywall installers and finishers are a breed of their own. That is probably because not too many people like doing it. OK, this was a bigger job with several steps, but none of them should have taken that long. The trick is to be patient. Allow a drywall hole repair to run over the course of a couple of days. Find other things to do while the mud is drying. We hope that your experience with drywall hole repairs has not been too traumatizing. If you were traumatized, try to find a support group in your area. With the skills you have developed you will be ready to deal with holes in the future.


drywall-hole-patch-pic1
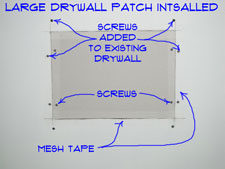
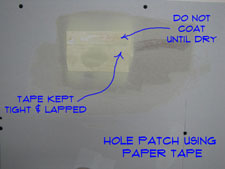
Learning how to patch small holes in drywall will not take you very long and you will save both time and money in the future. You may already have the tools and the materials are inexpensive.

When it comes to holes in drywall, size does matter. There are three categories of holes that need to be patched and repaired. Check to make sure you are reading the right information for the problem you have.

Small Holes, Dents and Dings

Really small holes like nail holes or the holes left from picture hangers  can usually be fixied with spackling. No need for mud, tape and pieces of drywall. This type of hole is the easiest to fix.

Spackling small holes in drywall only takes a few minutes and a little sanding. If you are preparing a wall for a fresh coat of paint, you want to see the article 'How To Spackle a Wall' for a complete discussion on this type of repair.

How To Patch Small Holes in Drywall

Let's say you move a piece of furniture or an appliance into your home and you put a deep gouge into the wall. Another scenario might be a full blown hole the size of a quarter in the drywall. No questions asked on how it got there, but it is definately more that you are going to be able to fix with spackling.

Holes of this type cannot be fixed with just a little spackling compound. However, they are not big enough to require new drywall to be installed. You have just entered into the world of fixing holes with tape and drywall compound. Yes, you can fix a wide variety of seemingly serious drywall problems with some paper or fiberglass tape and some all purpose drywall compound.

For this type of hole, you are reading the right series of articles. See below for more information and links to the steps involved with this type of repair.

How To Patch a Large Hole in Drywall

For big holes you need a bigger solution. Suppose the appliance tore a hole in the drywall that your dog could fit through while your were moving it. Spackling and tape are not going to fix this problem. You are going to have to replace some drywall.

This is not the end of the world, just a bit more work. It will also involve a little more material. See the series of articles on  'How To Patch a Large Hole in Drywall', for complete instructions on what to do.

How To Patch Small Holes in Drywall - The Issues

What Can You Save? - Patching a small hole will involve taping, which involves drying time. Even with quick setting compound you can be looking at one to two hours to take care of something. When it is your house you can go an do other things. Someone you hire will either wait or make return trips. The size of the patch matters but let's say between $100 and $200 dollars to hire someone to repair drywall in your home.

How Hard Could It Be? - Patching small holes in drywall will require taping and that takes a bit of practice and patience. These repairs will have a Difficulty Level of: A Bit of Work. These repairs require a Skill Level of: Skill Level Here. For and explanation of the terms in this section, see 'How to Use This Site'.

Check the Simple Things! - See if it is just an indentation before you use tape and mud. Small holes and indentations can be repaired with just compound or spackling. Go to the article 'How to Spackle Drywall', for more information.

What Can Go Wrong? - Using the wrong size knife can make a mess of the spot you are trying to fix. Failing to take your time and make sure that the drywall hole patch is smooth can leave a patch that will show after it is painted. You would be amazed at how unforgiving drywall can be when the right light hits it. Drywall is messy in it's own way, take precautions to deal with the mess. That is only needed if you care what your spouse will say.

Preparation for Drywall Patches

drywall-hole-patch-pic2

The first step in making a drywall hole patch is the hardest and most time consuming. You need to prep the hole to make sure you are not taping over loose material.

If you apply drywall compound over loose material you will get poor results. The mud will flake away since it is not attached to anything that is solid. Make sure everything is tight before you start applying drywall compound.

With a sharp utility knife (be careful, it cuts skin to) carefully cut away any loose paper. Remove any loose gypsum from the hole. Got it cleaned out? Good now you are ready for the tape.

At this point, you want to determine if you can patch this hole with just tape. It may have looked smaller before you removed all of the loose paper.

Is the hole smaller than the width of the tape? If it is, you can safely patch it with with mud and tape. Is it bigger? See the article 'Repairing Bigger Holes in Drywall'  for information on what to do.

Taping and Finishing Drywall Patches

 drywall-hole-patch-pic3

Taping and mudding a drywall hole patch will involve three or four steps. Make sure let the mud dry between each application.


The following is the steps you need to follow to tape and finish the drywall hole patch. For complete instruction of drywall finishing, see the article 'Taping and Mudding Drywall'.

Applying the Drywall Tape

You can use paper drywall tape or fiberglass mesh tape to repair the hole. Mesh tape is preferred by most pros for patching since it saves you a step.

Make sure you completely cover the crack and have the tap onto solid wall surface. This may mean that you have more than one width of tape. If you use paper tape, make sure you have compound between the layers of tape.

Coating the Crack With Compound

drywall-hole-patch-pic4
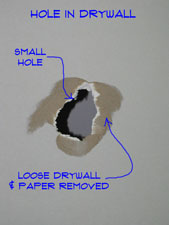
You will likely have to apply two coats of compound and a skim coat to get a nice finish. Lightly sand the high spots down between each coat.

Do not try to do too much with each pass. The first coat will be the heaviest. You want to completely cover the tape and feather the edges toward the flat surface of the wall.

Allow the drywall mud to completely dry before you apply another coat of mud. This is a common mistake, being impatient. If the mud underneath is not dry it will roll up and make a mess of your patch.

Skim the repair with a wide knife on the third pass to eliminate in hollow spots and tool marks left from the previous passes. See the article 'Taping and Mudding Drywall', for additional instructions.

Sanding and Painting

Sand the repair lightly until you have a smooth surface suitable for paint. Paint the wall and the hole in your wall is gone.

>

Summary

OK, it was several steps, but none of them should have taken that long. The trick is to be patient. Taping and first coat are the most work. You have to shape the patch on this step. After that it gets easier. Except for the sanding, no one likes to sand.

Allow a drywall patching job to run over the course of a couple of days. Find other things to do while the mud is drying. We hope your drywall hole patch has been a successful project. Now that you are done with it you can start living your life again.

drywall-cutting-tools-pic1You need drywall cutting tools when you have a drywall repair project. Using the same tools that you use to cut wood on drywall is not a good idea. Drywall is a much different product and therefore, cuts differently. Worse yet, using a power saw on drywall can ruin the saw and make a mess that you would not think possible.

Drywall is made of a core of gypsum that is sandwiched between two layers of heavy paper. Without the paper, the gypsum will crack and break apart easily. Gypsum is a soft white or gray rock that generates dust when it is cut. Tools that do not generate dust and that are designed for cutting the paper are best.

Most small drywall projects can be handled with just a few tools. A large investment of money is not needed. Are you remodeling? Do you have a lot of drywall to install? There are other tools you can consider.

For instructions on 'How To Cut Drywall', follow this link. It takes some practice and a few tips to learn how to cut drywall like a pro.

Below you will find descriptions of common drywall cutting tools. An approximate price is included, although prices will vary from store to store. Generally, the costs will be low, for the tools you need. The tools are fairly durable and will last a long time, once purchased.

Drywall Utility Knife

drywall-cutting-tools-pic2
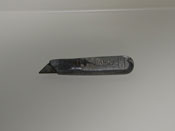
Of all the drywall cutting tools, the drywall utility knife is the one that is used the most. Cutting the paper is the key to cutting drywall. You need to 'score' the paper on one side of the drywall first. Then you 'break' the core by folding the drywall back. Next you use the utility knife to cut the second layer of paper.

A drywall utility knife is a popular tool and most homes have them. They use replacement blades that are available at hardware and home supply stores. Instead of sharpening the blades, most will opt to replace them.


A word of caution! These types of knives have short blades. Don't let this fool you, these blades are very dangerous and can cause serious, possibly fatal cuts. Use extreme caution when using a utility knife.

WARNING!! Utility Knife Blades are VERY SHARP. BE CAREFUL!!! WARNING!!!

There are basically two different types of utility knives. Ones with fixed blades and those with retractable blades. You will find several variations of both types. Some have slick features for easily replacing the blades. Others are supposed to be ergonomic. The cost can vary, but most of them run between $5 and $15.

Retractable utility knives have a button on them that slides the blade into the housing when the blade is not in use. This is both a safety feature and a preservation feature. The drawback to cutting drywall with a retractable blade is the quality of the retractable mechanism. You have to put a fair amount of pressure on the blade to cut into to or 'score' the drywall. Some of the cheaper utility knives will give way under the pressure.

A drywall utility knife with a fixed blades as the name implies does not retract. The blade is exposed at all times. This can be a safety issue. Use extreme caution when using a blade of this type. You also want to use a tool pouch that has a pocket designed for a utility knife. This will save the tool belt and your fingers from unwanted cuts. Most professional drywall hangers use a fixed blade. For a homeowner, it may be wiser to work with a retractable blade unless you experienced with a fixed blade. Be Careful with either kind of knife. Both will work fine as a drywall cutting tool.

Drywall Tee Square

drywall-cutting-tools-pic3
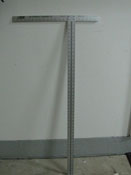
Drywall comes in sheets that are four feet wide. Getting accurate cross cuts can be a little tricky and time consuming. For this purpose, the drywall 'tee square' was developed. It looks like a big tee, one side is four feet long and is used as a guide for the utility knife. The other side of the tee rests against the factory edge of the drywall, thus 'squaring' the cutting guide.

You hold the drywall tee square in place at the desired spot with your hand and toe (or knee). Using the utility knife, you follow the square, scoring the drywall. This speeds up the cutting process and increases the accuracy of the cuts. Drywall usually needs to butt up to other pieces of drywall, so a clean straight cut is important.


A drywall tee square is an important part of the drywall cutting tools line up. You can find them at stores that sell drywall and drywall supplies. A tee square will run around $15 or $20. Probably not worth it if you only have a couple of cuts to make. A bigger job or keeping it in your tool box for future projects will make it worth the investment.

Drywall and Sheetrock Saws

Keyhole Saw

drywall-cutting-tools-pic4
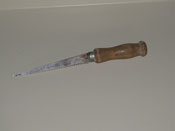
A drywall keyhole saw is a small saw with a blade that comes to a point. The teeth are fairly coarse, making it an effective tool for cutting drywall.

The point can be used to bore into a sheet of drywall to cut out and opening, such as an electric box. It can also be uses to saw notches and other cuts in a sheet of drywall.


The drawback to cutting openings with a drywall keyhole saw is that you have to measure and lay them out on drywall. Then you cut them out before the drywall is installed. Getting accurate measurements requires some skill. Other cut outs, like pipes, have to be cut out ahead of time.

A keyhole saw is an important drywall cutting tool. Most of the time it is a must for a drywall repair project. A keyhole saw will cost between $5 and $10 and will generally last a long time.

Big Drywall Saw

big-drywall-saw-pic1
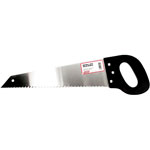
In the days before routers, a big drywall saw was a standard item for a professional drywall hanger. It has heavy blade with large teeth. Originally they had wooden handles. Most of them today have plastic handles, making that a durable tool.

A big drywall saw is used to cut out large openings, like doors and windows, in the drywall. The design of the teeth keeps the saw from binding and will cut through drywall quickly.


You may want to consider this type of saw when you have a lot of cuts to make. For just a few cuts, a keyhole saw will work. A big drywall saw will run around $15. They are not as common as they once were, but they can still be found and drywall supply stores.

For most drywall hangers, the 'Drywall Router' has replaced the big drywall saw. Routers are also capable of making large cuts quickly.

Circle Cutter

drywall-circle-cutter-pic1
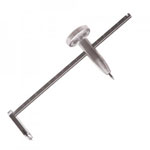
When you have a round hole to cut, a drywall circle cutter is the tool of choice. A circle cutter is a compass of sorts. It has a center pin that is pushed into the drywall and a wheel that will score the paper. The wheel is attached to an adjustable shaft.

Pipes, light boxes and can lights, all require that round holes be cut into the drywall. Yes you can draw the circle on the drywall and cut them out with a keyhole saw. This tends to be a little time consuming and less accurate.


You set the diameter on the drywall circle cutter to match the size of hole you want. You still have to cut the hole out with a keyhole saw, the circle cutter just makes laying it out quicker and easier. It also scribes the paper on the drywall, giving the saw a path to follow.

A drywall circle cutter will cost about $15. They last a long time and would be considered a good investment for homeowners that are willing to tackle drywall projects. Most stores that sell drywall and drywall supplies will have this tool.

Drywall Router

drywall-cutting-tools-pic5
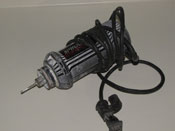
Do you want to add some muscle to your drywall cutting tools? A drywall router would be just the thing. Routers have streamlined many of the cutting tasks for drywall. In addition, they have dramatically reduced the amount of lay out required to make cut outs.

The main advantage to a drywall router is that it will follow the item that needs to be cut out accurately and neatly. You tack the sheet of drywall in place and then insert the router inside the area to be cut out. You move to the outside of the cut out and then follow the shape with the router. No question, this if very cool!


There are some drawbacks. First, there is the router itself. It is not a standard router that you use for woodworking. It has a special sized collet for the drywall cutting bits. So there is the investment of $60 to $80 to consider. Second, they require some practice to use effectively. You need to learn which way to go to follow an opening. Additionally, you have to learn how to get to the outside edge of items like electric boxes.

Third, there is the mess. A drywall router creates a lot of dust. Drywall dust has the ability to get everywhere in a home very quickly. It is very fine dust and a chore to clean up. You can use a shop vac in conjunction with a router, but this is not a totally dust free solution and extra work.

For a small project, this type of drywall cutting tool does not make a lot of sense. When you have a bigger project or ongoing projects, you may want to consider it. Remember you will need to practice a little, before you start using it. See the article 'How To Cut Drywall', for some tips and tricks on using a drywall router.

Drywall Rasp

drywall-rasp-pic1
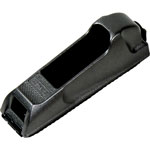
A drywall rasp is used to smooth the edges of the drywall once a cut is made. You cut drywall by scoring the paper and then 'breaking' or 'snapping' it.

When you do this the gypsum core of the drywall breaks unevenly. The bumps in the gypsum can keep your panels from aligning properly.


>

The solution to this problem is to smooth the edges. A drywall rasp will do the job nicely. It will cut the gypsum down until it is smooth with the edge of the paper.

A rasp is inexpensive, around $5 to $10. This can be a good addition to your drywall cutting tools.

Stanley makes a rasp that is commonly available and sells for under ten dollars. Wal-Board makes one that is used by professionals that is available most places that drywall is sold.

Go to top