Search
Repair Topics
How To Clean Your Air Ducts
The air ducts for your heating and cooling system have a tough job, and they are going to eventually become contaminated with dirt, mold and/or debris over time. Experts in the field recommend air duct cleaning bi=yearly, or every two years. Dingy and dirty air ducts can cause health concerns in your home and also represent other underlying issues.
As people learn about how to clean air ducts and keep them in tip top shape, it's important they be informed about the benefits and the purpose. If you're considering cleaning the air ducts for your heating and air conditioning system, then it's important you take the right steps in the right order.
Check For Mold
Mold can be one of the biggest problems in a home, and your air ducts are one place where it can be present. Mold assessment is absolutely necessary, and it is typically found in areas without adequate ventilation and where there is moisture.
Whether or not you can visibly see mold is one thing, but to determine its presence in your air ducts, an air sample must be undergo a laboratory analysis. Furthermore, insulation that has accumulated any mold will likely need to be replaced.
Debris Clogs
Are you witnessing any particles flying out of your air ducts? Even if this isn't the case, there could still be debris buildup in your air ducts, possibly even from rodents. Naturally, the buildup increases without cleaning the air ducts, and mold can come into play here as well. Mold grows on the debris, and as the debris builds up, it does indeed make its way into a home.
Air Duct Cleaning Estimate
That's right, you're not going to clean the air ducts on your own. Instead, you have a professional air duct cleaning company to pay you a visit and assess the situation, providing you with a no obligation estimate. If there is a mention of mold, request the laboratory analysis discussed in the previous section. You want to be present during the process so you can ensure everything is thoroughly checked, even the areas that are difficult to access.
Environmental Protection Agency
The EPA cautions you to realize that if there indeed is a debris issue, or especially mold, then a remediation team must address what first caused the mold. Obviously, you're going to be dealing with more mold if you don't address the root cause.
Hiring The Right Company
Air duct cleaning is a very professional business niche utilizing top-notch equipment and requiring much experience and expertise. You're going to want to check testimonials of customers who also learned how to clean air ducts, and you're also going to want that solid estimate.
After an estimate is agreed upon, there needs to be a services contract in place. This contract is for your protection, detailing what services are going to be provided and the associated costs, and it will also highlight service guarantees the company offers you. Check over the contract, and then you're ready to let them render services.
Electric Stove Repair - Troubleshooting Guide
If you are in need of electric stove repair, this troubleshooting guide should help you. Review these common problems and the likely causes.
Why is my electric stove not turning on?
You may be experiencing problems with getting electricity to it. This could be caused by the unit not being plugged in properly or at all.
If you have just moved into a place, the outlet may not be working. It is also possible at any time that the circuit breaker was tripped or that you have a blown fuse.
Why aren't my coils heating up?
If the lights on your range work or one or more of the coils is working properly, you have a different problem than if you are not seeing any part of the unit turning on.
You may have an internal ignition switch that is faulty.
The coil element itself may not be plugged in properly. This can cause a loose connection or none at all. Something may also be stuck between the element and the stove.
It is possible that the burner has been damaged. If something heavy was dropped on it or something cold came in contact with it while it was hot, it could have caused it to break even if there are no visible signs of damage.
If you have not used this burner before, it is also possible that the element used in that spot is not the right one for the appliance.
Why do I see sparks when I turn on the stove?
Dangerous sparks can be caused by several things. The element itself may have experienced damage from extreme temperatures or weight. It may not be compatible with your appliance.
Your stove top may have loose wires or connections somewhere. The problem may be directly related to the coil element that is sparking or that is triggered by that element being turned on.
Why are the lights not turning on that show my burners are hot?
The small indicator lights that let you know when your burners have been turned on or are still hot might have a burned out bulb.
You may also have a faulty control switch inside of the stove.
Why can't I adjust the temperature for one of my burners?
This frustrating problem generally results in a burner going to high heat and staying there, no matter where you set the knob.
It is most likely caused by a faulty internal ignition switch.
Why do the coils move around when I put a pot or pan on them?
This is a problem that is generally caused by not having the right tray beneath the coil. Not only do these trays keep food from leaking into your stove, they also secure the coil. You may also have a coil that is not the right size for the burner, allowing it to wiggle when touched.
These electric stove repair troubles can be repaired once you have determined what is causing the problem.
Repairing Toilet Tank Levers
 It is rare that the toilet tank lever is responsible for problems with your toilet.
Do you have to jiggle the handle to get the toilet to flush correctly. This is probably not the handles fault. Check the 'Toilet Flapper' or the chain that is attached to it for correct adjustment. The same would hold true for a toilet that is running either constantly of intermittently. Go to the Article on 'Repair a Running Toilet' for the correct information for solving this problem.
Not sure what your problem is? See the article 'How to Fix a Toilet' to troubleshoot your problem.
The repair that you want to make may mean replacement. Follow the information below to check for problems and make the appropriate repairs.
Repairing Toilet Tank Levers - Information
What Can You Save?
If you call a plumber it would be a service call, $50 to $100 plus parts. Likely a new handle would be installed.
How Hard Could It Be?
This repair requires that you have some basic skills with simple tools. This is a very easy toilet repair.
Check the Simple Things!
Check the adjustment on the chain for the flapper valve before you buy a new handle. The chain should not have too much slack or the handle will not cause the flapper to lift high enough.
What Can Go Wrong?
Be careful when tightening or loosening the nuts for the toilet tank lever. You can crack the tank if you use too much force. If you are careful you should not splash any water on any other surfaces. Take precautions if you think you will splash water. You can flush the toilet by manually pulling on the flapper chain if for some reason you obtained the wrong handle.
Repairing a Toilet Tank Lever - The Steps Involved
There is not much that can go wrong with a toilet tank lever. Its only function is to move up and down to pull on a chain that is attached to the flapper valve. Adjusting the chain so that the flapper opens correctly is a simple task. The finish on the handle can corrode and look worn. You may want to replace the handle for that reason.
Types of Toilet Tank Levers
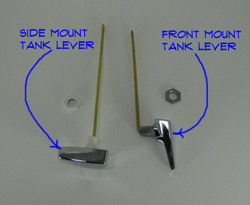 There are several toilet tank lever styles. The finish on the exposed part of the handle can vary. From a functional point of view there are two common styles of toilet tank levers. A front mount or a side mount.
Most of the time, the levers can be used on either side of the tank. The bar that lifts the chain needs to be reversed, depending on the handing that you need.
Front mount is the more common style. When purchasing a new tank lever, make sure you get the correct one. The package should be marked showing the front or side mount designation.
Getting the wrong handle may cause you to question your home repair skills. Don't, just go back and get the right one at the store. This is not a serious physiological issue, just a mistake.
Removing the Old Lever
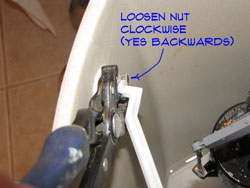
Removing a toilet tank lever is not too hard. There is usually just one nut that holds it in place.
Shut the water supply off and drain down the tank by flushing it if you do not want to work in the cold water. Using a pair of adjustable pliers loosen the nut on the lever by turning clockwise. Yes this is correct the nuts are threaded left hand or backwards from what you would expect.
The nut may be badly corroded and difficult to loosen. Do not try to force it. Use a hack saw to cut through the shank nut. Unhook the chain from the flapper and the handle should be free. Remove and discard.
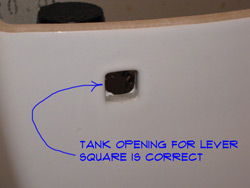
The hole that the lever was connected to may be discolored and corroded. This is a good opportunity to clean it up. Use a plastic scrubber and some bleach based cleaner to clean up the area. Now you are ready for the new toilet tank lever.
Installing a New Tank Lever
 Installing a toilet tank lever is simple once you have the old one removed. By now you should have purchased a replacement lever and you are ready to go.
Clean any corrosion or residue off of the finished surface of the toilet. Insert the new handle and tighten the nut with your fingers, turn counterclockwise, yes it is backwards.
Do not over tighten with pliers, you could crack the tank. Attach the chain for the flapper at the appropriate hole on the lever. More or less vertical from the flapper. Leave the minimum amount of slack on the chain so that the flapper will open correctly.
Flush the toilet a couple of times to make sure the flapper is opening and closing correctly. Everything working fine? Great, that's all there is to it. Good Job!
Summary
So, what were you faced with on this repair? Was the chain tangled? That should have been pretty easy to take care of. The toilet tank lever is such a simple device that repairing it usually involves replacing it with a new one.
Following the steps above you were able to successfully accomplish this task. This was an easy job and should not have taken up much of your time. Now you can move on to more pressing matters in your life. Maybe a well deserved nap.
How To Cut PVC Pipe
 Knowing how to cut pvc pipe is useful knowledge that will be needed for many plumbing repair projects. The pipe is made of plastic and cuts easily. The trick is getting it the righ length.
For related information see the articles, 'Sink Drain Plumbing Repair', 'Identifying Sink Drain Plumbing Parts', 'Installing a Sink Drain' and 'Troubleshooting Plumbing Pipes'.
Cutting sink drain pipes is not difficult. Especially if you go with the less expensive pvc plastic pipes.
Types of PVC Pipe
PVC pipe comes in several different types. The most common varieties are for interior and exterior drains and residential water piping. Depending on the usage, the pipe can be different colors. Exterior drainage pipe is usually green. However, there is no completely standard coloring system and the use of colors has evolved over time.
For interior drain pipes, it is usually white. The white color can also apply to sink drain plumbing fittings. White can also be used for water supply lines.
So what is the right pipe to use for a repair or replacement? You need to have pipe that matches the pipe that y
For sink drains the fittings are mostly compression type. Meaning that they do not get glued together, instead a nut and washer is used to stop the fitting from leaking.
The other type of pvc pipe is for glued connections.
Measuring PVC Pipe
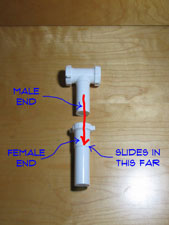
Notice the fittings fit inside one another. So the fittings that slip together have either a male or female end. Some ends are threaded to mate up with a matching piece, like the P Trap.
Due to this feature you will have to allow for the overlap when you measure your pieces. You can tell on the outside of the female piece how far in the other piece will slide in. Mark the piece you are cutting accordingly.
Ways To Cut PVC Pipe
Your use a hack saw to cut the pipe whether it is metal or plastic. The cuts do not have to be perfect due to the overlap. Dry fit the pieces to make sure the are fitting correctly. The piece of drain pipe that goes into the wall will also be cut long. It will go inside the pipe a couple of inches and be held in place by the nut and washer.
How To Drain a Toilet
Knowing how to drain a toilet can save you a lot of mess when you are working on your toilet. There are several repair that cannot be performed without partially or completely draining the toilet. It is not hard, it just needs to be done before you work on the toilet.
For related information, see the articles 'Troubleshooting Toilet Problems', 'Fixing Clogged Toilets', 'Toilet Tank Problems', 'How To Fix a Leaking Toilet' and 'Toilet Bowl Issues'.
Shutting Off the Water
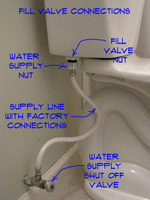
Shut off the water supply to the toilet. There should be a water shut off valve on the wall or floor below the toilet tank.
Draining the Toilet Tank
Draining the toilet tank is a must to replace a toilet fill valve. Depending on the age of your toilet, there could be as much as five gallons of water in the tank. The toilet fill valve is attached via a hole in the bottom of the tank.
Even after the tank has been flushed and the water is off, there is still a lot of water in the bottom of the tank.
Turn off the water supply to the toilet first. Most tanks have a fill line marked on the side of the tank. Some do not. You can use a marker to put a mark at the correct water level if it is missing. Usually the fill line is to the top of the flush valve tube.
If it has been replaced it may be at a different level. Shut the water off. After that, flush the toilet to drain out most of the water from the tank. Place a pail below the nut for the toilet tank inlet. Loosen the nut on the water supply line. Let the remaining water drain out of the loosened nut.
There will be about an inch of water left in the bottom of the tank. You can use rags to try and get the rest of this water to drain into the tank. Or you can loosen the nut to the fill valve and let the water drain into the pail. Any water that you do not remove is likely to wind up on the floor. It is clean water, but is still wet.
Draining the Toilet Bowl
Flush the toilet. This will drain most of the water out of the tank. Additionally, most of the water will siphon out of the toilet bowl to.
At this point you will still have some water left in the tank and some water in the toilet bowl. To drain the tank completely, you will need to loosen the large nut on the bottom of the tank that holds the toilet fill valve in place. It is the larger nut closest to the tank. The lower nut is for the water supply line. Use adjustable pliers or a large adjustable wrench for this nut, it will be plastic or possibly brass. Place a small pail under the connection to catch the water that drains out of the tank. Loosen the nut until the water starts to drain out around the rubber seal. This should drain most of the rest of the water out of the tank. The remaining water can be soaked up with a rag. Re-tighten the nut after you are finished.
Use a plunger to force the remaining water in the toilet basin out. Get as much out with the plunger as you can. You can ladle the remainder out with a small paper cup or use a rag to soak it up. Remember to wear gloves for this part of the exercise.
Leave the water supply shut off. You should remove the water supply line from the tank. Loosen the nut that is just below the nut that holds the toilet fill valve in place. It is the nut that connects the water supply line to the tank. You can use adjustable pliers for this task, the nut is plastic on most newer toilets, chrome or brass on older ones. Remove the nut completely, so that the supply line is free from the tank.
Summary
Draining a toilet is needed for several toilet repairs. You may need instructions on other repairs after you have the toilet drained. For related information, see the articles 'Troubleshooting Toilet Problems', 'Fixing Clogged Toilets', 'Toilet Tank Problems', 'How To Fix a Leaking Toilet' and 'Toilet Bowl Issues'.