Search
Repair Topics
Removing a Ceiling Fan
 Removing a ceiling fan is a bit of a job. Your old fan will be heavy, so you might want some help for it. For related information, see the article 'How to Install a Ceiling Fan' and 'Ceiling Fan Troubleshooting'.
Shutting Off the Power
Shut off the power to the fan at the breaker box. Tag the breaker so that no one will turn it back on. Remember, electricity can be dangerous.
Removing the Fan Blades
Ceiling fans are awkward to handle with the blades installed. The blades should have screws or bolts on the top side of the blade that goes down into a metal bracket that is attached to the fan motor.
Each blade will have three or four screws that hold it in place. Remove the blades one at a time. Save the screwes if you are planning on installing the fan somewhere else.
Removing the Light
To help reduce the amount of weight you are dealing with and reduce the chance that you will break the fixture, it is a good idea to remove the globes and light bulbs from the fan. Usually these come apart similar to other light fixtures. They use thumb screws to hold the globes in place. The light bulbs should unscrew like a normal light bulb.
Removing the Fan Housing
Loosen the screws to take the fan unit off the base plate. With an older fan you may need someone to hold it, while you unhook the wires. Check the box with a non contact tester before you mess around inside. Look to see if there is a maintenance hook. Hang the fan there, if it is available. Unhook the wires and put the wire nuts back on.
It is unlikely that the old base plate will be suitable for the new fan. You can compare them if you want to. Remove the old base plate and mounting screws. Hang onto the mounting screws, you may need them. So far so good, on this wiring a ceiling fan project.
Unhooking the Wires
You will likely have three, possibly four wires that are connected to the fan from the electrical box. If you have three wires, one will be a hot, the other a neutral and a ground wire.
If you have not already done so, you want to turn off the breaker that controls the power to the fan. Do not rely on just turnin off the switch. It is too easy for someone to accidently turn the switch back on.
If you have four wires attached to the fan then you have a separate switch for the light and the fan.
With the power off, you can safely unhook the wires at the connections. Place a wire nut on the hot wire(s) for safety, in case you need to turn the power back on before the new fan is installed.
Installing a Ceiling Fan
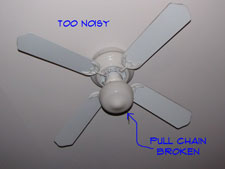
 Why are you thinking about wiring a ceiling fan? Is the old one ugly? Is it not working? You need something to do? Ceiling fans are great, they keep the air moving. They add to the decor. Replacing a ceiling fan or adding one to replace another fixture is common. Your ceiling fan may be broken, noisy or in general not working properly.
Not sure if you need to replace your ceiling fan? See the article 'Troubleshooting Ceiling Fan Problems' for a listing of possible repairs that could get your existing fan working again.
After attempting to repair it you have decided that a new one is the way to go. Got your spouse involved? Looks like a shopping trip. You will now find that wiring a ceiling fan is the easy part. Picking one out, now that is tough.
Read the information below and check out the evaluations to see if this is something you want to tackle. The hardest part is getting it up there. They are kind of heavy. Most of the newer ones, especially the better quality ones have a hook arrangement that makes the job a lot easier.
Wiring a Ceiling Fan - Information
What Can You Save?
Well you have to buy the fan. Got that cost no matter what you do. Assuming the box in the ceiling is suitable for a ceiling fan it is about an hour project. Conservative cost for an electrician would be $60 to $85. Could be more for a high end unit or where extra backing needs to be added.
How Hard Could It Be?
Wiring a ceiling fan can be a little bit of work. I mentioned the heavy part already. Makes it a little more difficult than putting up a hall light.
Check the Simple Things!
If you got here you probably tried every simple thing. Breakers, switches, weighting the blades and so on. If not go back to the article on Ceiling Fan Troubleshooting for more information.
What Can Go Wrong?
Dropping the heavy ceiling fan will not do it much good. Get a helper, just a few critical lifts that you need help for. The box in the ceiling needs to be able to support the weight. Make sure it is adequately supported before you hang it. Boom, could be the outcome otherwise.
Installing a Ceiling Fan – The Steps Involved
When you replace your ceiling fan, you will need to remove the old one. The article 'Removing a Ceiling Fan' provides instructions and information on safely taking down and old fan.
Wiring a ceiling fan is not too difficult. However, there are multiple configurations for hooking up the wires. One big factor is whether you are controlling the light and the fan separately from the switch. See the article, 'Ceiling Fan Wiring Diagrams', for information and instructions.
Newer fans have better mounting brackets for installing the fan. One new development for many fans is a hanging hook that supports the fan while the wires are hooked up. The article 'Installing Ceiling Fan Mounting Brackets' discusses how to install the fan safely.
An important last step in installing a ceiling fan is making sure that it is balanced. A poorly balanced fan can wobble and be noisy. See the article 'Balancing a Ceiling Fan' for information.
Summary
As a rule you are left with the wiring that is already in your home when it comes to a ceiling fan. In newer houses you may have options for switching. Most of us have to rely on the pull chains to change the function of the fan.
It is too bad that your old ceiling fan gave up and left you. Look on the bright side, you now have a new ceiling fan. Better looking, great air flow, quiet, life is good. This job was not that hard, especially if you got a little help at some critical points.
How To Ground an Outlet
Outlets without grounding can be a safety issue. Electrical shocks can result when an outlet is not properly grounded. Newer home built under modern codes are required to have grounding for all electrical outlets.
Older homes may not have grounded receptacles. Using adapters is not a good practice, due to the fact that they still need to be grounded. You can ground to the box if it is hooked to metal conduit.
This is rare in residential homes. The ground wire is a safety feature the prevents electrical shock in the event of a neutral failure.
Homeowners that have outlets without grounding may want to consider upgrading their wiring. This is a big undertaking and beyond the scope of this article. You will need to hire an electrician. It is possible that you can get grounding installed on certain key outlets, such as those that need GFCI protection. Again you will need to consult an electrician or develop basic wiring skills of your own.
Testing an Outlet Ground
You can use an inexpensive circuit tester to check to see if an outlet is grounded. Another option is an outlet receptacle tester. These cost a bit more, but they test for multiple conditions.
A circuit tester lights up when there is power traveling between the two contact points. In a grounded outlet the small slot should be the power, the larger slot is the nuetral. Normally, when power is used, it travels from the hot, through the device and back through the neutral. If for some reason the neutral fails, the ground is used to convey the power back safely.
An outlet receptacle tester has three lights on it the will light up in different combinations, depending on how the outlet is wired. One of the things they test for is 'open ground' and 'open neutral'. Either of these situations is not desirable. For complete instructions on testing an outlet, see the article 'How To Test an Outlet'.
Fixing an Outlet Ground
When an outlet shows 'no ground' or 'open ground' it may just be a problem at the box. A loose wire or an incorrectly wired receptacle could be the problem. If that is the case, it is not too difficult to fix the wiring. It may just be a matter of switching the wires or connecting the outlet to the ground wire.
For instructions on wiring an outlet, see the article 'How To Wire a Receptacle'. This article shows the correct placement of wires to have the outlet work properly.
Adding a Ground Wire
A common problem in older houses is wiring that does not have a ground wire. As mentioned above, the ground wire is only used when there is a failure or some distruption in the current going back through the neutral. Years ago it was not considered necessary to have a ground wire. Ground wires were added as safety features and are now part of the electrical code.
Installing New Wiring
How To Install a GFCI Outlet
Before you begin an electric outlet installation, make sure the power is off. Turn off the breaker and put a piece of tape over it. Double check for power with a tester. Newer plugs all have three wires attached to them. A Hot (Black), Neutral (White) and a Ground (Bare or Green).
How a GFCI Outlet Works
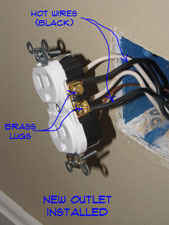
Unhook the wires from the old receptacle, noting the orientation. Attach the ground wire to the green ground lug. Then attach the neutral to the silver side of the outlet. Lastly, attach the hot wire to the brass side of the outlet. This coding system is fairly universal. Depending on the light you have, you may have to look close to tell between the silver and brass lugs.
 Some outlets may allow you to push the hot and neutral wires into the back of the outlet. There are round holes there. You strip the wire the proper distance, keeping it straight and simply push the wire in until the insulation touches the back of the receptacle. Tighten the screws and that is all there is to it. These push connections are sometimes only good for one size wire, such as 14 gauge. To hook to the lugs you will have curl the wires and hook them around the lugs. Tighten them snugly.
For outlets that had four wires attached you will need to reattach all of them. The extra two wires are to feed the next outlet in the circuit. As a safety precaution you want to wrap electrical tape around the lugs. This is especially needed if you have metal boxes.
The final step to install electrical outlets is to put it back together. Use the tester to make sure it is working. Attach the outlet back to the box and then install the cover plate. Got young children? Put the safety plugs back in. Congratulations! You can plug the lamp back in. It's time to move on to other electrical or home repairs.
Electrical Wiring
 There are numerous items in your home that have electrical wiring. Outlets, lights and appliances come quickly to mind. Some items use low voltage, others use a lot of power, like an electric range.
There are two key issues with electrical wiring. The first is the wire itself. Wiring usually runs inside the walls and ceilings of your home. The power runs through the wire and is controlled by a panel box that contains circuit breakers. The second item is the connections that determine where the power goes. The connections are inside of the boxes that devices like outlets and lights are hooked to.
Before attempting any electrical repair, you want to make sure you have a good understanding of electricity. Following safety guidelines cannot be stressed enough. People are seriously hurt and killed by electricity. See the article 'Electricity Safety Tips' and 'Basic House Wiring' for more information.
Electrical Wiring - Finding Help
Below you will find some common problems you are likely to have with your electrical wiring. There is a brief description and a link that will lead you to additional electrical wiring information. Our evaluation sections of the pages will help you to decide if you want to make the repair. The "What Can You Save?" and "How Hard Could It Be?" sections give you a quick overview of the repair. This will help you decide if you feel confident enough the make your own electrical wiring repair.
The "Check the Simple Things First" section will clue you in to easy fixes to check for. Is it possible to solve your problem without a lot of effort? Many times it is. In an effort to warn you about what you are in for, there is the "What Can Go Wrong" section. Benefit from the mistakes made by others, avoid problems.
Electrical Wiring Topics
Installing Electrical Outlets
How many things do you have in your home that have plugs on them. Millions of items manufactured every year, all making the assumption that you will have somewhere to plug them in. That is where the lowly electrical outlet comes in. Set up with a standardized set of openings, things can be plugged into them and 'presto' they work. Follow the link above for more information on the issues associated with electrical receptacles.
Wiring a Light Switch
Light switches are one among the simplest of electrical devices. All they do is break the current to the light. A simple yet important technology.
For information on a standard light switch follow the link above. This article has a discussion on the issues associated with light switches, single, two way or whatever.
Wiring a Three Way Switch
The other weirdly named switch is discussed in this article . OK I understand that there are three elements, two switches and one light, three way. Then why don't we call a standard switch a two way? The article helps you with two of the three parts of your three way, the 'two' switches. We cover all switches in our home electrical repair topics, no matter how many 'ways' they have.
Wiring a Dimmer Switch
Dimmer switches are slick devices that dim your lights to the desired level. There is a level of complexity that comes with a dimmer. The dimmer regulates the amount of power going to a light. Fortunately the technical aspects are built into the dimmer.
Wiring Lights
Things can go wrong with the lights in your home. We already mentioned the light switches. What do you do if the light doesn't work when you flip the switch? Time to get out the candles. That is one option, the other would be to repair the lights.
Most of the time there is a simple explanation for why the light won't work. You may be able to figure it out and repair it in a few minutes. Sometimes you just get tired of your fixtures and want to replace them. Whatever your problem this article can help you with this type of home electrical repair.
Phone Jack Wiring
Internet phones, cell phones, wireless phones and smart phones. Does anybody need to plug a phone in anymore? You would be surprised. Hard wired phone lines are still a big factor in the phone industry.
There are different ways that phones can be hooked up. Different problems, as well. Take a look at this article to see what your problem might be. Phone jack wiring is an important home electrical repair.
Installing a New Circuit Breaker
Once in a while you will have troubles with an electrical circuit in your home. What can you do? You may be able to isolate the problem. You could have a loose connection in one of your boxes.
On a rare occasion a breaker will go bad. Is it possible to change one yourself? Find out if is this is a home electrical repair you can make.