Search
Repair Topics
How To Wire a Light Switch
 Knowing how to wire a light switch can save you both time and money. Working with electricity makes some people nervous. However, if you take the proper precautions, you can fix the switches in your home safely. For safety concerns, see 'Electrical Safety Tips for Homeowners'.
This article discusses standard single pole switches. For other types of switches, see 'Wiring Dimmer Switches' and 'How to Wire a Three Way Switch' for more information. Not sure if this is your problem? See 'Troubleshooting Wiring Problems' and 'Home Electrical Repairs' for a full listing of electrical issues.
How a Light Switch Works
A light switch is a simple device. When it is on it allows the power to go to the light. Off, the current is interrupted and the light is off. Light switches are the easiest of all items to wire.
Only one wire is involved, unless it has a grounding lug and then you have two. The Hot (Black) and the Ground (Bare or Green). Obtain your desired light switch before you begin. For this article we are talking about single pole switches.
I must warn you that there are a lot of choices. You may need to involve your spouse in this decision. I know, it's a hassle, but it's cheaper than divorce court. Find a switch that suits you and you're ready to go.
Wiring a Light Switch - Information
What Can You Save?
Prices will vary but it will probably cost between $40 and $150 to have someone come out and replace a light switch for you. New light switches are a couple of dollars (more for dimmers) and take ten to fifteen minutes to change. Your savings could be between $35 and $145, not bad for fifteen minutes of work wiring a light switch.
How Hard Could It Be?
Wiring a light switch is not that difficult.
Check the Simple Things!
Check the bulbs first. Yes it is possible to get a brand new bulb out of the package and it be bad. Try a second one of the first one still does not work. Loose wires on the switch would be the next simple thing.
What Can Go Wrong?
Electrical shocks can cause severe injury and even death. Be careful, make sure the power is off. Always double check, turn the breaker off and then use a tester to make sure nothing is hot. It is possible for more than one circuit to be fed through a single box. Faulty or incorrect wiring can cause dead shorts and fires. Make sure you understand how to hook something up before you attempt it.
Wiring a Light Switch – Resources
Before you begin you want to make sure that the switch is bad. The article 'Checking for a Bad Switch' covered what you needed to do to figure it out.
A related topic for light switches is testing them. See the article 'How To Test a Light Switch' for instructions on how to tell if the switch is not working the way it should.
Another useful resource for light switches is a wiring diagram. See the article on 'Light Switch Wiring Diagrams' for a visual example of how a switch is wired.
There are different types of light switches. Make sure you are using the type that you need. See the article 'Different Types of Light Switches' for more information.
Summary
Are you done with your wiring a light switch project. We hope it was successful. A few tools and a few minutes should have taken care of it. That was after you selected a switch. Were you able to stick with one for around a dollar? Did you go with a nice decorator one? You know it will make all the other switches look old.
What are you going to do with all the free time you have? Take a look at your list and decide on another project you want to tackle. Now that your confidence has been built up by this success story.
Removing a Dimmer Switch
 Removing a dimmer switch is not too difficult. The first thing you will want to do is turn off the power to the switch. Put a piece of tape over the breaker so that no one inadvertently turns it back on.
This happens when the stereo quits working and your children don't know you're working on the power. In fact let everyone in the house know that you will be working on the electric. Check with the tester to make sure that it is dead.
Before you start removing a dimmer switch, see the article 'Electrical Safety Tips', for added information on electrical safety. Electricity is dangerous, don't take chances.
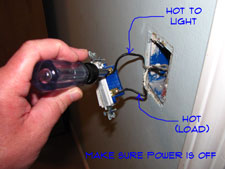
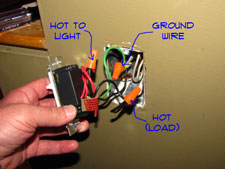
Remove the cover plate and then unscrew the switch from the box. Light switches interrupt the hot (Usually Black or Red) that goes to the light. Inside the box the neutrals (White) will be connected together. So you should have a black wire on both sides of the switch. A ground wire may also be connected to a green grounding lug. Check one more time to make sure that the power is off.
Remove the wires from the old switch. Put the wire nuts back on for now just as an added precaution. For single pole switches, one light, one switch the wiring is simple. You break the current for the hot wire going to the light. Should be two black wires attached to the switch.
Installing the New Dimmer Switch
 With the proper wires located, you can begin installing a dimmer switch. Take note of the orientation of the switch wires. It is likely that the dimmer switch that you purchased needs to be turned a certain way. Check the instructions. I know you hate to do that, but go ahead, wait until no one is looking. Turn the switch the right way.
Bend a hook in the wires or strip them the proper distance if the switch has hold down plates on the lugs. The ground wire is always wrapped around the green screw. Check the installation instructions for the switch you purchased to be sure.
Hook the wires up to the lugs on the switch. Turn the power back on to make sure it is working properly. Does the light work? Yes, great! You're almost done wiring a light switch. Turn the power back off and wrap some electrical tape around the lugs. Screw the switch back into the box and install the cover plate. That's all there is, congratulations!
Dimmer Switch Wiring Diagram
 Locating dimmer switch wires is important. Many dimmers need to be loaded a certain way to work properly. Check the wiring diagram for the dimmer that you have purchased. Do you know which wire is the load (Hot)? You don't, great, what do we do now?
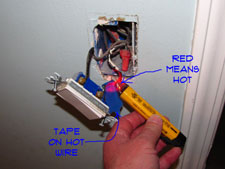
Not a big deal use a voltage tester to check which wire is hot. A non contact tester is best. You will have to turn the power back on. Make sure the wire nuts are on the exposed ends of the wires. Got it now? Put a piece of tape on it to tag it for now.
Make sure the switch is in the off position. One wire leading to the switch should be hot with the switch off. The other wire should not have any power. Are both of them hot? Then the switch is not off. Tag the hot wire before you remove the wires. Turn the breaker back off, remember.
One issue with dimmer switches is that they are bigger than normal switches. You may need to push the wires back into the box a little tighter to make room. Did you think that wiring a dimmer switch would not be any work at all?