Search
Toilets
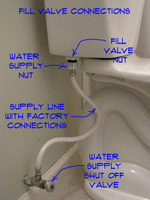
Toilet Water Supply Line Connections
Your toilet water supply line connects to your homes water supply and to the toilet tank.
Do you have a different Problem? See 'Plumbing Repair' or 'How to Fix a Toilet' for a complete listing of related topics.
Connection at the Water Supply
A toilet water supply line needs to be connected to the homes water supply. There should be a shut off valve at this location, but not always. If there is not shut off valve, you will likely need to shut the main water supply off for the house to work on it.
Toilet water supply lines require a 3/8" compression fitting at the valve. If there is no valve, there is an adapter to 3/8" compression.
We have already mentioned the water shut off valve. If the supply line is old the valve probably is also. It might be wise to change it now. See the article 'Repairing Water Shut Off Valves' for more information on what to do.
Connection at the Toilet Tank
The other end of the toilet water supply line connects to the toilet fill valve. This valve is mounted in the toilet tank and the nipple for it protrudes out of the bottom of the tank.
There are gaskets and a large nut that keeps the toilet fill valve held in place. At times a leak from this connection can look like it is coming from the water supply line.
The other end of the toilet water supply line connects to the toilet fill valve. The toilet fill valve uses a floatation device to control the amount of water in the toilet tank. Water running constantly in a tank is a sign of a poorly adjusted or bad toilet fill valve. See the article 'Fixing Toilet Fill Valves' for information on how to adjust and replace this device.
Types of Toilet Water Supply Lines
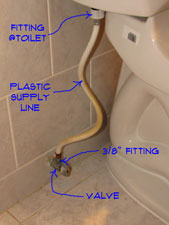 Toilet water supply line come in three styles. Most of the time, you have a 3/8" fitting at the shut off valve and a 7/8" fitting at the toilet tank.
Do you have a different Problem? See 'Plumbing Repair' or 'How to Fix a Toilet' for a complete listing of related topics.
Chrome Plated Brass
In the past you had to purchase a 3/8" brass tube that had a special flared end on it. This tubing was often chrome plated. The tubing had to be bent and cut to length. At the valve, a compression fitting is used.
The brass tubing has a couple of draw backs. First the tubing is stiff and needs to be bent into the proper shape to align properly. Kinking the tubing is a very real possibility. A kinked line should be thrown away and another supply line obtained. The other issue is cutting it to length. Obviously, cutting it too short renders it unusable.
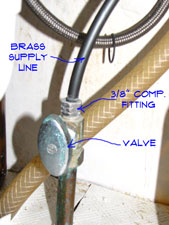 A brass toilet water supply line is a bit more difficult to deal with than a flexible one. For one thing, brass has a tendency to corrode.
A point of reference is that even if your supply line is silver, it is still brass inside. When the brass fittings and pipe corrode, the brass gets delicate. The result is that when you tighten the fittings you may do more harm than good. Sometimes the leak gets worse.
Never try to tighten a leaking line with just one wrench. This is especially true when the fittings are old and corroded. Use two wrenches, one on the fitting you are tightening and the other on the valve or pipe you are tightening to.
For small leaks you can try tightening the fittings. Be careful and don't over tighten. Too much torque and you can make things worse, a little leak becomes a big leak. Go a quarter turn at a time and check to see if it is still leaking. Dry the fitting off with a rag and rub you finger across it. A dry finger should mean no leaks.
If the toilet water supply line is too corroded you will need to replace it. Shut the water off at the water shut off valve. Is the valve old and corroded to? See the article 'Repairing Water Shut Off Valves', for information. With the water off you will want to loosen the fittings. The two wrench thing applies even when you are removing the old one.
Two things you have to do with the supply line. First you have to shape it to the right bends. Use a tubing bender or your thumbs to carefully bend the pipe. Don't kink it. Dry fit the tubing to the flange on the toilet and mark the length to cut it. Use a hack saw to cut the tubing to length.
Get a new nut and ferrule for the end that goes into the valve and a large nut for the closet connection. Make sure the supply line you buy is for a toilet and not a sink, they are different. Put the nut, then the ferrule on the line and start the tubing into the valve. Turn the nut finger tight. Put the nut on the toilet and tighten finger tight. Tighten them down if you are sure they fit. Turn the water back on and check for leaks.
Flexible Supply Lines
A more popular choice in recent history is a flexible line with factory installed fittings. Since the line is flexible you can move it as needed for proper alignment. The fittings screw onto the valve and toilet tank without any additional parts. Simple, less than ten minutes to install one of these.
Toilet water supply lines come in two styles. Plastic lines are less expensive and are usually white. Stainless steel lines cost a little more. The steel lines are still flexible and are a little tougher.
Flexible toilet supply lines have factory installed ends on them. These ends have integral washers built into them, so they are ready to go.
Tightening a Leaking Supply Line
The likely problem with this type of line is a leak at one of the fittings. Tightening them up is usually the solution.
A flexible toilet water supply line is a little easier to tighten. It is still a good idea to use two wrenches. This is just to make sure that you don't damage anything else. Tighten the fitting that is leaking a quarter turn at a time until the leak stops. Use a dry rag and your finger to check for leaks.
Replacing a Toilet Supply Line
Replacing the supply line is pretty easy. Shut the water off before you loosen the fittings. Loosen the fittings and remove the old supply line. See the article on 'Toilet Supply Line Fittings' for information on getting the supply line connected correctly.
Obtain a flexible toilet water supply line that is close to the length you need. Do not get a supply line for a sink, it will not work on a toilet. One end of a toilet supply line is much larger than a sink line.
Start the fittings onto the proper male threads at the valve and toilet. The large end goes under the toilet tank.
Use two wrenches when you tighten the fittings, you don't want put stress on the valve and get it leaking. Tighten up the fittings and check for leaks. That's it, not much to it.
Supply Line Sizes
These lines come in various lengths, such as 9", 12" , 15" and 20". Try to get a length that is slightly longer than what you need. Too long and you will have to loop it under the tank. Not the end of the world, but less desirable.
Replacing a Toilet Flange
Replacing a toilet flange when they crack or break is very important. A broken toilet flange can allow the toilet to loosen and start leaking. A toilet that will leaks at the base will get dirty water on your floor.
Replacing a toilet flange will seem like a big job at first. However, the biggest part of the job is removing the toilet.
Purchasing a Toilet Flange
You are going to want to purchase a toilet flange that is suitable for a retrofit situation. You will probably want one with a pressure fitting that will attach to the old pipe.
Your old toilet flange may be partially broken already. Remove the broken pieces that are loose. You may need to chisel away what remains of the old flange. Try not to damage the piping that it is attached to.
Installing the New Toilet Flange
Follow the manufacturer's instructions for installing the new toilet flange. Make sure the toilet flange is level with the floor before tightening the compression fitting.
Once the fla nge is snug you can screw it to the sub floor. Install new tee bolts and a wax ring and you are ready to replace your toilet.
Caulking Around a Toilet Base
This article on 'How To Caulk a Toilet' will give some tips and instruction on sealing the base of your toilet to the floor. Whenever you remove your toilet, you will need to replace the caulking.
Some common reasons for removing a toilet are troublesome clogs, replacing the wax ring, replacing the flooring and working on the toilet flange.
Toilets That Are Leaking at the Base
A word of caution about leaking toilets. Adding caulk around the bottom of a toilet is 'NOT' a solution for a leak. You will trap the water and cause other problems, not the least of which is rotting out your subfloor. If you have a toilet that is leaking around the base, see the article 'Fixing a Toilet Leaking at the Base'. You want to fix the leak as soon as possible to avoid further damage.
Reasons For Caulking the Toilet Base
There are two key reasons for caulking the toilet to the floor. First, you want your toilet to look like it belongs there. You will usually have an unsightly gap around the base if you do not caulk it.
The second reason it that you will invariably get some water on the floor. Mopping the floor, spills and dripping while we are drying off will get water on the floor. Water that gets under the toilet base cannot be cleaned up. It will produce unwanted odors. Caulking will keep the excess water out on the floor where it can be dealt with.
Choosing Caulk for a Toilet
You want to use a good quality 'Tub and Tile' or 'Bathroom' caulk for this job. This means it will be 'Silicone', probably 100%. Do not use standard painters or latex caulks for this job. Your bathroom is considered a 'wet' area, so you want caulk that will stand up to the moisture. A tube of this type of caulk will run between $5 & $10, it is best not to be cheap about this purchase.
Getting the right color is a concern. Ideally, the color of the caulk will closely match the color of the toilet. White is common of course, but many times people with have decorator colors for the bathroom fixtures. Talk to the staff at your paint supply store for assistance.
Preparation for Caulking
Silicone caulk is not the easiest stuff to work with. It 'Does Not' clean up with water. The best thing to use is a solvent, lacquer thinner is preferred by many. Silicone also requires some tooling (yes, that can be your finger).
First thing you want to do is prepare the area. Carefully clean the surfaces that the caulk needs to stick to. Use caution with solvents. You can ruin your flooring or other surfaces. Make sure the cleaning agent you use is compatible with the finishes around your toilet.
Once you have the area clean, you will want to tape off the surfaces that you don't want to get caulk on. If you are skilled at caulking, you can skip this step. However, most of us are amateurs and don't get enough practice to be skilled. Use blue or green tape on both sides of the caulk joint. When you tool the joint, the excess will harmlessly wipe off onto the tape.
Caulking Around the Toilet
Once you have taped off the joint so that you only get caulk where you want it, you are ready to start. You want to fill the gap completely, so make sure you get enough material into the joint. To do this, you will use a caulking gun. Keep a scrap piece of cardboard handy to set the gun on when you need to set it down. Release the pressure on the gun when you set it down. Even when you do that the caulk will continue to ooze out the end, so you want it dripping on something besides your floor.
Caulk all the way around the base of the toilet, making sure the joint is filled. Have a rag handy with a little solvent on it for when you start to tool the joint.
Don't wait to long before you smooth out the joint. Silicone will start to tack after a few minutes and the tooling will be more difficult. Use a joint tool or your finger to smooth and shape the joint to a pleasing look. Keep wiping off the excess caulk onto the rag.
Cleaning Up
When you have the joint completely tooled, you will want to give it a few minutes to set. After that, you can pull the tape off carefully. Pull the tape up and away from the joint in a continuous motion. Have a garbage bag handy to throw the tape away.
After the tape is removed, carefully clean away any caulk that got where you did not want it. You can also let the caulk dry and use a scraper or razor blade to remove it.
Try to let the caulk dry for 24 hours before you get it wet. Some caulks claim that they are waterproof in shorter amounts of time. Check the label to make sure.
Summary
See the article 'Fixing and Troubleshooting a Toilet' to make sure that the rest of your toilet components are functioning properly.