Search
Toilets
Tightening Toilet Flange Bolts
Toilet flange bolts or tee bolts as they are commonly called are in my opinion very poorly designed. They work on compression, when the nut is tightened the flanged end of the bolt pulls against the toilet flange keeping it in place.
This works great when the bolts are new. However, when they are old and corroded, they can seize up, causing them to spin and not tighten. Take a pair of pliers and hold the threaded portion of the bolt and use a wrench to tighten the nut. Hopefully it tightens and you have solved your problem. If no threads are showing try to tighten it with just the wrench. If it spins you will have to replace the bolts.
Assuming the tightening is successful, tighten both sides until the toilet is secure and not loose. Be certain that the toilet is not leaking. You may want to wait a day or two to make sure. No leaks, good. Use a silicone caulk around the bottom of the toilet to keep water from the floor out. Replace the caps for the tee bolts and you are done. Good Job! That's all there was to this toilet flange repair.
Troubleshooting Toilet Bowl Repairs
Toilet bowl repairs involve the lower portion of your toilet. Most toilets are made of two pieces, the toilet bowl and the tank. The bowl or base it the part that is attached to the floor. The seat is attached to it and it has the trap that connects to the drain in the floor.
Toilet Bowl Issues
Water Level
Loose
Leaking
Broken Toilet Flange
Loose Toilet Seat
New Toilet Seat
Toilet Fill Valve Replacement
Replacing a toilet fill valve is not a hard job. You need to drain the tank and then remove the old fill valve or ball cock. Once that is done it only takes ten or fifteen minutes to install the new fill valve.
For related articles on toilets and toilet tanks, see the articles 'How To Fix a Toilet' and 'Troubleshooting Toilet Tank Problems' for information and a listing of all the toilet repair topics.
Purchasing a Toilet Fill Valve
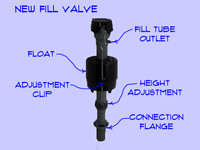
The only spot that needs to match the toilet is the threaded pipe that goes through the hole in the bottom of the tank. With that said, toilet fill valves are pretty universal. Most of the newer ones have a vertical post that also acts as the water supply. The floatation device is round and goes up and down along the post.
What if you have a ball cock. One of the ones with the big float ball attached to a horizonatal arm. Can you use a newer style flush valve? Yes you can, just completely remove the ball cock assembly and the new fluidmaster fill valve will fit in nicely.
A new fill valve will run between $10 and $20. They are available at hardware stores, home supply houses and numerous places online.
Draining the Toilet Tank
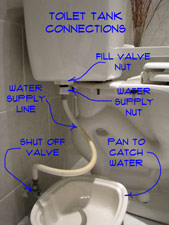
Draining the toilet tank is a must to replace a toilet fill valve. Depending on the age of your toilet, there could be as much as five gallons of water in the tank. The toilet fill valve is attached via a hole in the bottom of the tank.
Even after the tank has been flushed and the water is off, there is still a lot of water in the bottom of the tank.
To completely drain the tank you are going to have to loosen the nut on the toilet fill valve. You will need to have a pail underneath of the fitting, since the water will drain out onto the floor. See the article on 'How To Drain a Toilet' for complete instructions.
Removing the Old Fill Valve
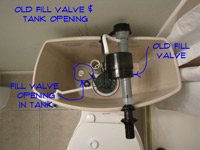 Before removing the toilet fill valve, make sure the tank is empty. You should have already taken the nut off the water supply and loosened the retaining nut that holds the fill valve in place.
Finish taking the nut off and then unhook the tube that connects the fill valve to the flush valve. Remove the fill valve and set it aside for the moment.
You should already have the new one available and now it is time to put it in. The vertical fluid master type as shown in the picture are the preferred style. You can replace ball cock type fill valve with this style.
Although, it may not be much fun, you should check the instructions for the new fill valve. Make sure you understand the order the parts should go in, especially the seals. Nothing worse than getting something back together only to find out that it leaks. There is usually a diagram that will help you.
Installing the New Toilet Fill Valve
 Installing a toilet fill valve is straight forward after the old valve is removed. Make sure the hole where the old one came out is clean and free of residue.
If you are using a fluidmaster type fill valve the length is adjustable. Compare the new valve to the old one and see if an adjustment is needed. Put the washer onto the threaded nipple with the rounded side turned down.
When the fill valve is set the proper length and the washer is in place, you can put it back in the hole where the old one was. Double check the instructions for the new valve for any specific steps that need to be taken.
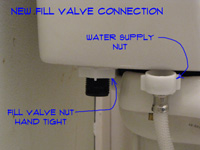
Start the nut onto the treads and snug it up finger tight. Adjust the orientation of the float inside the tank so that it does not interfere with the tank lever. Tighten up the nut until the fill valve is secure. Attach the tube from the flush valve at the outlet on the fill valve.
Put the nut for the supply line onto the threaded nipple and hand tighten. Use the adjustable pliers to tighten it snugly Do not over tighten, the parts are plastic. Turn the water on and check for leaks. Adjust the float so that the water shuts off at the correct height. No leaks, toilet flushes, great. You have successfully completed another home repair.
Toilet Fill Valve Repair
The toilet fill valve is the device that allows water to get into your toilet tank. They generally have some type of float on them that causes the valve to shut off when the water has reached the correct level.
There are two things that are normally done with them. First adjusting them to keep the water at the proper height and Second, replacing them when the valve fails to shut off.
Not sure if this is your problem? See the article 'How To Fix a Toilet' for information on all of the possible toilet issues and what needs to be done to solve them..
The valve can go bad and get to the point where even after adjusting the float, the toilet will continue to run, wasting water. Replacing the fill valve is not a difficult job, read on and learn how.
A bad fill valve will usually cause the toilet to run constantly. This is a big waste of water and will cost you money on your water bill.
How a Toilet Fill Valve Works
The toilet fill valve is the device that allows the tank to fill with water to the correct level. The water is stored in the tank until the toilet is flushed. This valve uses a float to turn the water on and off.
As the name implies, it is a valve, just like any other water valve it has a seal inside that keeps water from getting through when it is closed. Just like other valves the seals can wear out and the valve won't stay closed.
Toilet Fill Valve Repair - Information
What Can You Save?
Replacing the toilet fill valve for an experienced person is a ten to fifteen minute job. Let's assume he does not take to long to assess the problem. One service call $50 to $100 plus one fifteen minute period. Total savings could be between $65 and $135 plus parts.
How Hard Could It Be?
This repair requires that you remove the fill valve and replace it. Not hard at all.
Check the Simple Things!
Make sure you try adjusting the float first. Adjust if down if the tank is running all the time. When the valve keeps running no matter what you do, the valve is bad. Time to replace it.
What Can Go Wrong?
Replacing the toilet fill valve involves removing it from the tank. The tank contains water, clean water, still water. You will need to take precautions to deal with any water that may spill out of the tank when it is removed. Anything that can be damaged by water should be removed from the area before the repair is attempted. Failing to drain the tank down can generate a lot of water on the floor and surrounding area. Getting the toilet partially repaired before it gets too late or the parts store closes can leave the toilet not operating. One trick is that a toilet can be flushed by dumping a couple of gallons of water quickly into it. This emulates the normal function of the tank.
Adjusting the Float
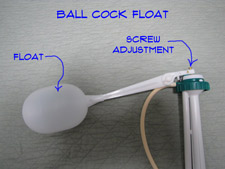 The method for adjusting a toilet float will vary depending on the type of fill valve you have. Older toilets may still have a ball that is attached to a rod. This type will have a screw near the valve that is used to adjust the height of the float. The water level in the tank should be adjusted so that it is near the top of the fill tube in the center of the toilet.
Newer toilets will have variations of a vertical post that is in the corner of the toilet. It will have a float attached to it that controls the water that is allowed in the tank.
Getting the water level right is important. See the article 'How To Adjust a Toilet Float' for complete instructions what to do.
Replacing a Toilet Fill Valve
If you have adjusted the toilet float and you cannot get the water to stop running, you may have an issue with the toilet fill valve. When the valve won't close properly, there is not much you can do with it. There are no replacement parts for the fill valve.
Replacing a toilet fill valve it the likely option. They are not expensive, maybe ten or fifteen dollars, depending on where you purchase it at. They are somewhat universal so a standard fill valve will work in most toilets.
See the article 'Replacing a Toilet Fill Valve' for instructions on how to change the valve. There is some preparation involved so you are going to want to review the article.
Repair and Replacement of a Toilet Flush Valve
 The toilet flush valve is a key element in the toilet tank. The flush valve is not at fault very often.
The toilet flapper can cause the toilet to run intermittently or not flush correctly. Before you assume it is the flush valvem make sure the flapper is not the culprit. See the article on 'Toilet Flapper Repair' for more information.
Not sure what your problem is, see 'How To Fix a Toilet' to troubleshoot your problem.
It includes a fill tube and the flapper and water inlet for the toilet bowl. Most replacement kits include a new gasket for the tank and bolts to hold the tank in place. You will want to replace the flush valve if the seal between the tank and the bowl is leaking and does not respond to tightening. Or if the flapper will not seat even after being replaced.
Is your problem a leak at the bottom of the toilet tank? You will want to try to tighten the bolts holding the tank in place first. Check out the article on Toilet Leak Repair for more information.
Toilet Flush Valve Repair - Information
What Can You Save?
Replacing the flush valve is more work than a typical service call. The initial call will be $50 to $100. If it takes longer than the initial time period (this varies), they generally charge you in fifteen minute increments. $15 to $35 per fifteen minute period. It is unlikely that you need a new toilet if it is just leaking. Assuming a repair period of one service call plus one half hour the Savings would be from $80 to $170. Parts would be extra of course, and marked up at a repair shop's pricing.
How Hard Could It Be?
This repair requires that you take off the toilet tank. This is harder than some of the other toilet repairs.
For and explanation of the terms in this section, see 'How to Use This Site'.
Check the Simple Things!
Check the toilet tank flapper first for a toilet the leaks water into the tank and runs intermittently. See the article 'Toilet Flapper Repair' for information on adjusting or replacing a toilet flapper.
What Can Go Wrong?
Replacing the toilet flush valve involves taking the toilet tank off the base. You will need to take precautions to deal with any water that may spill out of the tank when it is removed. Anything that can be damaged by water should be removed from the area before the repair is attempted. Failing to drain the tank down can generate a lot of water on the floor and surrounding area. Getting the toilet partially repaired before it gets too late or the parts store closes can leave the toilet not operating. One trick is that a toilet can be flushed by dumping a couple of gallons of water quickly into it. This emulates the normal function of the tank.
Replacing a Toilet Flush Valve
Draining the Tank
 Draining the toilet tank is the first thing you want to do before working on a flush valve. Toilet tanks have a lot of water in them, that can get everywhere. It is clean water, but still, it makes a mess.
Turn off the water supply to the toilet first. Most tanks have a fill line marked on the side of the tank. Some do not. You can use a marker to put a mark at the correct water level if it is missing. The new flush valve tube may be a different height than the old one.
With the water turned off, flush the toilet to drain out most of the water from the tank. Place a pail below the nut for the toilet tank inlet. Loosen the nut on the water supply line. If the water is off, you should not get much water from the supply line.
There will be about an inch of water left in the bottom of the tank. Sopping the water up with rags will be a tedious task. The best way to finish draining the tank is to loosen the nut to the toilet fill valve. Loosen the nut to the fill valve and let the water drain into the pail.
Any water that you do not remove is likely to wind up on the floor. Removing the toilet flush valve will completely open up the bottom of the tank. Draining the toilet tank prior to this step is important.
Removing the Toilet Tank Bolts
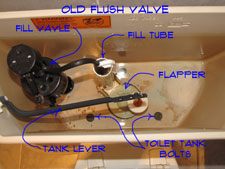
Removing toilet tank bolts begins with the right tools. The tops of the bolts usually take a large flat blade screwdriver. On the under side of the bolts you may find brass or plastic nuts. The plastic nuts may have wings on them that allow you to hold them with your fingers, this is nice feature.
Depending on the configuration of your toilet, you might need, an adjustable wrench, box end wrench or even a deep socket wrench.
You may have gotten a tool with the toilet that was used to tighten these nuts. Your builder or plumber may have thrown it away. Finding it now may be a challenge. Before you begin, try to locate wrenches that you can use on the nuts in question.
The tank is held onto the base by two or three bolts that are visible from inside the tank. Many times you can hold the plastic nuts with your fingers. Loosed and remove both bolts. That's all there is to it, the tank should be free. Place a piece of cardboard on the floor and pull the tank up from the base. Lay it on it's back on the cardboard.
Removing the Flush Valve
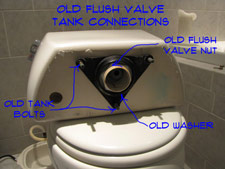 After you have removed the tank from the base, removing a toilet flush valve is pretty easy. Lay the tank on its back to see the washer and nut for the flush valve.
Before you purchase a flush valve, make sure you know the size. Most of them are a nominal 3" or 4" diameter. If you are not certain, you want to take the old flush valve with you to match it up.
Certain brands of toilets have proprietary flush valves that only fit that brand of toilet. This is usually only true of more expensive toilets. If you are in doubt, check the internet for your model of toilet to see which flush valve it takes.
Remove the rubber washer from the base of the tank. There is a large plastic nut that holds the flush valve in place. Use a large pair of adjustable pliers to remove the nut, holding the valve assembly from the inside of the tank.
Remove the tubing that is connected to the top of the flush valve tube. Remove the large nut and the flush valve should be free. Remove and discard the old flush valve along with the flapper. You should have gotten a new one with the flush valve kit.
Installing a New Flush Valve
 By this time you should have the old flush valve removed. Before installing the toilet flush valve you want to get the instructions for the new one. Follow the instructions on the new valve to properly locate the washers and nut.
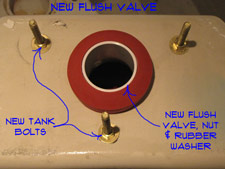
Put the new flush valve into the tank and orient it appropriately the same way the old one was. There should be a washer between the valve and the tank, if it is supplied loose you will need to put it on. Put the plastic nut on and tighten it down.
Obviously, with plastic fittings you want to exercise some caution with tightening them. On the other hand, make sure the nut is snug. If you get a leak from this connection, you will have to start all over again. Yes that is correct, you won't know unitl it is all put together and you turn the water on.
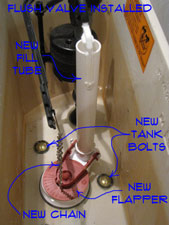
Place the main seal over the outlet and push it up to the bottom of the tank. Attach the tubing at the top of the fill valve. At this point the inside of the tank should look similar to how it was when you took it apart.
Replacing the Toilet Tank
 You may want a little help replacing the toilet tank. It is fairly heavy with all of the parts inside. In addition, it is a little awkward to handle.
Put the tank back on the toilet base and start the bolts and washers through the holes. Put the wing nuts on and snug them up finger tight. Hold the wing nuts and use the screwdriver to tighten the bolts.
Tighten them down evenly, switching back and forth. Do not over tighten. Make sure the tank is secure.
Hook the flapper chain to the tank lever making sure that there is no slack. It should operate freely, up and down.
Make sure the nut for the fill valve is snug and then hook up the water supply. Tighten the nut for the water supply line, don't over tighten it, remember it is plastic. Turn the water back on and check for leaks. First check the water supply and then the main seal. No leaks, good. The float for the tank should still be set at the proper height.
When the tank stops filling, check the water level. Too low, adjust the float until the tank fills to the correct level. After that, flush the toilet. All your problems should be solved.
Summary
So replacing a toilet flush valve is a little bit of work. Taking the tank off sounds a little scary at first. Once you are past that it is a breeze. One big plastic nut and a few bolts to tighten. You have to do a leak check, but that's not hard.
All done, toilets works great, Good Job! This is a home repair has a higher level of difficulty. By following the instructions and taking your time you were able to do it. What's even better is that you saved some money, great.