Search
Toilets
Replacing a Toilet Flapper
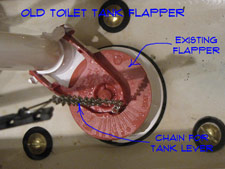 Replacing a toilet flapper is not a hard job at all. Unhook the chain from the toilet tank lever and remove the flapper from the fill tube. Some types have an assembly that slides over the fill tube.
Not sure if you have a problem with your toilet flapper? See the article, 'Fixing Toilet Tank Issues' or 'Fixing and Troubleshooting Toilet Problems' for a complete listing of all the subjects related to toilet repair.
Before you can replace your flapper, you will need to purchase a new one.
Purchasing a Toilet Flapper
Toilet flappers can be ordered online or are available at home supply stores. Most of them are universal and vary only by size.
Cost
A toilet flapper is not an expensive item. You should be able to find one for around ten dollars, although some may cost more. For a premium toilet, you may have to obtain an particular flapper that is matched to the toilet, these will likely cost more.
Getting the Right Size
In the past flappers were pretty universal. With the new water saver toilet requirements (all new toilets are required to use 1.6 gallons of water), there have been some engineering changes. Many of the newer toilets have a 3" diameter outlet for the flush valve, instead of the 2" that was standard for many years.
For a long time all toilets were manufactured using a 2" outlet for the flush valve. Most flappers would handle this opening size as long as the opening did not exceed 2 1/2" or so. There has to be enough of a flange around the opening for the flapper to properly seal. If there isn't, the toilet will leak water into the bowl and the tank will need to refill periodically.
Check the size of the existing flush valve outlet before getting a replacement flapper. Lift the flapper up and measure the inside diameter of the outlet. Should be either 2" or 3". Purchase the appropriate replacement part.
For universal replacement flappers, you can get a 2" or a 3". If your toilet has been installed since 2000, it is likely that you will need a 3" flapper. Prior to that time, the 2" will likely work. If you want to be sure, take the old flapper with you when you go shopping.
Installing a Toilet Flapper
Before you can install the flapper, you will need to shut off the water to the toilet. Flush the toilet to drain most of the water out of the tank. Take the lid off the toilet tank to see the flapper location. A little water in the bottom of the tank is okay and will not interfere with the installation.
Attaching the Flapper to the Flush Valve
The flapper should attached to plastic wings on either side of the fill tube. The flapper is made out of rubber, so there are two flaps with holes in them that go onto the side of the flush falve.
Near the bottom of the flush valve you will see two ears that protrude out the sides. The flapper presses on and off these ears. Pull the old one off and then put the new one on over the two ears. Make sure it is moving freely up and down.
The new flapper should completely cover the rim of the flush valve with some over hang. If the edge of the flapper appears to be too close to the edge of the flush valve opening, you may have gotten the wrong flapper.
Hooking Up the Pull Chain
For the flapper to work, it needs to be attached to the arm on the toilet handle. This is done via a chain that is either metal or plastic. The chain should be hooked to the new flapper already.
There will be a clip that holds the old chain onto the arm of the toilet handle. Remove the clip and remove the old chain. Attach the new chain with the new clip.
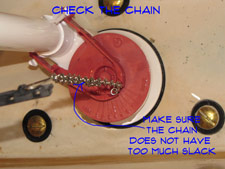
You want some slack in the chain, but not too much. If the chain is too long, it will tangle and cause the flapper not to open or not close. See the article, 'Adjusting a Toilet Handle Chain' for infomation on getting the chain located properly.
Test the Flapper
After you have installed the new flapper, turn the water to the toilet back on. After the tank fills, flush the toilet a couple of times to make sure the flapper is opening and closing correctly. Check to make sure that there is no interference from the chain.
Summary
Replacing a flapper is a pretty simple job. You just need to make sure that you get the right one for your toilet. Most of the time this will be either a 2" or 3" flapper. While you are working in the tank, you should check to make sure that the toilet tank water level is set to the right height. See the article 'Setting Toilet Tank Water Levels' for instructions.
Checking the Toilet Flapper Chain
 Checking the toilet flapper chain is the first step when your tanks refills intermittently. A poorly seated flapper will allow the water in the tank to drain out, causing the tank to refill.
Not sure if this is your problem? See the article 'Troubleshooting Toilet Problems' for a listing of all the toilet repair topics.
Checking the Toilet Flapper
Take the lid off the toilet tank. Look at the chain that connects the toilet tank lever to the flapper. Is there a lot of slack in the chain? When there is too much slack the flapper can lift slightly and then the weight of the water can push it back down before it allows the proper amount of water to go into the toilet.
Try it, is the tank draining down completely when you depress the lever? No, adjust the chain so that there is not a lot of slack in it. Not so tight that it holds the flapper open and allows water to drain out.
You adjusted the chain and the toilet flushes correctly. Problem solved, Great.
Replacing a Toilet Flapper
The toilet flushes fine but there is a trickling sound after the tank is completely full. This would mean that the flapper is not seating correctly. You have two choices here, replace the flapper or replace the whole flush valve assembly. A flapper is around five dollar and two minutes work Try this first, it works most of the time, see step two.
See the articles 'Replacing a Toilet Flapper' and 'Fixing Toilet Flush Valves' for options on what can be done at this point.
Toilet Flapper Repair
 Toilet flapper repair, what could go wrong with such a simple device. A toilet that runs intermittently without being flushed will usually have a malfunctioning flapper.
Not sure what your problem is? See the article on 'How To Fix a Toilet' to narrow down your problem.
At times the chain may hang up and cause the flapper not to close correctly. The rubber can age and it may not seat correctly. Adjusting or replacing the toilet tank flapper is a quick easy job.
The toilet flapper is not the only thing that can cause a toilet to run. A bad toilet flapper will cause the toilet to leak water into the tank and then run intermittently.
A toilet that runs constantly is usually caused by a bad fill valve or a float that is need of adjustment. Does it sound like the toilet fill valve? Check out this article on replacing the 'Toilet Fill Valve' and adjusting the float.
Toilet Flapper Repair - Information
What Can You Save?
You can save a service call, $50 to $100 plus the mark up for the parts. A new flapper is around five dollars.
How Hard Could It Be?
A toilet flapper repair is one of the easiest home repairs you will find.
For and explanation of the terms in this section, see 'How to Use This Site'.
Check the Simple Things!
This is a simple thing, nothing else to check. OK, there is one thing, check the chain and make sure it is not tangled.
What Can Go Wrong?
Worried about losing water. Shut the water supply off while you work on the flapper. I usually don't bother. Adjusting or replacing takes about five minutes. The water is cold, not a good idea for someone with arthritis.
Toilet Flush Valve Issues
Most of the time, replacing the toilet flapper will solve the problem. It is worth the risk to try and replace the flapper first.
Sometimes the rim of the flush valve corrupts and even a new flapper will not seal as it should. Replacing the toilet flush valve is a fairly big project. It does involve removing the toilet tank.
The toilet tank is held in place by bolts and there is a seal between the tank and the bowl. Unhooking the supply line, draining the tank, removing the flush valve, installing the new flush valve, setting the tank and getting it working again could easily take two to four hours.
Need to replace your 'Toilet Flush Valve'? Make sure you have tried fixing the flapper chain and replaced the toilet flapper before you decide to do this. See the article 'Replacing a 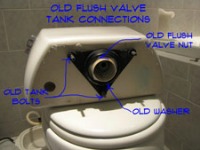 Toilet Flapper' for more information.
In Step One the article 'Checking the Flapper Pull Chain', helped you to make sure that the pull chain is free and working properly. This is the simplest fix of all.
'Replacing a Toilet Flapper', covered what to do when the flapper is old and worn. It may have not been seating properly, causing the water in the tank to drain down.
Replacing the toilet flapper may not have solved your problem. The article, 'Toilet Flush Valve Problems', discussed what to do if the flapper will still not seat properly.
Summary
You can't get much simpler when it comes to a repair project. A few dollars and a few minutes should be about it. I love jobs like this, when you can be a hero and not have to put out much effort.
I hope that your toilet flapper repair was not a problem. In addition, I hope that it was successful. A toilet the runs off and on and leaks constantly can be very irritating. Having solved this problem you can move onto other home repairs that you may have.
Troubleshooting Toilet Tank Repairs
To troubleshoot toilet tank repairs you need to understand that a toilet tank has a number of important components built into. To fix a toilet tank you will need to adjust or replace one of these components.
How a Toilet Tank Works
Troubleshooting Problems
Toilet runs constantly
Toilet tank refills when the toilet is not flushed.
Not enough water in the tank.
Tank does not refill.
Water trickles into the toilet bowl.
Toilet Leak Detection Tablets
 Toilet leak detection tablets are used to dye the water in the toilet tank to track down a leak. This method is used when you have a slow leak around your toilet flapper. The leak may be slow and not make any noticeable noise or disturbance in the toilet bowl.
Toilet tank leak dye tablets can be used to find even very slight leaks. If the dye gets from the tank into the bowl, you know you have a leak.
Not sure if this is your problem? See the article 'Troubleshooting Toilet Problems' and 'Home Plumbing Repair' for more information and a listing of all the toilet related problems.
Locating Toilet Leak Detection Tablets
There are several manufacturers that make these tablets. Such as Niagara Conservation Corp, New Resources Group and AM Conservation Group. They are relatively inexpensive, although prices can vary quite a bit. Hardware stores and home supply stores may have them in stock.
To find them online, search for 'Toilet Leak Detection Tablets' or 'Toilet Tank Leak Dye Tablets'. A couple of links you can try are 'Niagara Conservation' or 'Conservation Mart'. At the time of this writing, Conservation Mart had them for $0.17 a package.
To find them locally, you may want to call ahead to your hardware or plumbing supply store to make sure they have them in stock. For such a small item, you don't want to be wasting time and gasoline driving around town.
Using Toilet Leak Dye Tablets
The toilet leak detection tablets need to go into the water inside of the tank. You use one or two tablets per the manufacturers instructions.
Remove the lid from your toilet tank. The lift straight up and should not be attached in any way. They are made of porcelain, so be careful where you set is down. Do not drop it, the toilet tank lid can crack or shatter.
Drop the tablet(s) into the water inside the tank as directed. Wait about 15 to 30 minutes for the dye tablets to dissolve or until you see the dye in the bowl. If you see dye in the bowl your toilet flapper is allowing water to drain into the toilet.
Obviously, water running down the drain for no good reason is costly. It can also be irritating since the tank will need to refill periodically. At night this can be bothersome.
Fixing Toilet Tank Leaks
For this type of leak it is one of two problems. The toilet flapper or the toilet flush valve. The toilet flapper is the easier of the two to fix. See the article 'Toilet Flapper Repair' for more information.
The other possible problem would be the toilet flush valve. The toilet flush valve is the part that the flapper is connected to. It provides the fill tube for the toilet and allows the water from the tank to enter quickly into the toilet bowl. Replacing this item is a bigger job, see 'Toilet Flush Valve Repair' for instructions.