Search
Toilets
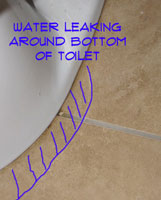
Toilet Leaking at Base
 This article on 'Toilet Leaking at Base' will help you to idendity the cause of your leak and direct you to the resource that will help you fix it. This type of leak occurs when you flush the toilet. Tightening the toilet tee bolts and replacing the wax ring are two ways that this problem can be fixed.
Before you head down this path, make sure that the leak is coming from the base. Other parts of the toilet may be leaking and creating water on the floor.
Review the troubleshooting section in the article 'Fixing a Leaking Toilet' to locate your problem. For other toilet issues you want to take a look at 'Fixing and Troubleshooting Toilets', this has a complete listing of toilet problems along with solutions.
Toilet Leaking at the Base Concerns
The first precaution would be to stop using the toilet if this is possible. The water that is leaking out of the base of the toilet is dirty water. This is water that has been in the bowl when the toilet is being used. There may be odor as well from this type of leak.
This type of leak can damage the sub floor, flooring and possibly the ceilings below the toilet. It also creates an unhealthy situation in your bathroom
You are going to want to use some disinfectant when cleaning up after this type of leak.
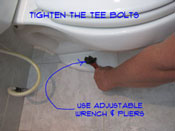 Tightening Toilet Tee Bolts
Is the toilet loose or is it bolted tightly to the floor? If it is loose, there is a good chance that the wax ring is not longer providing the proper seal.
A loose toilet can start to leak around the base. Tightening the toilet may help. There is one warning about the expectations for success with this method.
You do want your toilet fastened to the floor securely. The tee bolts that are connected to the toilet flange serve this purpose. A wax ring in compressed between the flange and the base of the toilet, forming a water tight seal. The wax ring is not elastic and will not spring back once it is compressed. With that said, tightening the tee bolts may not stop the leak if the wax ring is not sealing properly.
(1) Make sure the toilet is positioned correctly on the floor.
(2) Remove the plastic covers from the tee bolts.
(3) Use an adjustable wrench, open end or box end wrench to tighten the bolts until the toilet is secure.
(4) If the bolts are frozen or they just spin you may need to replace them. See the article 'Replacing Toilet Tee Bolts' for more information.
Replacing a Wax Ring
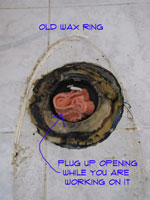 When the seal is broken between the bottom of the toilet and the wax ring, there is little you can do short of replacing it. A failed wax ring will definitely cause a toilet to leak at the base.
The good news is that the wax ring only costs a few dollars. The bad news is that you have to remove the toilet to replace it. This is not a five minute repair, instead it may involve a few hours and the need for some help.
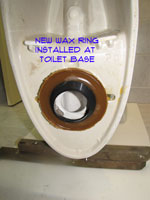
(1) Purchase a suitable wax ring for your toilet. See the article 'Purchasing a Toilet Wax Ring' for more information on getting the right one.
(2) Remove the toilet from the floor and lay on its side. Caution see the article 'Removing a Toilet' before proceeding with this step. The toilet needs to be drain and shut down before removal. Additionally, you may need some help removing the toilet.
(3) Carefully clean away the old wax ring from the toilet base and the toilet flange. See the article 'Replacing a Toilet Wax Ring' for additional instructions.
 (4) Replace the toilet tee bolts if they are corroded. See the article 'Replacing Toilet Tee Bolts' for instructions on how to do a better job so they can be loosened in the future.
(5) Install the new wax ring on the base of the toilet. Add a filler wax ring for toilet flanges that are depressed below the floor line. See the article 'Replacing a Toilet Wax Ring' for more information.
(6) Install the toilet in its original position. You may need some help for this step. See the article 'Installing a Toilet' for additional information.
(7) Check for leaks. After the water is turn back on, check the base for leaks. You may want to wait a few days before you caulk the base to make sure that your problem is solved.
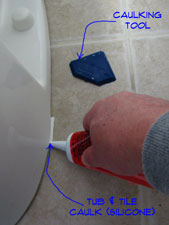 Caulking the Base of a Toilet
Caulking around the base of the toilet is not a solution for a toilet that is leaking around the bottom. The reason for caulking around the base is to keep water from mopping and other sources from getting under the base of the toilet.
Water that is trapped under the base may cause mold and odors that cannot be reached. The caulking will keep the water out on the floor where it can be cleaned up.
The leaking toilet bottom should be repaired before caulking is installed. Once you have made the repairs, you can review the article 'Caulking a Toilet Base' for some information on properly sealing the bottom of the toilet.
Toilet Leaking at the Base – Summary
Have you been able to fix the leak at your toilets base? Still have issues? Return to 'How To Fix a Leaking Toilet' for more topics. You can also return to the 'Home Repair Central - Home Page' for additional information.
Toilet Supply Line Leaking
There are four possible places that a toilet supply line can leak. Sometimes it is difficult to tell where the water is coming from. It is possible for water to be leaking from the tank and running down the supply line, making it appear that the supply line or valve is the problem.
Not sure if this is your problem? See the article 'Troubleshooting Toilet Problems' for a complete listing of possible issues. For general plumbing questions, see 'Plumbing Repair for Homeowners'.
Since leaks can be deceptive and water runs down hill, we will work from the top down in locating the leak.
Be Careful
Older toilets may have corroded brass lines and corroded fittings. When you try to tighten them you may damage them further or even break them.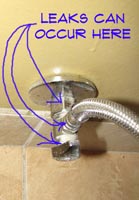
Locating Toilet Supply Line Leaks
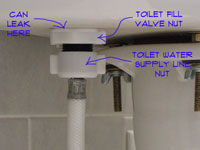
We will work from the toilet back to the wall to locate the problem. Use a dry rag and your finger to determine which spot is leaking. (1) At the nut that connects the supply line to the Fill Valve. (2) The nut that connects the supply line to the shut off valve. (3) The connection where the valve attaches to the water line. (4) The washer in the valve itself.
Fill Valve Inlet Nut
 Use a pair of adjustable pliers or an adjustable wrench to tighten the nut that attaches to the Fill Valve. Do not over tighten. Make sure the nut is not cross threaded before you start to tighten. You should be able to make several turns by hand without difficulty. Some older nuts may have a loose washer that may have gone bad. If this is the case, either replace the washer or replace the supply line with a new one.
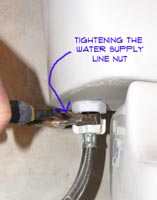
Supply Line Valve Nut
The nut that attaches the supply tube to the valve can also be tightened. Use both a pair of pliers and an adjustable wrench when you do this. Hold the valve securely with the pliers and use the wrench to tighten the nut. Take it easy until the leak stops. If the leak won't stop, you may have to replace the supply line. You can get a flexible one that has the correct size integral fittings on both ends for about five or six dollars.
Valve Connection at Water Line
There are two types of connections at the water line. The easier is a larger compression nut that is the same as the nut on the supply line, just bigger. Before you try working on a water supply valve it is a good idea to turn off the water. Especially if the valve is old.
Tighten this nut in the same way you would the smaller one. Use the pliers to hold the valve and the wrench to tighten the nut. Tighten it until the leak stops. Turn the water back on to check for leaks as needed. Take your time and be careful.
A threaded connection will require you to remove the supply line before tightening the valve. You will need to hold the nut on the water line with a wr
ench and use another wrench or large pliers to turn the valve. You can try tightening it one full turn or a portion of a turn. Turn the water back on to check for leaks. If the leak stops, re-attach the supply line, if not, try to tighten some more.
Shut Off Valve
The shut off valve has a washer inside of the housing that keeps it from leaking. A large nut under the handle holds the assembly in place. If the water is coming out around the stem then try tightening this nut. Hold the valve with the pliers and use a wrench to tighten.
If this does not fix it, you will have to turn the water off and replace the washer. Obtain the right sized washer and replace. You can also replace the entire valve. Get a quarter turn ball cock valve if you do. They have far fewer problems.
Toilet Supply Line Leaking – Summary
Toilet supply lines generally leak at one of the connections, either at the toilet tank or at the valve. Often, you can solve the problem by tightening the fitting.
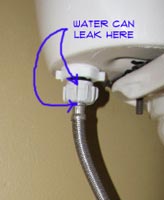
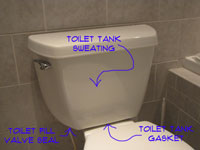
Toilet Fill Valve Leaking
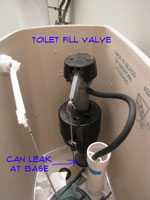 A toilet fill valve leaking is usually diagnosed by a small puddle on the floor. The toilet fill valve is connected to the toilet tank via a compression fitting at the bottom of the toilet tank. A rubber seal keeps the water in the tank from draining out. When the fitting loosens or the seal gets old, leaks can occur.
Not sure if this is your problem? See the article, 'Toilet Troubleshooting' for a complete listing of all the toilet topics. Related articles to this one are, 'Fill Valve Repair', 'Toilet Tank Issues', 'Toilet Water Supply Lines', follow these links for more information.
There is only one place that a toilet fill valve can leak and that is at the fitting that connects it to the tank. See the information below for instructions on locating it and tightening it.
A fill valve that is allowing water to run over the top of the fill tube and down into the tank is not really a leak. See the article on 'Adjusting a Toilet float' for information on fixing this problem.
Locating the Toilet Fill Valve Fitting
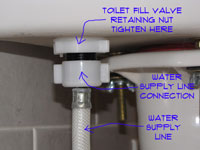
 The toilet fill valve fitting is usually located on the left side of the tank (when you are facing the toilet). There will be a plastic or metal nut directly below the porcelain tank bottom.
You can also identify this by following the water supply line up to the bottom of the tank. The water supply is connected to the toilet fill valve.
Tightening a Toilet Fill Valve Fitting
Shut the water off to the toilet, using the valve at the water supply line.
Take the lid off of the toilet tank. You can flush the toilet at this point to drain most of the water out of the tank. Hold the toilet flapper open to get as much water out of the tank as possible.

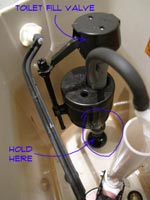
With one hand you want to hold onto the base of the toilet fill valve on the inside of the toilet tank. Use the adjustable pliers to tighten the nut on the bottom of the tank. These nuts are usually plastic, so be careful not to tighten.
When you feel that it is tight check for leaks, there should still be some water in the bottom of the tank. If there is not water leaking turn the water to the toilet back on and let the tank fill. Check for leaks again. If there are no leaks you can put the lid back on. If it is still leaking, you can try tightening again.
If the seal still leaks after tightening, you can replace the seal or replace the entire fill valve. See the article 'Toilet Fill Valve Repair' for more information.
Water Supply Line Problems
The fill valve gets blamed for some leaks that are really the fault of the water supply line. There are two fittings that are very close together at the bottom of the toilet tank. One connects the supply line to the fill valve.
See the article, 'Leaking Toilet Supply Lines' for information on what to do with this situation.
Replacing a Toilet Fill Valve
If the fittings are corroded or damaged, you may need to replace the fill valve. This is not an expensive part and they are readily available at home supply stores. See the article, 'Replacing a Toilet Fill Valve' for instructions on getting this done.
Summary
The toilet fill valve is attached to the tank with a compression fitting. This fittining may need to be tightened to stop the fitting from leaking. It is not a big job, but it is much easier if you first drain the toilet tank.
Fixing a Toilet Flapper Leak
 Fixing a toilet flapper leak is usually diagnosed by a trickling sound of water in the tank. However, you may not always hear it. A certain sign is a toilet tank that fills periodically, even when no one is using the toilet.
You can use dye tablets to check for a slow leak. See the article 'Toilet Tank Leak Detection Tablets' for more information.
There are three possibilities for this problem. First, the flapper may not be adjusted correctly. The Second possibility is the flapper itself. It may be old and worn out. The Third and least desirable problem is the seat on the toilet flush valve may be worn badly and not allow for a tight seal.
Adjusting a Toilet Flapper
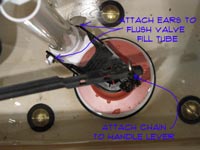
 The toilet flapper is controlled by a chain that is connects the toilet handle to the flapper. If the chain is too short, the flapper may not close all of the way, allowing water to leak into the bowl. A chain that is too long, may interfere with the flapper closing completely. Adjusting the chain can solve this problem.
(1) Turn off the water for the toilet at the toilet water supply valve.
(2) Drain the tank by flushing the toilet.
(3) Remove the lid from the toilet tank. It is not fastened and should lift up easily. Be careful where you lay it down. The lid is made of porcelain and will crack and chip easily.
(4) At this point the flapper should be in the down position. Inspect it to see if any portion of the chain is underneath the flapper. Some chains are long and have excess links that have no use. If this is the case, remove the chain from under the flapper and adjust the chain so the excess cannot interfere with the flapper.
(5) Is the chain holding the flapper partially open? Again the chain needs to be adjusted.
(6) You adjust the chain by shortening or lengthening it on the retaining clips that hold it in place. A properly adjusted chain should have a small amount of slack and allow the flapper to close completely. Excess chain should be wrapped around the handle or cut off and discarded.
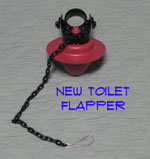
Replacing a Toilet Flapper
The toilet flapper, as the name implies opens and closes to allow the water from the toilet tank to quickly enter the toilet bowl. The rush of water creates a siphonic action that causes the toilet to flush. When closed the toilet flapper is the only thing keeping the water in the tank.
If the flapper is adjusted properly and it still leaks, the only recourse is to replace it. This is not a big job and generally takes about five minutes. The article 'Replacing a Toilet Flapper' provides complete instructions for this repair.
There are different sizes of toilet flappers. I would be a good idea to take the old one along with you to make sure you get the right size.
(1) Turn off the water for the toilet at the toilet water supply valve.
(2) Drain the tank by flushing the toilet.
(3) Remove the lid from the toilet tank. It is not fastened and should lift up easily. Be careful where you lay it down. The lid is made of porcelain and will crack and chip easily.
(4) Unhook the chain from the toilet flapper. The chain connects the rod from the handle to the toilet flapper. Depressing the handle lifts the flapper, causing the toilet to flush.
(5) The flapper is connected to the toilet flush valve with two rubber ears. You should be able to remove this with just your fingers. Remove the old toilet flapper.
(6) Install the new toilet flapper onto the toilet flush valve. Make sure is moves up and down freely.
(7) Hook the chain to the toilet flapper. You want a little slack on the chain, but not a lot. Test the handle and the flapper when you hook up the chain. Does the flapper open wide when the handle is depressed? A flapper that only opens partially, may close to quickly before all of the water has drained from the tank.
(8) Turn the water back on and make sure the flapper is working properly. This should solve your leaking flapper problem. You can use some 'Toilet Tank Leak Detection Tablets' to make sure.
Replacing a Toilet Flush Valve
The toilet flush valve has the opening that the toilet flapper closes against. Sometimes this opening becomes corroded or deteriorated over time. When this happens the toilet tank will still leak, even with a new flapper installed.
Unfortunately, this is not a simple repair. To replace the toilet flush valve, you need to remove the tank. With the tank removed it is not too difficult to replace the flush valve.
See the article 'Toilet Flush Valve Repair' for instructions on dealing with this issue.
Toilet Flapper Leaking – Summary
Hopefully you have been able to your toilet flapper leaking problem. Most of the time, replacing or adjusting the toilet flapper is an easy task.
How To Fix a Leaking Toilet Tank
 Learning how to fix a leaking toilet tank starts with determing what your problem is.. There are three likely possibilities for a leaky toilet tank. The first is the seal between the tank and the bowl. The second is the seal at the toilet fill valve.
A third possibility is a cracked toilet tank. One other problem that is not really a leak is condensation on the toilet tank that drips onto the floor making a mess.
Not sure if this is your problem? See our complete 'Toilet Troubleshooting Guide' to narrow down the possibilites.
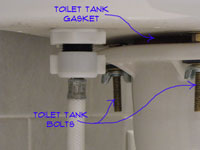
Tightening a Toilet Tank Seal
Most toilets are made of two porcelain castings, the toilet bowl and toilet tank. These two parts are connected together to form the toilet. There is a large rubber seal at this connection that keeps the water inside of the toilet. Two or more bolts hold the tank to the bowl unit. When tightened, these bolts compress the seal to make a watertight joint.
 You have likely guessed where this is headed. The bolts can loosen over time and the seal will start to leak. As long as the seal is in good condition, you can tighten the bolts to stop the leak. This repair requires a large screwdriver and an adjustable wrench.
(1) Shut the water off to the toilet, using the valve at the water supply line.
(2) Take the lid off of the toilet tank. You can flush the toilet at this point to drain most of the water out of the tank. Hold the toilet flapper open to get as much water out of the tank as possible.
(3) In the center of the toilet tank you should see the toilet flapper that is attached to the toilet flush valve. The flush valve has a vertical fill tube attached to it.
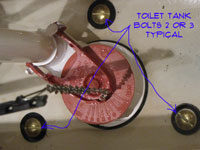 Around the flush valve there will be two or three bolt heads with rubber washers on them. The bolts are secured in place with nuts and washer that are found underneath the toilet tank.
(4) With the large screwdriver in one hand and an adjustable wrench in the other, you can tighten the tank bolts. Use the adjustable wrench to hold the nut from spinning and use the screwdriver to do the tightening.
You want to tighten the bolt evenly, since this also levels the tank. Try a half turn or so for each bolt. If they feel loose, tighten them until the feel snug.
(5) Fill the tank up and check for leaks. If it is still leaking, you will want to try again. When repeated tightening does not solve the problem, it is possible that the seal is bad and needs to be replaced. See the article 'Replacing a Toilet Tank Gasket' for instructions on how this is done.
Tightening a Toilet Fill Valve
The toilet fill valve provides the water that your toilet uses to work. The toilet tank has a hole in the bottom for the fill valve. The fill valve is held in place by a large nut and a rubber washer.
The washer creates a seal that keeps the water from leaking out around the hole in the bottom of the tank. Tightening the nut will usually stop a leak at this location.
You will need a pair of adjustable pliers for this repair. They need to be large enough for the nut at the base of the tank.
(1) Shut the water off to the toilet, using the valve at the water supply line.
(2) Take the lid off of the toilet tank. You can flush the toilet at this point to drain most of the water out of the tank. Hold the toilet flapper open to get as much water out of the tank as possible.
 (3) The toilet fill valve is a vertical pipe that is usually on the left side of the tank as you face the toilet. It has a float attached to it that controls when the water shuts off.
(4) Hold the base of the flush valve with one hand to keep it from spinning. Using a pair of adjustable pliers, tighten the nut that is directly below the bottom of the tank. There are two nuts at this location, one for the water supply line and one for the toilet fill valve. Be careful not to overtighten, these are usually plastic fittings.
(5) Turn the water back on and check for leaks. If the seal is still leaking after tightening, you may need to replace the rubber washer or the entire fill valve assembly. See the article, 'Toilet Fill Valve Repair' for more information.
Fixing a Cracked Toilet Tank
A crack in a toilet that is leaking may be difficult to repair. There are porcelain repair kits available that can be purchased. Some of them use a fiberglass mesh, this style would need to be used on the inside of the tank. All of them use some type of epoxy.
(1) Purchase a porcelain repair kit.
(2) Shut off the water and drain the tank, by flushing the toilet.
(3) The surface will need to be dry before the repair can be made. Let the tank dry completely for several hours. You can use a hair dryer to speed up the process.
(4) Carefully follow the instructions for the repair kit and patch the crack.
(5) Allow to dry thoroughly before refilling the tank.
Toilet Tank Condensation
This problem is not really a leak. Instead it is a result in differing temperatures and humidity. At times this problem can make a mess on your floor, requiring extra work to mop up the excess water.
The condensation occurs when the tank fills with cool water, usually around 50 to 60 degrees, and the room temperature is much warmer. The humidity in the air will cause the moisture in the air to condense on the cool surface of the toilet tank. Water droplets will form and run down the side of the tank.
After the water temperature inside of the tank adjusts to the room temperature, the condensation will stop. There are a few things that can help, and a few rather expensive solutions that are listed below.
(1) They make insulating blankets for toilet tanks. These may not solve the problem entirely, but they also absorb any water that does condense, thus reducing the mess.
(2) You can try running the a fan inside the bathroom to increase the air circulation.
(3) Adjusting the room temperature with your homes air conditioning system. If the difference in temperature is reduced the condensation will be reduced in a corresponding amount.
(4) There are also more expensive tempering valves and tempering tanks. The idea would be to fill the tank with water that is already at room temperature. These solutions will involve plumbing modifications to your home.
How To Fix a Leaking Toilet Tank – Summary
From the above, you can see that there are several places that a toilet tank can leak. This article should have provided the information you need to fix the problem and get rid of the leak.